tldr: limit your GPUs to about 2/3rd of maximum power draw for the least Joules consumed per token generated without speed penalty.
–
Why run an LLM yourself in the first place?
The llama.cpp software suite is a very impressive piece of work. It is a key element in some of the stuff that I’m playing around with on my home systems, which for good reasons I will never be able to use in conjunction with a paid offering from an online provider. It’s interesting how the typical use-case for LLMs is best served by the larger providers and the smaller models are just useful to gain an understanding and to whet your appetite. But for some applications the legalities preclude any such sharing and then you’re up the creek without a paddle. The question then is: is ‘some AI’ better than no AI at all and if it is what does it cost?
What to optimize for?
And this is where things get complicated very quickly. There are so many parameters that you could use to measure your systems’ performance that it can be quite difficult to determine if a change you made was an improvement or rather the opposite. After playing around with this stuff a colleague suggested I look into the power consumption per token generated.
And that turned out - all other things being equal - to be an excellent measure to optimize for. It has a number of very useful properties: it’s a scalar, so it is easy to see whether you’re improving or not, it’s very well defined: Joules / token generated is all there is to it and given a uniform way of measuring the property of a system you can compare it to other systems even if they’re not in the same locality. You can average it over a longer period of time to get you reasonably accurate readings even if in the short term there is some fluctuation.
You could optimize for speed instead but for very long running jobs (mine tend to run for weeks or months) speed is overrated as a metric, but for interactive work it is clearly the best thing to optimize for as long as the hardware stays healthy. And ultimately Joules burned per token is an excellent proxy for cost (assuming you pay for your energy).
Creating the samples
So much for the theory. In practice though, measuring this number turned out to be more of a hassle than I thought it would be. There are a couple of things that complicate this: PCs do not normally come with easy ways to measure how much power they consume and LLama doesn’t have a way to track GPU power consumption during its computations. But there are some ways around this.
I started out by parsing the last 10 lines of the main.log file for every run of llama.cpp. That works as long as you only have one GPU and run only one instance. But if you have the VRAM and possibly multiple GPUs this will rapidly become a hot mess. The solution is to ensure that every run pipes its output to a unique log file, parse the last couple of lines to fish out the relevant numbers and then to wipe the log file.
Sampling the power consumption was done using a ‘Shelly’ IP enabled socket, it contains a small webserver that you can query to see how much power is drawn though the socket. It’s not super precise, secure or accurate but more than good enough for this purpose. Simply hit
http://$LANIPADDRESS/meter/0
and it will report the status of the device as a json object, which is trivial to parse. Nvidia’s nvidia-smi program will show you the status of the GPUs and report their current power draw. Subtract that out and you’re left with just the CPU, RAM, MB and the drives.
Experiment
You then let this run for a while to give you enough samples to draw conclusions from. In order to figure out what the sweet spot of the setup I have here is (right now 2x 3090, i7) I stepped through the power consumption of the GPUs in small increments. 25 Watts per step, with a multi-hour run to get some precision in the measurements. Nvidia cards have an internal power limiter that allows you to set an upper limit to their consumption in Watts for a dual GPU setup the command line is:
nvidia-smi –power-limit=$Wattage –id=0,1
Just replace $Wattage with whatever limit you desire, but keep it above 100 and below the maximum power draw of the GPU for meaningful results.
Doing this for a series of steps using the Llama 13B 5 bit sampled model (which uses about 10G of VRAM), running four instances of llama.cpp concurrently (so two on each card) for an hour per step to reduce sampling inaccuracy gives the following graph of power consumption limits of the GPUs (horizontal) vs Joules consumed per token generated (vertical):
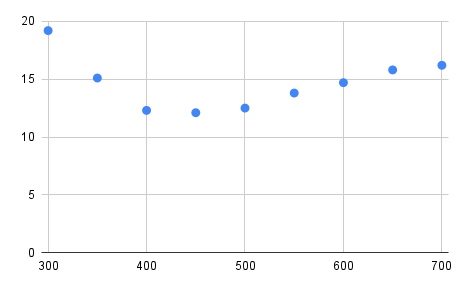
In tabular form:
GPUs (W) tps  J/token GPU Temp (W)
300       27    19.2    43
350       35    15.1    48
400       48    12.3    50
450       52    12.1    53
500       51    12.5    53
550       49    13.8    55
600       50    14.7    57
650       50    15.8    60
700       50    16.2    63
Conclusion
The ‘sweet spot’ is pretty clear, the graph starts off on the left at about 19 Joules per token because the simple fact that the machine is on dominates the calculation. Not unlike a car that is idling or going very slow: you make no progress but you consume quite a bit of power. Then, as you ramp up the power consumption resulting in more processing efficiency increases fairly rapidly, up to a point. And after that point efficiency drops again, this is because now thermal effects are dominating and more input power does not result in that much more computation. If you live in a cold climate you may think of this as co-generation ;) In an extreme case you might run into thermal throttling, which is because of the way llama.cpp handles the interaction between the CPU and GPU just going to lead to a lot of wasted power. So there is a clearly defined optimum, for this dual 3090 + i7 CPU that seems to lie somewhere around 225W per GPU.
The efficiency is still quite bad (big operators report 4-5 Joules / token on far larger models than these), but it is much better than what you’d get out of a naively configured system, resulting in more results for a given expense in power (and where I live that translates into real money). If you have other dominant factors (such as time) or if power is very cheap where you live then your ‘sweet spot’ may well be somewhere else. But for me this method helped run some pretty big jobs at an affordable budget, and it just so happens that the optimum efficiency also coincides with very close to peak performance in terms of tokens generated per unit time.
Caveats
Note that these findings are probably very much dependent on:
- workload
- model used
- the current version of llama.cpp (which is improving all the time) and the particular settings that I compiled it with (make LLAMA_FAST=1 LLAMA_CUBLAS=1 NVCCFLAGS=“–forward-unknown-to-host-compiler -arch=sm_86” CUDA_DOCKER_ARCH=“sm_86”)
- Hardware
- GPU (Asus ‘Turbo’ NV 3090)
- CPU (i7-10700K stepping 5)
- avoid thermal throttling (which would upset the benchmark)
- CPU and case fans set to maximum (noisy!)
- GPU fans set to 80%
- ambient temperature (approximately 24 degrees in the room where these tests were done)
- Quite possibly other factors that I haven’t thought of.
Please take these caveats seriously and run your own tests, and in general don’t trust fresh benchmarks of anything that hasn’t been reproduced by others (Including this one!) or that you yourself haven’t reproduced yet. If you have interesting results that contradict or confirm these then of course I’d love to hear about it via jacques@modularcompany.com, and if the information warrants it I’ll be more than happy to amend this article.
CNC Lasers for cutting and engraving
Laser cutters can injure or blind you permanently if you do not follow safety procedures! This post is an attempt to collect all of the information that I’ve gathered over the last year or so regarding budget laser cutters. There are no affiliate links on this page, I have no ties to any of the companies mentioned here other than that I’m a reasonably satisfied customer of some of them. If you have corrections or suggestions for expanding this article or if you want to contribute information for the materials section please contact me via jacques@modularcompany.com . The intention is to make this a ‘living’ document and to expand it and update it over time.
LASER CUTTER / ENGRAVER SAFETY
DO NOT STARE INTO LASER WITH REMAINING EYE
Sounds funny, doesn't it? Well, it isn't. Before you read the rest of this document I would love it if you read through this safety section in its entirety. If I could I'd add an exam that you have to pass before you can read the remainder but that would be annoying. So I will trust you to do exactly that: read this text as if your eyesight and general health depend on it because they do.
Lasers are dangerous. They are both dangerous because of the concentrated light that they emit and they are dangerous because of the fumes given off during the operation of the machine. This is why you can use them to cut and mark materials with in the first place. They can start fires and they will do so exactly when you're not monitoring the machine. There is no such thing as a safe laser that can cut or engrave material in any useful capacity. Do not let yourself be taken in by manufacturer marketing materials that show open frame lasers or enclosed lasers that do not vent to the outside.
Laser safety is a major subject in its own right and using one responsibly is more work than throwing caution to the wind. But your eyes, your family, your pets and your insurance company, and ultimately yourself are going to be much happier if you take these warnings into account. If you don't understand something in the safety section play it safe: don't do it. If you think something in this safety section is wrong, needs improvement or better wording by all means, contact me: jacques@modularcompany.com and I'll work with you until both you and I think it is the best possible because this is the most important part of this document. I'm most grateful to everybody that contributed safety related advice from the HN comments on this article, specfically and in no particular order: 0xEF, 542458, msds, avar, cstross, sen, cyberax, nullc, rocqua, mittrhowaway, jfim, elihu, kragen, FuriouslyAdrift, iancmceachern, xyzzy123 and CarRamrod.
- NEVER use an open frame laser ‘as is’ a laser needs an enclosure
- even if the manufacturer shows a video or a photograph depicting the machine in a dwelling
- Lasers should not be used in living spaces
- Children and pets should be kept away from an operating laser
- Lasers should never be operated unattended
- enclosures should be ventilated
- the exhaust system should be capable of removing a multiple of the volume of the enclosure every minute as well as the total volume of air injected by the air assist if your machine has this feature, you want ample capacity here.
- the exhaust system should be leak free and vent (filtered!) into the environment away from any occupied structure
- any windows in the enclosure should filter out the wavelength of the laser you are using (but better to use a camera!)
- enclosures should be ventilated even if the manufacturer claims otherwise.
- enclosures should have an interlock
- as soon as the enclosure is opened that should count as an e-stop, the machine should be disabled completely
- enclosures should have an e-stop switch on the outside that cuts all power to the system
- if possible an optical fence can create a perimeter around the machine that can’t be entered when it is running
- enclosures should be fire proof
- the bottom of the enclosure should be able to withstand a sustained direct hit from the laser head at its lowest possible position at maximum power while not in motion.
- there should be a fire extinguisher of sufficient capacity near the enclosure
- there should be a fire detection system.
- some materials should never be cut or engraved
- do not cut or engrave PVC under any circumstance, using PVC will create hydrogen chloride which is super dangerous
- do not cut or engrave Polycarbonate unless you can work under an inert atmosphere such as nitrogen
- do not attempt to cut or engrave leather, the smell is awful and it can be very dangerous
- if you do decide to cut or engrave leather make sure it hasn’t been tanned with Chrome
- depending on the wavelength the laser light itself may be more or less dangerous, the safe power limit depends on the wavelength
- Damage from laser light may not be readily apparent at first because your brain is very good at working around such damage.
- You wil need to get the best quality safety glasses for the wavelength of your machine that you can afford, and you need to procure them from a reliable source. Do not skimp on this, even if your last name is Scrooge. Green is almost certainly the wrong color for your glasses, orange/brown is what you are looking for and glasses that absorb the beam will be damaged (smoke, burning) by a direct hit. Think of it this way: if the glass doesn’t aborb the beam effectively that means the light gets passed on to your eye!
- you will always need to wear these when near the laser is powered up.
- that still does not obviate the need for an enclosure
- the best way to observe a laser cutter is indirectly, through a camera, get a camera!
- It’s not just direct hits of the beam emerging from the laser aperture that are dangerous, a reflection can do serious damage at these power levels
- Visible light lasers, which includes most cheap diode lasers, anything between 380 and 750 nm can give a false sense of safety.
- You can see the beam.
- But if you can see it it may be too late already, anything over 1 mW is dangerous
- This makes the light hard to block
- They may ‘leak’ at other frequencies as well making the light even harder to block.
- Fiber lasers using IR at 1064 nm are probably the most dangerous in the sense that your eye will focus the light just fine but there is no blink or avert reflex
- On deep infrared (CO2) machines the beam will be invisible
- your eye(s) will be damaged before you are even aware of it
- but the wavelength itself is a bit safer, damage will not be immediately catastrophic
- if your machine has a ‘pilot laser’ you’ll have an idea of where the invisible (and much more powerful) IR beam is
- So any laser of sufficient power to cut or engrave materials should be enclosed and shut off automatically if the enclosure is opened.
If any of the above items make you reconsider using a laser cutter/engraver that is perfectly fine, you may be better off joining a local makerspace where they have a machine set up with all of the safety requirements covered (hopefully!). It’s a valid alternative to having one set up in your own workspace.
Introduction
CNC gear has been getting cheaper and cheaper over time, since the 1980’s when I first encountered it. But laser cutters for the longest time refused to join the trend, they were very expensive, fragile, large, heavy and consumed a ton of power. That all changed to the point that today you can buy functional CNC laser cutters and engravers for less than $1000. Obviously these aren’t going to punch through thick steel like their industrial cousins do, but for cutting wood and various other materials as well as to engrave text or images on suitable backgrounds they perform remarkably well.
This article attempts to give a lot of background material to help you get started if you already have one of these or if you are considering buying one. If you haven’t bought a machine yet I’d recommend you read the article in its entirety before pulling the trigger on a particular machine. This is especially important in light of the pretty high pressure sales tactics that some of the manufacturers of this gear employ, keep in mind that you are buying a tool that in industry would require you to go through a required safety course and which would not operate without a large amount of safety measures including interlocks, optical fences and other tricks of the trade to keep the operators safe. Educating yourself a bit before bringing this kind of kit into your home is going to save you from possible injury, a ton of hassle and reading is free.
Laser cutters are of the class ‘subtractive manufacturing’, which means in technical terms that they shape the work piece by removing those bits that you do not want. In this sense they are much like other cutting devices such as rotating knife cutters, tool-and-die cutters, water jet cutters and plasma cutters. The main differences are that compared to rotating knife cutters they cut deeper, compared to tool-and-die cutters that there are no setup costs, compared to water jet cutters that they are relatively cheap and tend to char the edges of the piece to be cut slightly if it is combustible and that compared to plasma cutters you can also cut material that is non-conductive. This makes lasers the cutting tool of choice for a wide variety of materials, and it is precisely this versatility that makes them an excellent tool for hobbyists and the ‘maker’ crowd. And just like those other tools they are also excellent in producing large amounts of scrap, this isn’t a 3D printer where 97% of your input material becomes your work product, it’s not rare to have 20 to 30% scrap which you will need to dispose of.
History
Laser cutters have been around since 1965, coincidentally the year that I was born. But even in the mid-80’s to find a laser cutter in the wild was a rare occasion, especially because they were horrendously expensive. The reason for that expense is that a laser cutter is on two extremes of the technology curve at once: on the one hand it is a machine that carves up various materials and does so by using energy densities that you normally do not encounter on earth, on the other hand it uses absolutely incredibly precise optics for doing so. And on those first lasers the optics were impressive indeed: water cooled glass jacketed quartz tubes that output the laser beam across free space to a mirror mounted on a carriage for the X-axis, then to another mirror mounted on the Y-axis and finally down a focusing lens onto the material.
Much later these found some competition from so called fiber lasers, a variation that uses a solid state laser and a fiber amplification stage to create very small spot sizes for a much more efficient process able to cut more and sometimes thicker materials for a given power budget.
The semiconductor industry, which gave us diode lasers without any optics other than small mirrors mounted in the head to collate the beams and a focusing lens are the main driver behind the orders of magnitude in cost reduction, and these as well as smaller and lighter versions of the industrial machines mentioned above are the ones that you are most likely to encounter as a hobbyist or small business that wants to get into CNC laser work.
What you can buy
There are a ton of different companies offering laser gear, typically made in Asia, with or without an enclosure and of varying quality and power. At the time of this writing a typical diode based laser can be had for well under a thousand dollars. From a practical point of view these are functional tools, but from a safety perspective they are not usable at all, they’re excellent fire starters and are able to do you (and your eyes) great damage. If you want to work with these machines in a responsible manner you’ll need to do some work. It is probably more productive to think of most of these products as kits and starting points rather than as the finished article, even if they do work out of the box (usually after assembling them).
The most important parameters to look for when selecting a laser cutter are: optical output power and head construction, wavelength, cutting bed area, air assist, accuracy, cutting speed, enclosure and type of laser.
Optical Output Power & Head construction
The optical output of a laser cutter is measured in Watts. There are some manufacturers that advertise with the electrical input power of the device, but since lasers are quite inefficient this wrong foots the buyer into thinking they have bought a machine that is much more powerful than it actually is. Most manufacturers of cheap diode lasers tend to exaggerate a bit even if they do specify optical output power. A typical industrial tube laser or fiber laser of several thousand Watt will cut about 10 mm worth of mild steel. So it should be clear that an entry level diode laser of 40 W or so tops isn’t going to be doing much cutting in metal (even if the wavelength was optimal, which it really isn’t). And it also should be clear that a 5W laser isn’t going to cut much of anything and if it does that it will do so quite slow. A typical diode laser head contains one or more laser diodes, a set of mirrors and lenses to combine the output of all of the diodes and a focusing lens that aims the laser diode output at (hopefully) a single small spot on the work piece. The typical arrangement of all of the diodes within the head is a critical part in both the spot size as well as the depth to which the machine will be able to cut: as you get further away from the focal point the chance of the individual beams diverging increases and that will reduce the available power and increase the spot size. It may also cause the spot to be asymmetrical, for instance a spot can be wider than it is long which will make the machine penetrate material in one direction and barely scorch it in another! For any given power output fewer diodes is better because you’ll have a smaller spot size where that power is concentrated, but likely your diodes will run hotter and have a shorter operational life.
So the amount of raw optical power available and the geometry of the head is critical in deciding which machine you will buy. A typical high efficiency laser diode for cutting applications is 5 to 6W. For a 30W machine you can assume five or six diodes, depending on the make (and whether or not the numbers are accurate…). A powerful cutter head will usually have a small fan attached to forcibly cool the diodes to keep them below the temperature at which they self destruct. This is a very important feature and if the fan ever gets blocked or fails the laser head will die in short order. Bluntly: more power is better. You’ll cut either deeper or faster and there will be materials that you suddenly can cut instead of not at all. 5 or 6W machines will have a single diode and a very nice and tight spot. Above that you’ll have two or more diodes and an ever decreasing return on that extra theoretically available power. I’m not sure what the practical upper limit is but I already find that the spot size of a 6 diode factory aligned array laser is sub-optimal. It doesn’t perform six times better than a 5W single diode, more like three to four times better, and there is more spillover near the edge of the cut, especially in the plane the diodes are mounted in.
The output spot size is a very important factor to consider, a larger (less tightly focused) spot size means more overspill and a wider cut. You need to compensate for that in your design if you want to construct things that are solid, typically on the order of 0.1 mm press fits will have enough friction in them that you won’t even need glue. Most diode based lasers cut with the spot size that is so closely focused that near the surface of the work piece the so called ‘kerf’ is only about 0.4 mm wide. Deeper in the cut this can get a bit wider, this effect will be more pronounced when you cut thicker material because the beams that converge on the focal point will diverge beyond it. Even so, my ‘30W’ (take that with a grain of salt) laser head will happily cut 18 mm thick softwood and softwood based plywood, which I find nothing short of incredible. It’s not super fast at those thicknesses, 250 mm/minute (about 10”) on a good day, but it goes and if you’re patient you end up with very usable work pieces. And 18 mm is thick enough for actual construction pieces.
A valid alternative to buying a new machine, especially if you are looking at this to start a business is to buy a second hand industrial machine, either fiber or CO2 depending on your needs. These are not for hobby use, heavy, require a lot of power and they’re large. But from a throughput perspective they will leave the hobby machinery in the dust. Evaluating such a machine will require some expertise, you may want to find a buddy with relevant experience to help guide you and protect you from buying a very large doorstop. Parts and service will be quite expensive. You could still buy a cheap diode laser to start with to gain experience and to try your designs (assuming that the cutting capacity is sufficient), but in the long run the industrial machine is probably a better investment.
rstop
Wavelength
The wavelength of a laser is the characteristic that defines the color of the laser. Typical diode lasers range from 400 to 800 nano meters, but more typically between 400 and 470 nm, corresponding to violet to blue in the visible spectrum. For some materials this works well, for others less so because they are able to reflect these wavelengths resulting in most of the power not being absorbed by the work piece. Longer wavelengths tend to do better for more difficult materials (such as metals) but there really is no diode laser that can cut metal reliably or at any usable thickness. You may be able to cut very thin steel foil with them. Fiber lasers typically have a wavelength of 780 to 2200 nm, which is infrared to deep infra red, very suitable for cutting metals. They are super dangerous if not properly enclosed because you still focus but won’t blink or look away. CO2 lasers range from 9.3 um to 10.6 um, much longer wavelength than either fiber or diode lasers. On the plus side that makes diode lasers moderately safer for use by people that haven’t been specifically trained: you can see the beam and if you can then you at least have a chance to block it. Diode based optical lasers are in some ways more dangerous than their industrial IR counterparts. For one they usually ship without an enclosure, so there are no interlocks that will disable the laser if the user gains access to the guts of the machine. For another the visible nature of the laser beam makes it harder to block and there may be leakage into other parts of the spectrum making them even harder to block. On industrial infrared and deep infrared lasers the beam is invisible and the damage will be done before you are even aware of it but the machines are properly enclosed and have safety interlocks. If you ever get an infrared head for your laser get one that has a visible light pilot laser to make sure that you know where the beam is. Laser light can reflect in the most crazy ways and any kind of concentrated escaped light can be quite dangerous. I know this all sounds alarmist but this is a very real issue that you should never underestimate, a laser cutter of any power (even a 5W one) should be operated in an enclosure and with sufficient safety that the operator will never be exposed to the direct beam or a reflection of the beam.
Cutting bed area
A larger cutting bed will allow you to make larger work pieces, but it will also require more space for the machine. I have a 61x61 cutting bed, the machine itself is 70x80 cm and the enclosure is 1 meter x 84 cm and over a meter high. That’s quite a bit of space. But the upside from that larger cutting bed is that I have less waste (because more nesting can be done) and I can run much longer jobs in one go. All of this makes it worth it for me. But if all you do is small work then there is no point in getting a machine with a large bed. Keep in mind that you won’t be using exactly 100% of the cutting area due to hold-down, end stops, the need to ‘frame’ the work piece (to ensure that you are cutting material rather than air near the edges) and so on. Usually one axis can be completely used and one you will lose a little bit on the sides.
Air assist
For a proper cutter rather than just an engraver air assist is a must. Typically 10 to 15 liters per minute for a 20 to 40W machine. The function of the air assist is the get rid of the bits of material that the laser has already hit so that you can go deeper. The laser beam is otherwise blocked by the debris in the cut. This is a very effective mechanism and it increases the apparent power of the laser considerably. But don’t overdo it: too much air and you’ll be cooling your work piece faster than the laser can heat it up!
Accuracy
A typical laser cutter will have an accuracy of about 0.1 mm, which is for this price level ridiculously accurate. Given that you are not machining metal on a lathe or a mill and that the machines are less rigid by design more accuracy will come at a steep increase in price and you likely won’t need it anyway for the work pieces that you will want to make. The main factors in the (repeat) accuracy of the device are the way the motors drive the gantry and the head. Typically these slide freely on some kind of bearing and the movement itself is effected by a belt and a gear on the motor. Motors tend to be stepper motors, not servos so any kind of step loss will cause an immediate failure of the work piece (with servos the controller would correct for any positioning error). But because there is no back pressure from the tool this less of a problem than it would be with a milling machine. Another factor in accuracy is how square the machine is, and how level it has been set up. It pays off handily to spend some time on this and to ensure that the machine is as square as you can make it (the open frame based machines can flex quite a bit) and as level as you can make it. This will result in more accurate work and more consistent depth of cut and penetration depth across the whole of the work surface.
Cutting speed and movement speed
Cutting speed is usually limited by the laser head power, for a given job the cutting speed will simply be the highest speed at which you can still reliably penetrate the material. Movement speed is usually limited by the weight of the gantry in the Y direction and the weight of the head in the X direction. The size of the stepper motor and the stability of the power supply may come into play as well. The quality of the ways across which the gantry and the head assembly move and how much friction there is in the system will further affect the speeds.
Enclosure
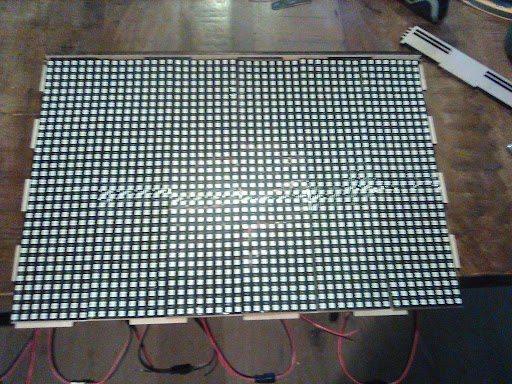
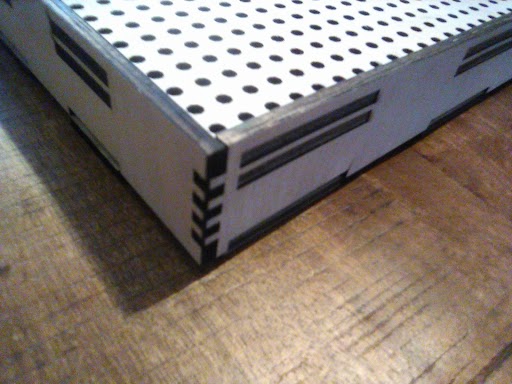
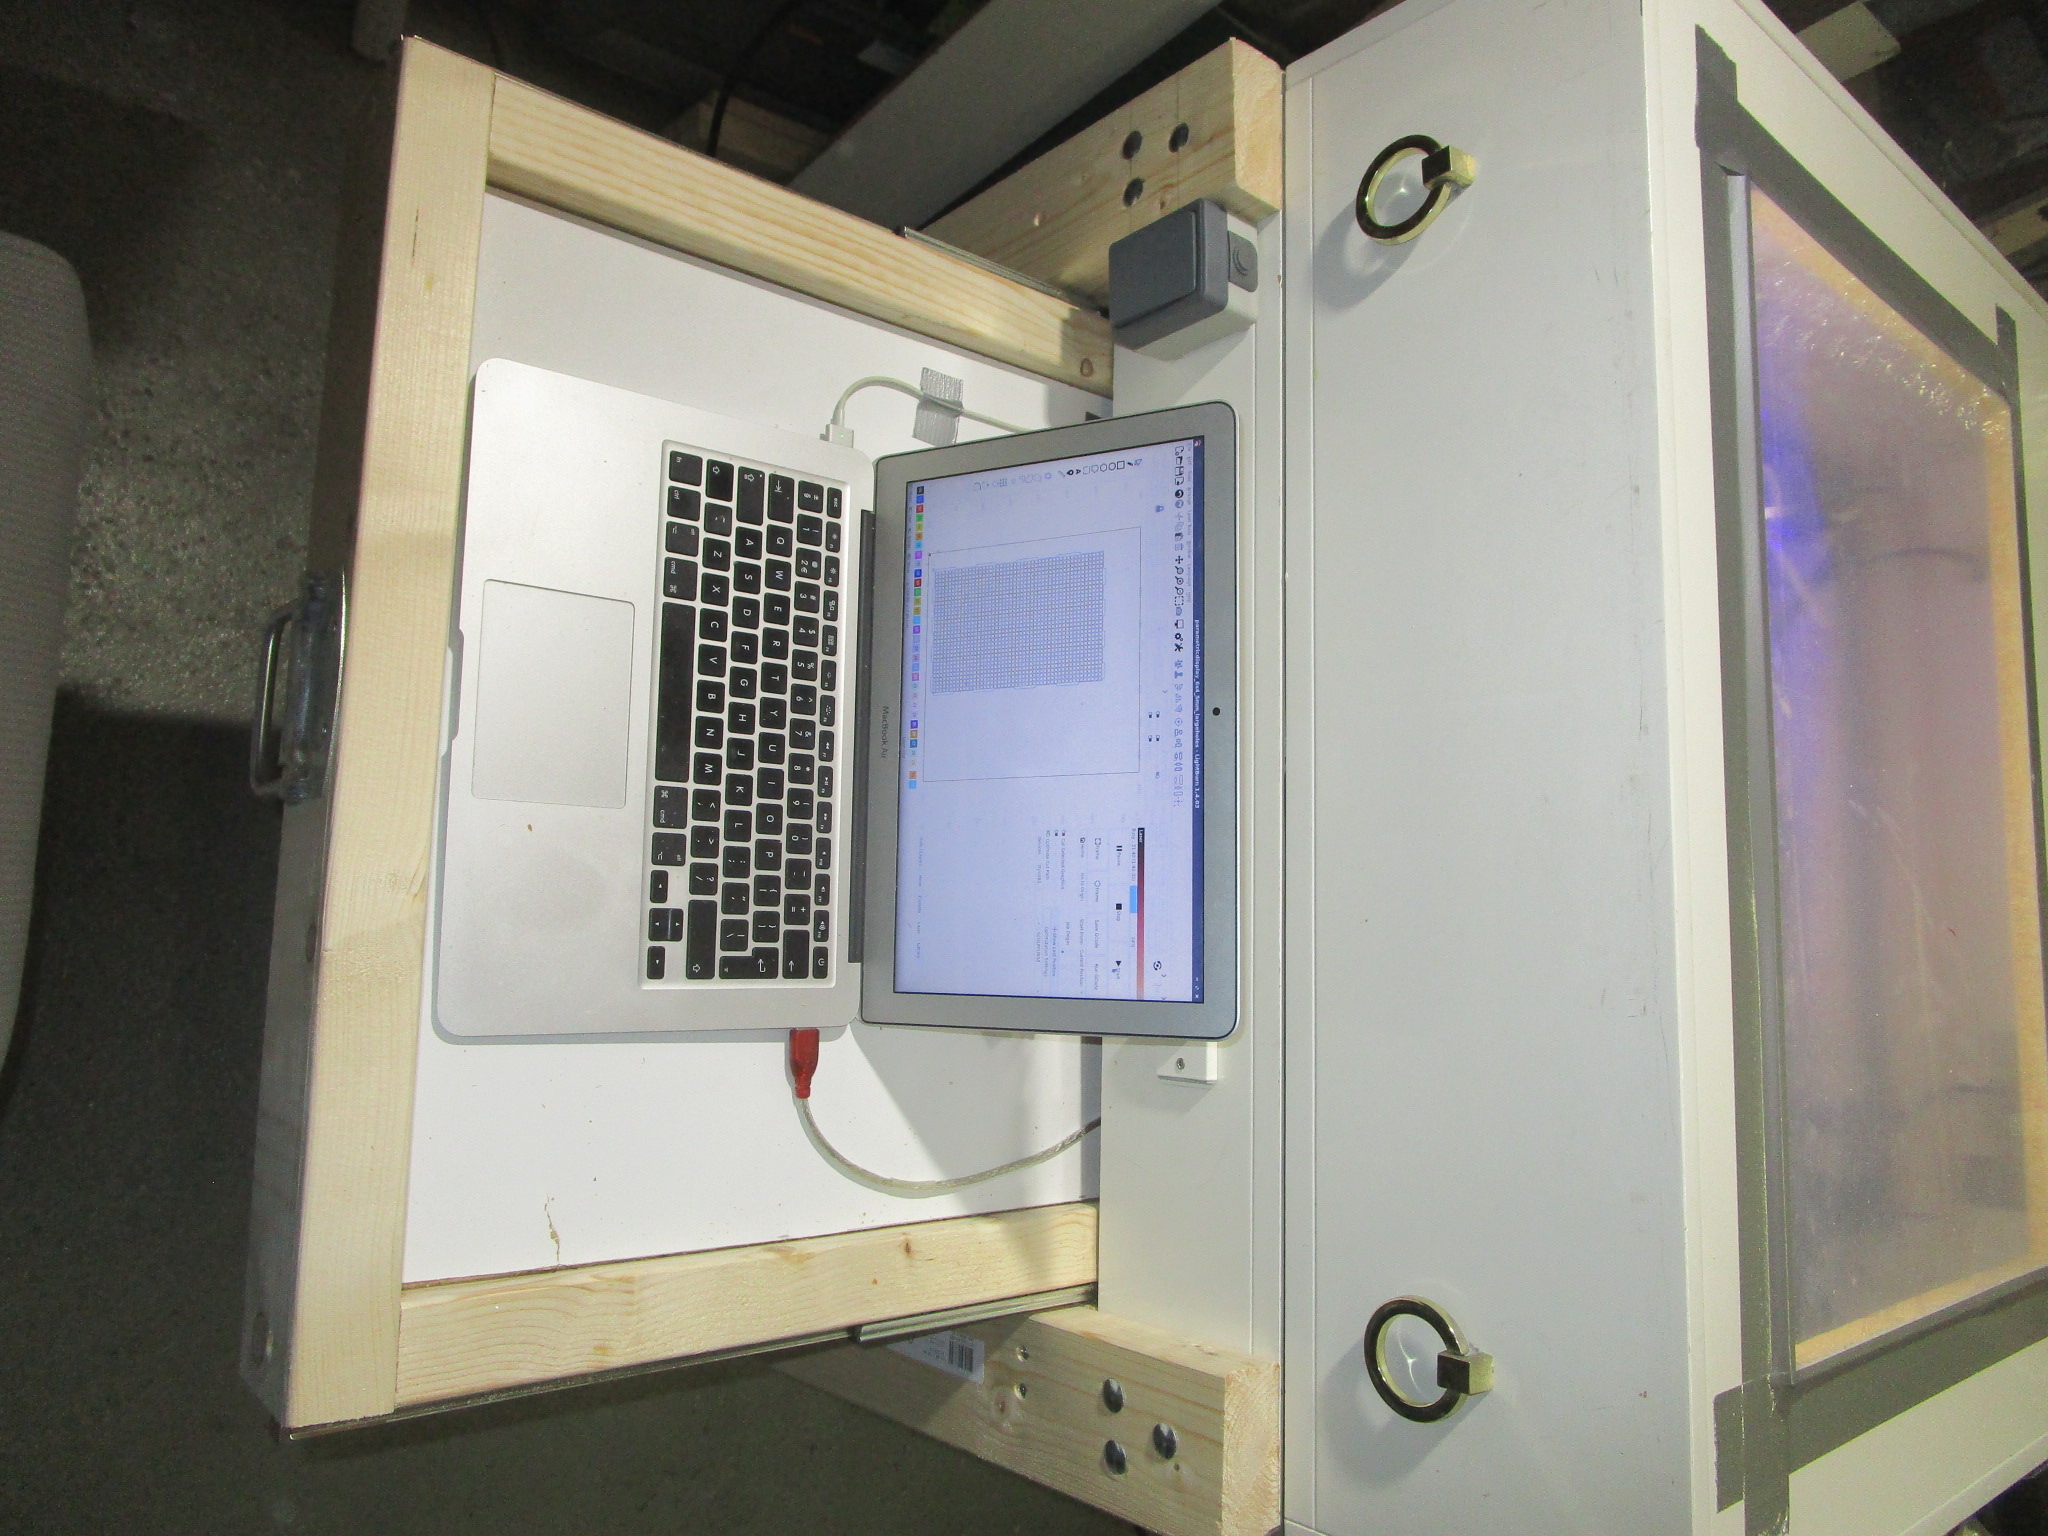
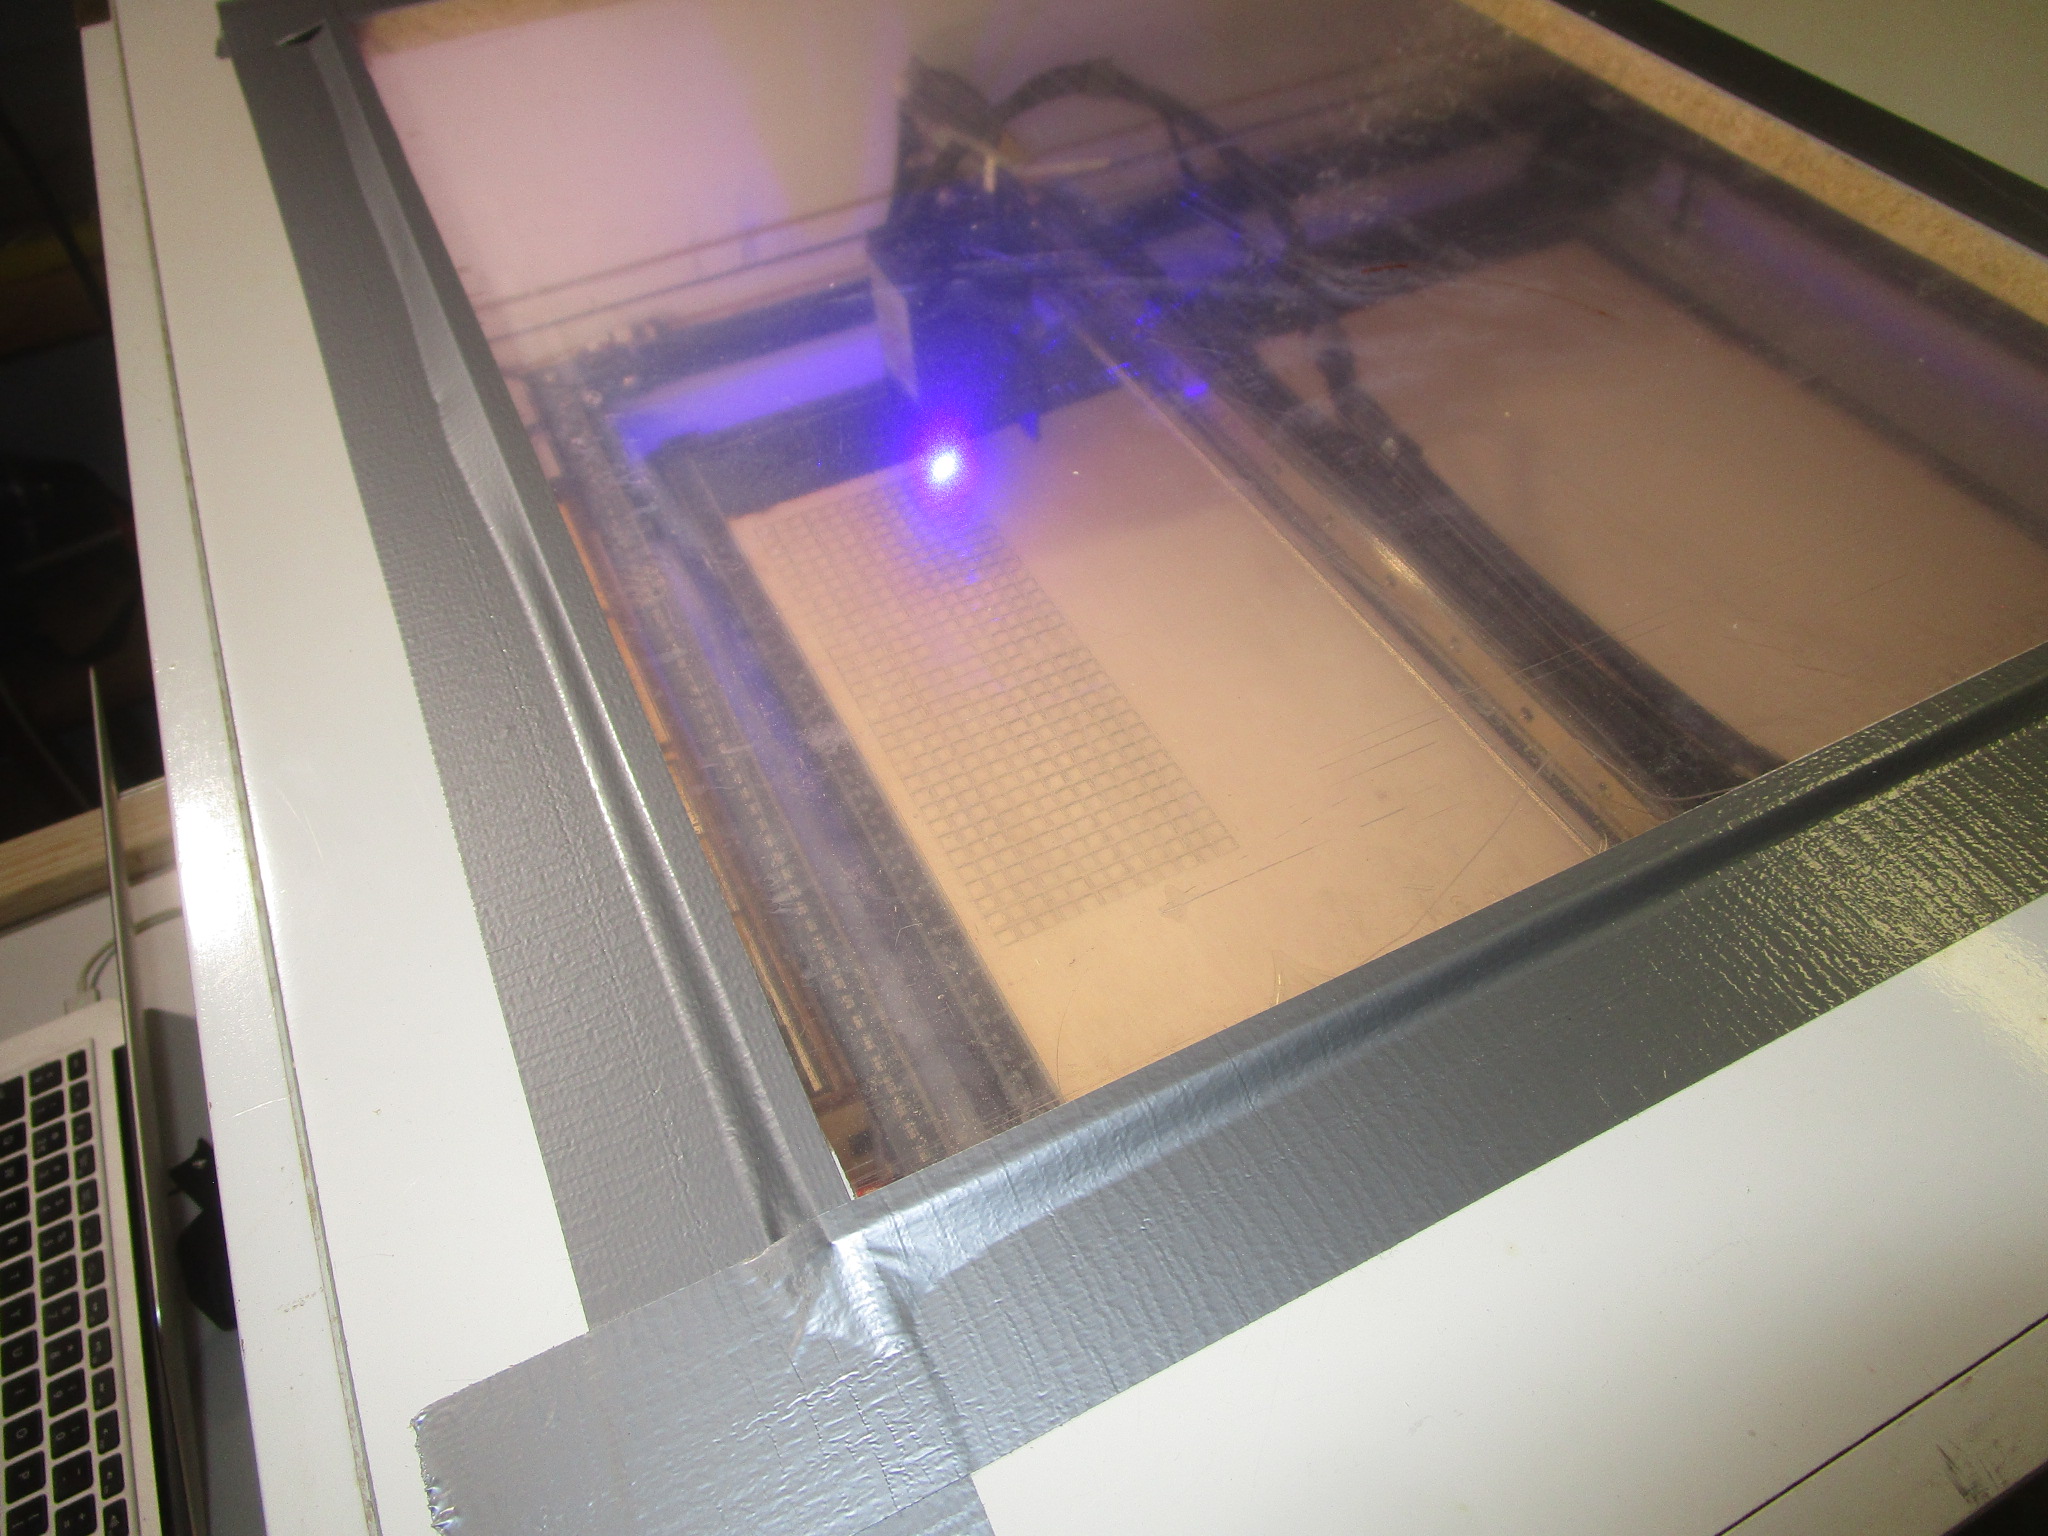
A laser cutter really needs to be enclosed, do not be fooled by manufacturers that show their machines in living areas or office like environments, it will simply not work. You will need a proper enclosure with fumes extraction and a path out of your building to use these responsibly. Here is an example, the enclosure that I built (if you look carefully you’ll see it is an old folding bed that was repurposed because I just love recycling stuff):
Type of laser
You can choose either a diode, fiber or CO2 laser depending on your needs, budget and space. CO2 lasers are the most versatile but finicky and require a lot of maintenance. Fiber lasers are ideal for cutting metal. Both of these are quite pricey and if they break the parts will be pricey as well. You can get them in very large formats and if you have the space (and the money) they may well be a good choice. Diode lasers are for the most part hobbyist and maker territory so the bulk of this document is geared towards those kinds of machines and applications.
Engraving vs cutting
Typically cutting requires more power than engraving when using the same material. Some materials can be engraved well, others not so much. As a rule, if you can cut it you probably can engrave it as well, but the reverse definitely isn’t true. Engraving is a surface treatment, so the thickness of the underlying material isn’t all that important whereas for cutting it is probably the next most important parameter besides the material itself.
How to install a laser cutter
A laser cutter must have an enclosure. Even if these are sold without using them naked is going to cause you a bunch of problems. For starters, laser cutting isn’t a very clean process. Your laser cutter will produce smoke, sometimes large quantities of it and this smoke can be extremely unhealthy to breathe in. To use a laser cutter properly your enclosure should be ventilated. A laser cutter with an ‘air assist’ (a small air pump that pushes air out parallel to the laser beam to enable it to make deeper cuts) is going to require a clean air intake to ensure it doesn’t foul up the optics. Your enclosure will need a window so you can keep an eye on what’s going on in the enclosure. And speaking of eyes, that window should block a large fraction of the laser light to make sure you keep the use of your eyes rather than that you end up finally getting that joke seen in physics labs (‘Do not stare into laser with remaining eye’).
You probably also want to invest in a pair of laser safety goggles with glass colored to match the wavelength of your laser. If you already wear glasses make sure these are sized such that they will fit over your existing glasses. A laser cutter should be set carefully level and any kind of support needs to be square and warp free. Inside the perimeter of the laser cutter you will need a sacrificial bed or a bed that the cutter can’t cut to support the material that you intend to cut. This so that the air has a place to go to and so that you don’t end up cutting whatever supports your material. Because laser cutters can generate a lot of localized heat (that’s what they’re made for!) there is some non-zero chance of setting your work piece on fire. So a laser cutter should never be operated unattended, and you should have some means of putting an actual fire on the bed of your machine out. The surface below the laser work area should be fire proof.
You will need an easy to access e-stop in case there is a fire or other mishap (it will cost you a work piece but that’s a small price compared to burning down your house or garage). You can use one of those big red mushroom switches that stay in position after you’ve pressed them to de-energize the system or you could use a multi-outlet bar with a switch. Never ever cut PVC, the fumes that it produces are extremely toxic and it will corrode your machine and/or injure or kill you. Chlorine gas is super dangerous and cutting PVC with a laser will produce it in quantities large enough to be a real problem.
Driving the laser
Most lasers talk to their host computers (you’ll need one of those too) using a serial-over-USB protocol, and the language they speak is called G-Code, which is a venerable but highly effective way to control various machinery by computer. G-Code is universal and used to control anything from lathes and mills to laser cutters, coordinate drills and pretty much anything else used in manufacturing these days. But programming G-Code directly is somewhat tedious, especially if you change your design frequently so the usual pathway is that you have some piece of software to create the design and then a piece of software to take that design (in some intermediary format) and to convert it to G-code. Consumer targeted software packages that are relatively easy to use and feature rich are:
- LightBurn, https://lightburnsoftware.com/ , LightBurn is a great piece of software, kudos to the makers for supporting Linux even though that is only a fraction of their market. It works quite well as long as you stick to the supported Linux versions, just dedicate an old laptop to your Lasercutter and you’ll be fine. LightBurn supports a camera that you can position over the bed of the cutter to keep you informed about what’s happening inside the enclosure. If you run into trouble with support for your camera you may use ffmpeg to convert the camera’s format to one that LightBurn can handle like so: ‘ffmpeg -i /dev/video4 -map 0:v -vf format=yuv420p -f v4l2 /dev/video6’ where /dev/video4 should be your real camera and /dev/video6 v4l loopback device (created using ‘sudo modprobe v4l2loopback’). I really should do a separate article on working with LightBurn. It is one of very few pieces of closed source software that I use and was very happy to pay for.
- LaserGRBL, https://lasergrbl.com/
- OpenBuilds, https://software.openbuilds.com/
- LaserWeb, https://laserweb.yurl.ch/
- lots of others, if I’ve missed your software please send me a name and a link to include
Some of these are free, some are commercial software, in the end all of them will work but the convenience level may vary and some may work better (or worse) for your particular setup and material. Try before you buy, make good use of the trial period and cut as many different materials and thicknesses as you can to get a good feel for the software before you decide. Pay special attention to how the software fits into your workflow, whether the file formats that you intend to use are supported without conversion steps and that the import of those files is error free.
The laser driver software that I’ve seen all still misses tricks of the trade and more than once I’ve seen (subtle) bugs. For instance, radius compensation (to offset the path half the beam width so you get more accurate work) needs to be done to the outside for outer curves and for the inside for inner curves but the software tends to get confused by what is outer and what is inner especially if the tool path changes direction. This is the result of a naive implementation of the correction, the right way to do it is to first figure out if a curve is inner or outer and then to offset in the direction of the scrap. But that implies that you know what the scrap is and that information isn’t necessarily present in the input file to the laser so the software has to make an educated guess. And this doesn’t always work. Other bugs I’ve seen relate to penetrating thick material. In order to do that you normally start well in the scrap and then spiral into the edge of the work piece so the laser is always in motion when it hits the work piece itself. Constant beam power (so that you always cut with the same amount of power) is another fact that you really would need to offset for, especially if the spot size is asymmetrical, so you need to cut slower in the direction where the beam is less focused for consistent results. All of this is tricky to get right and some of the software out there is better at these things than others, but nothing on the market today gets all of these factors right.
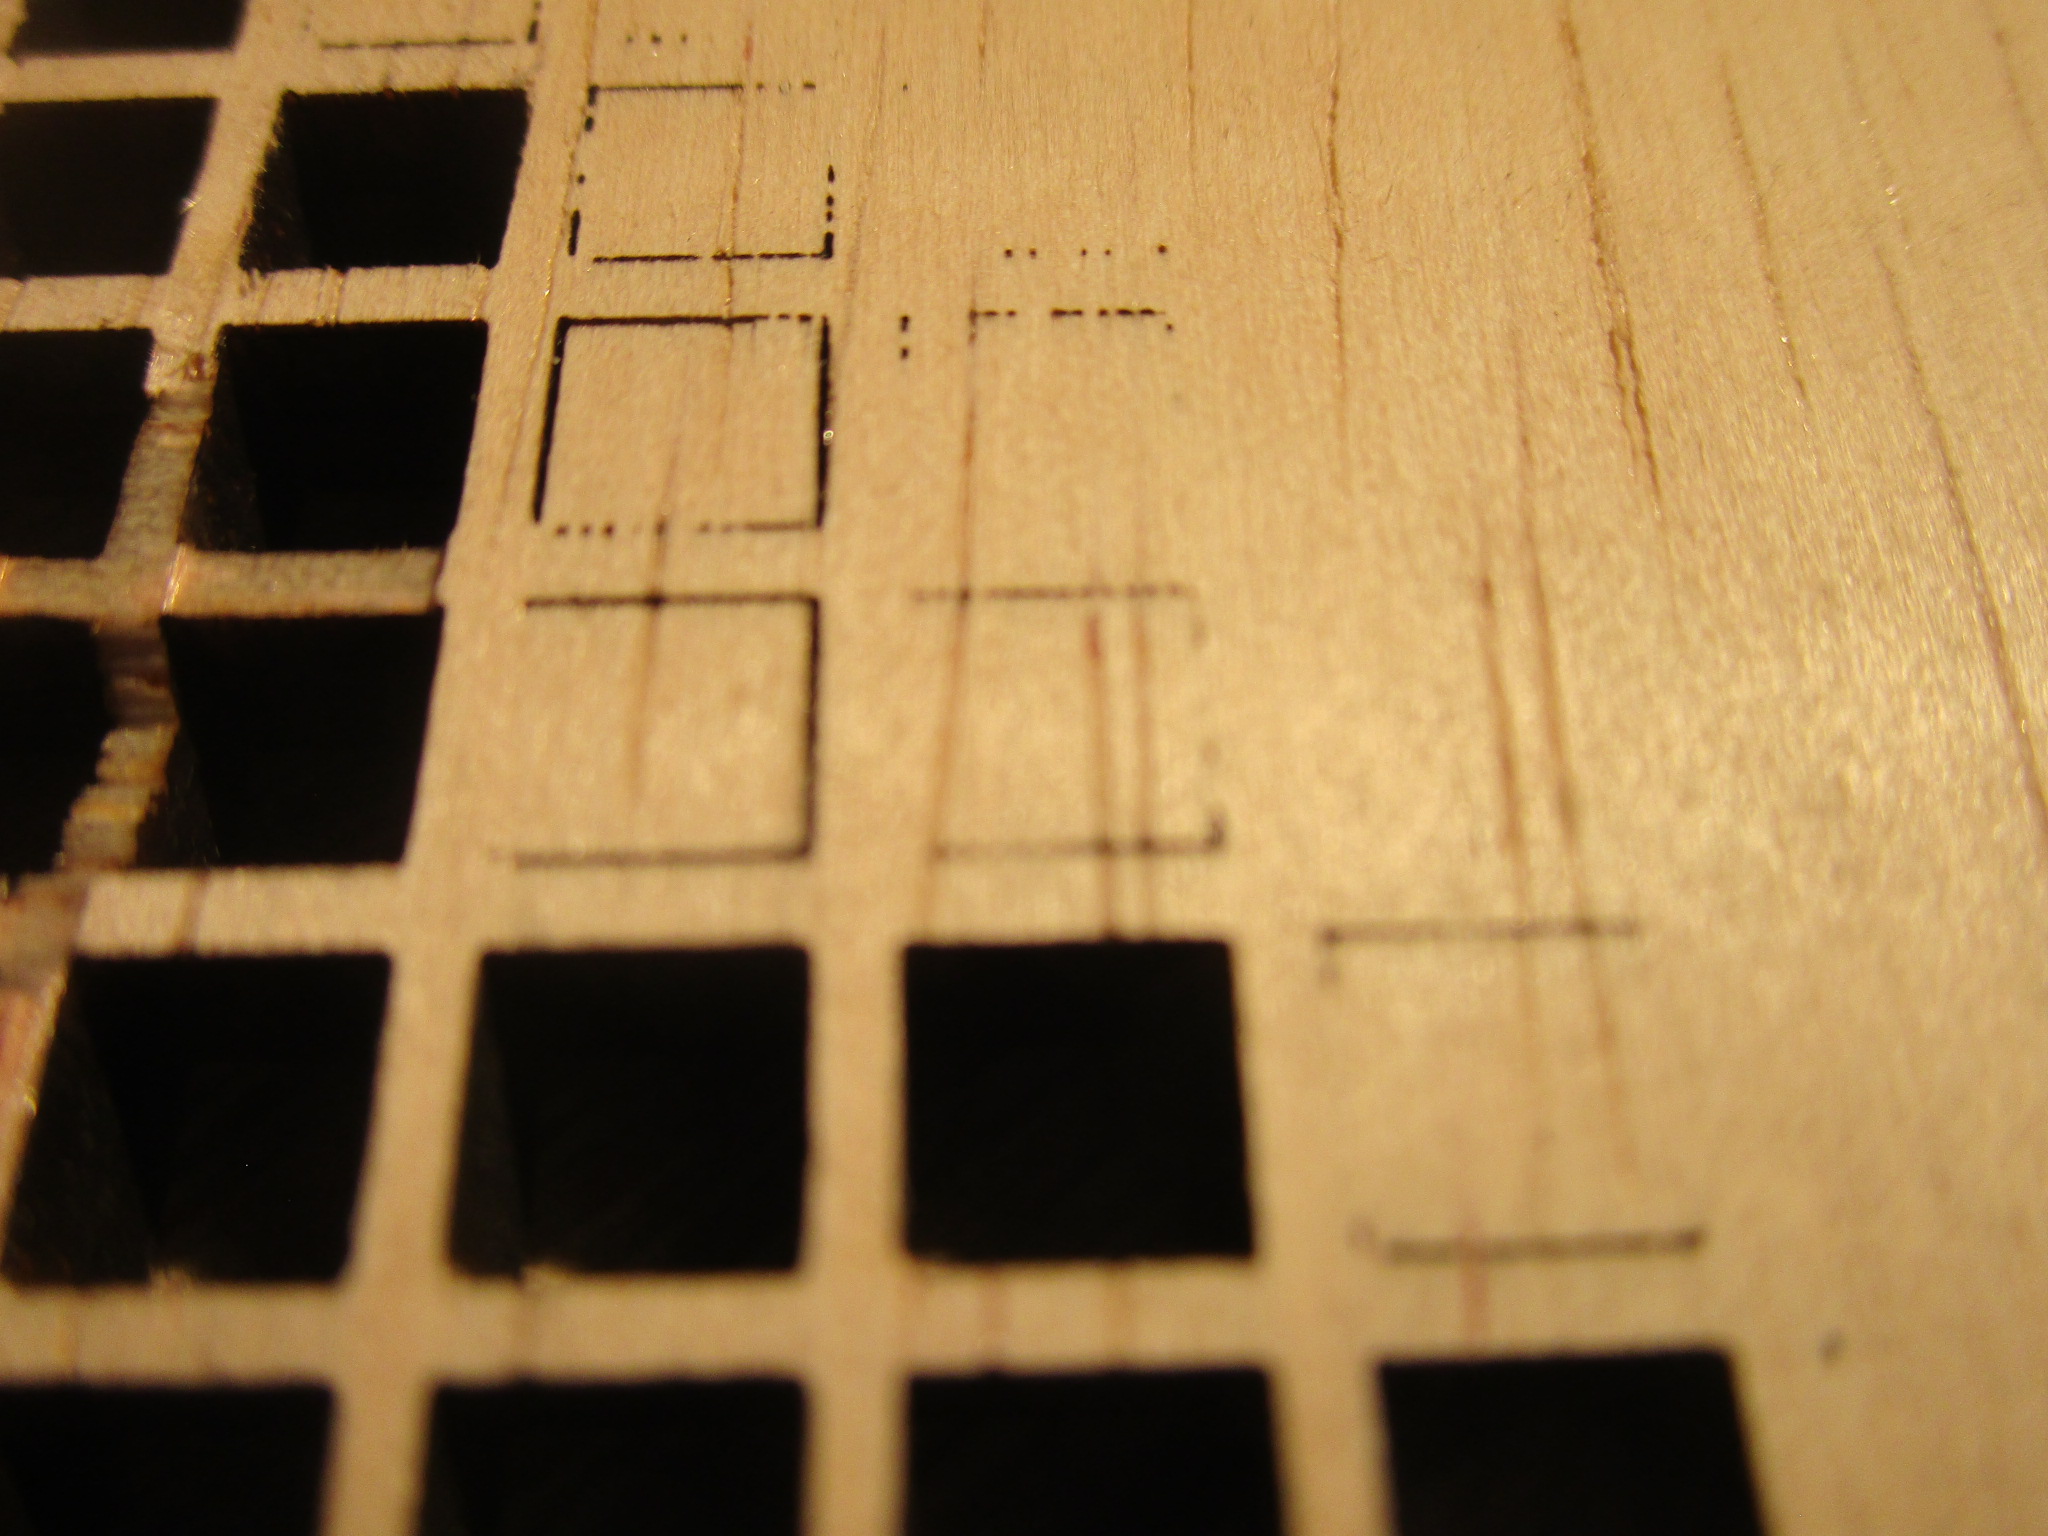
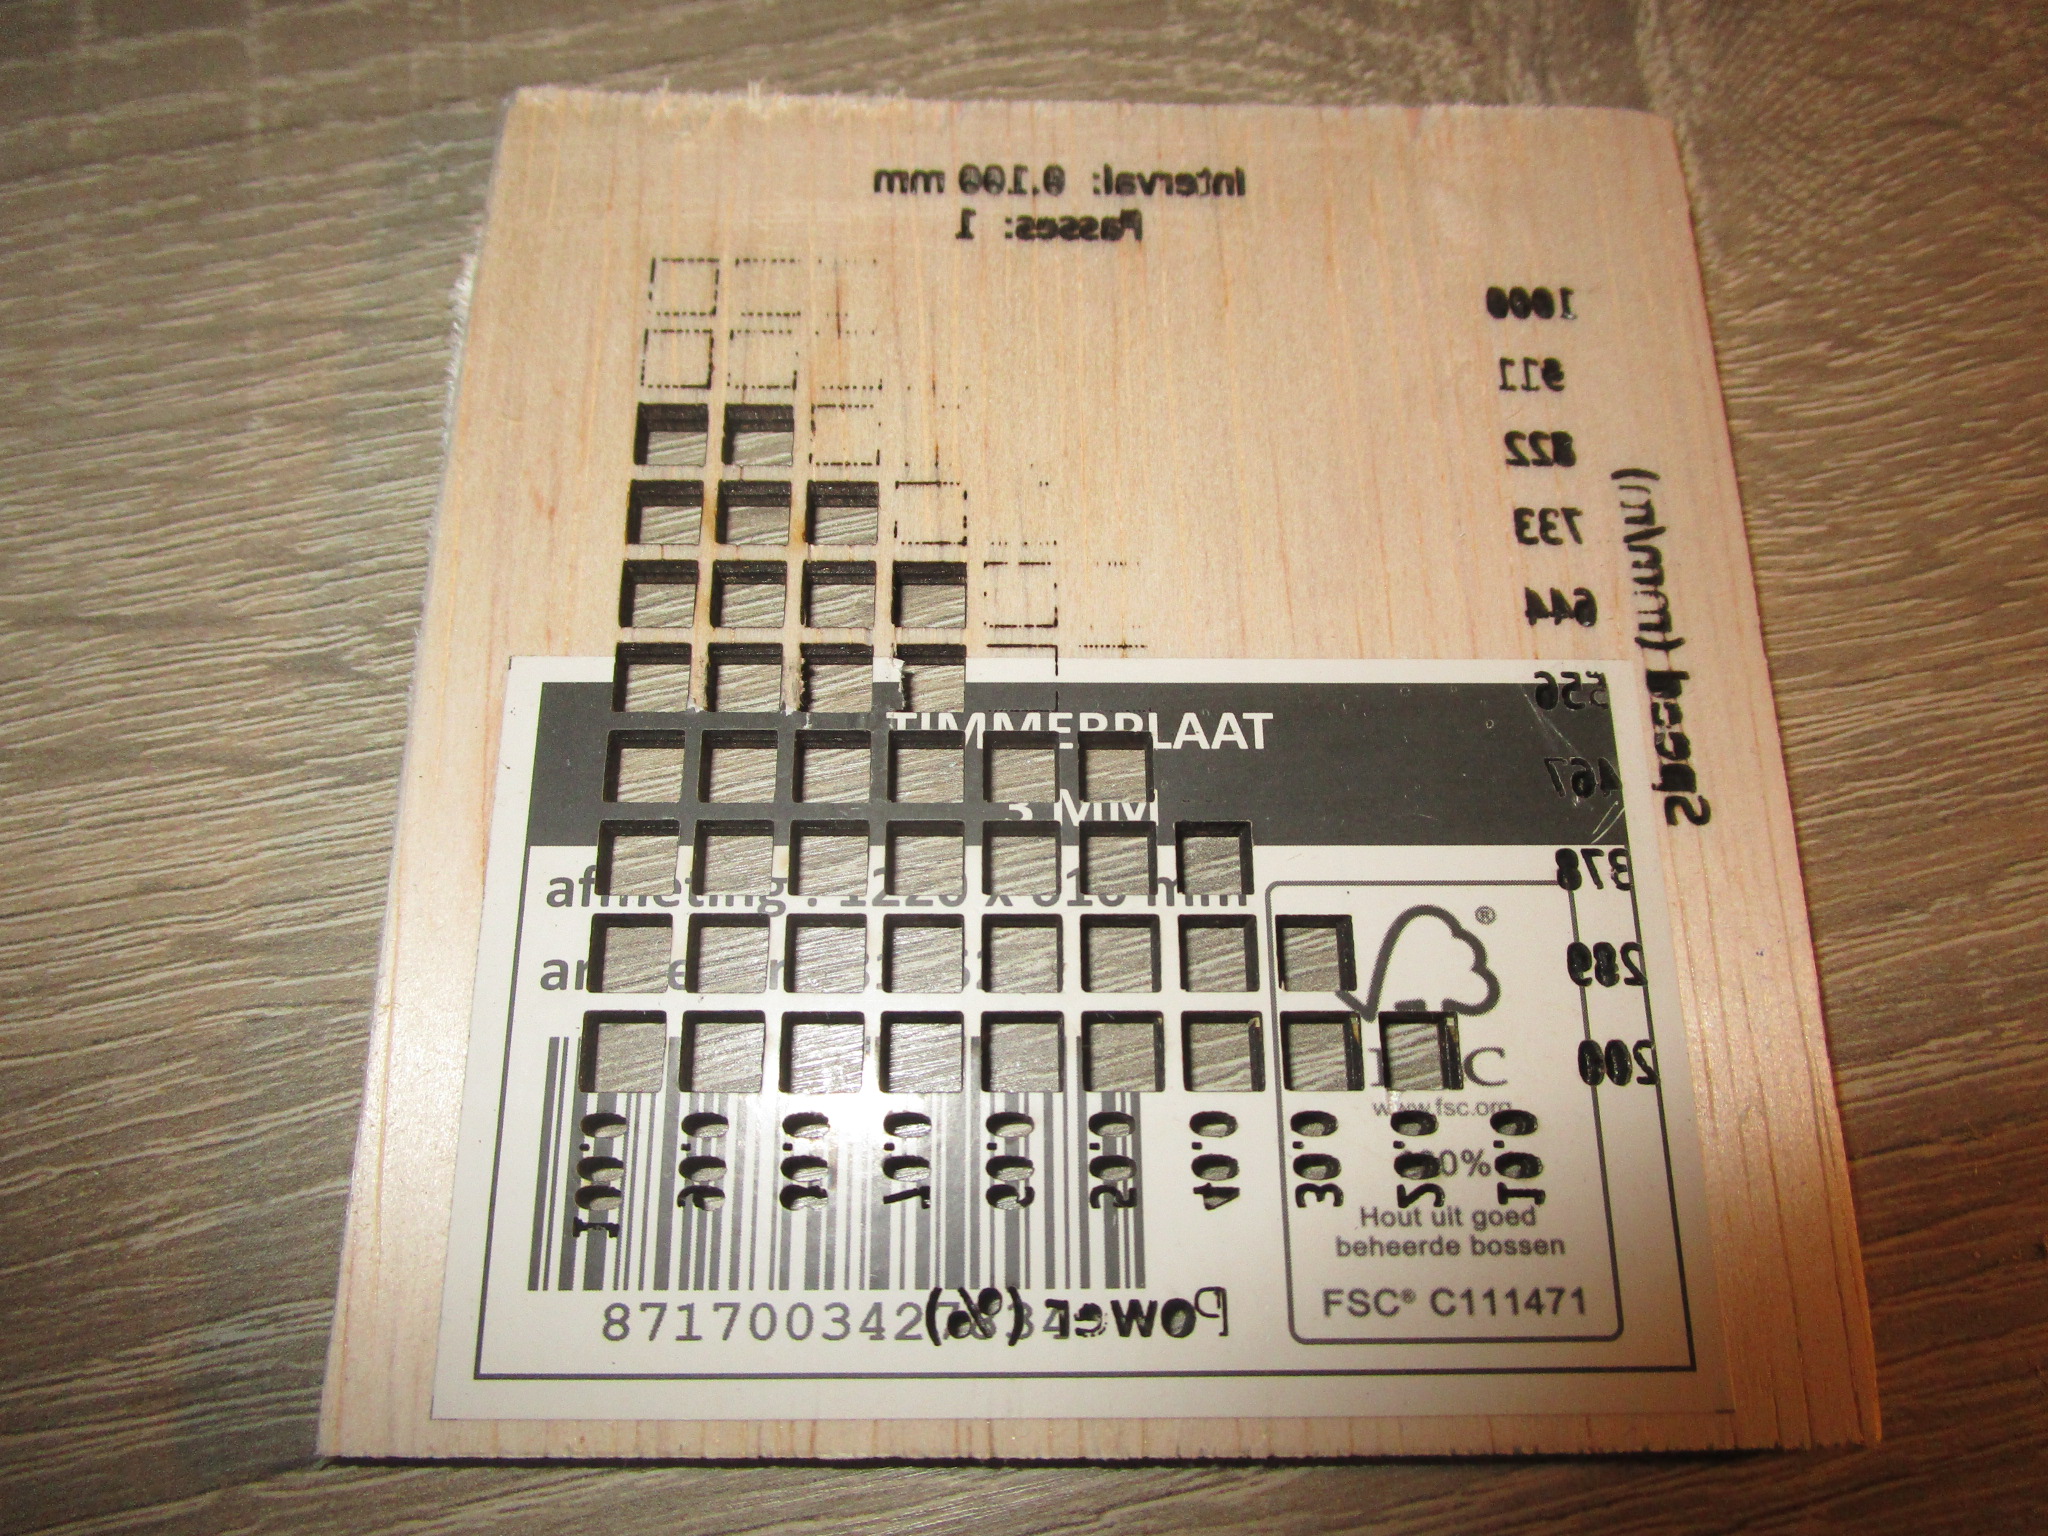
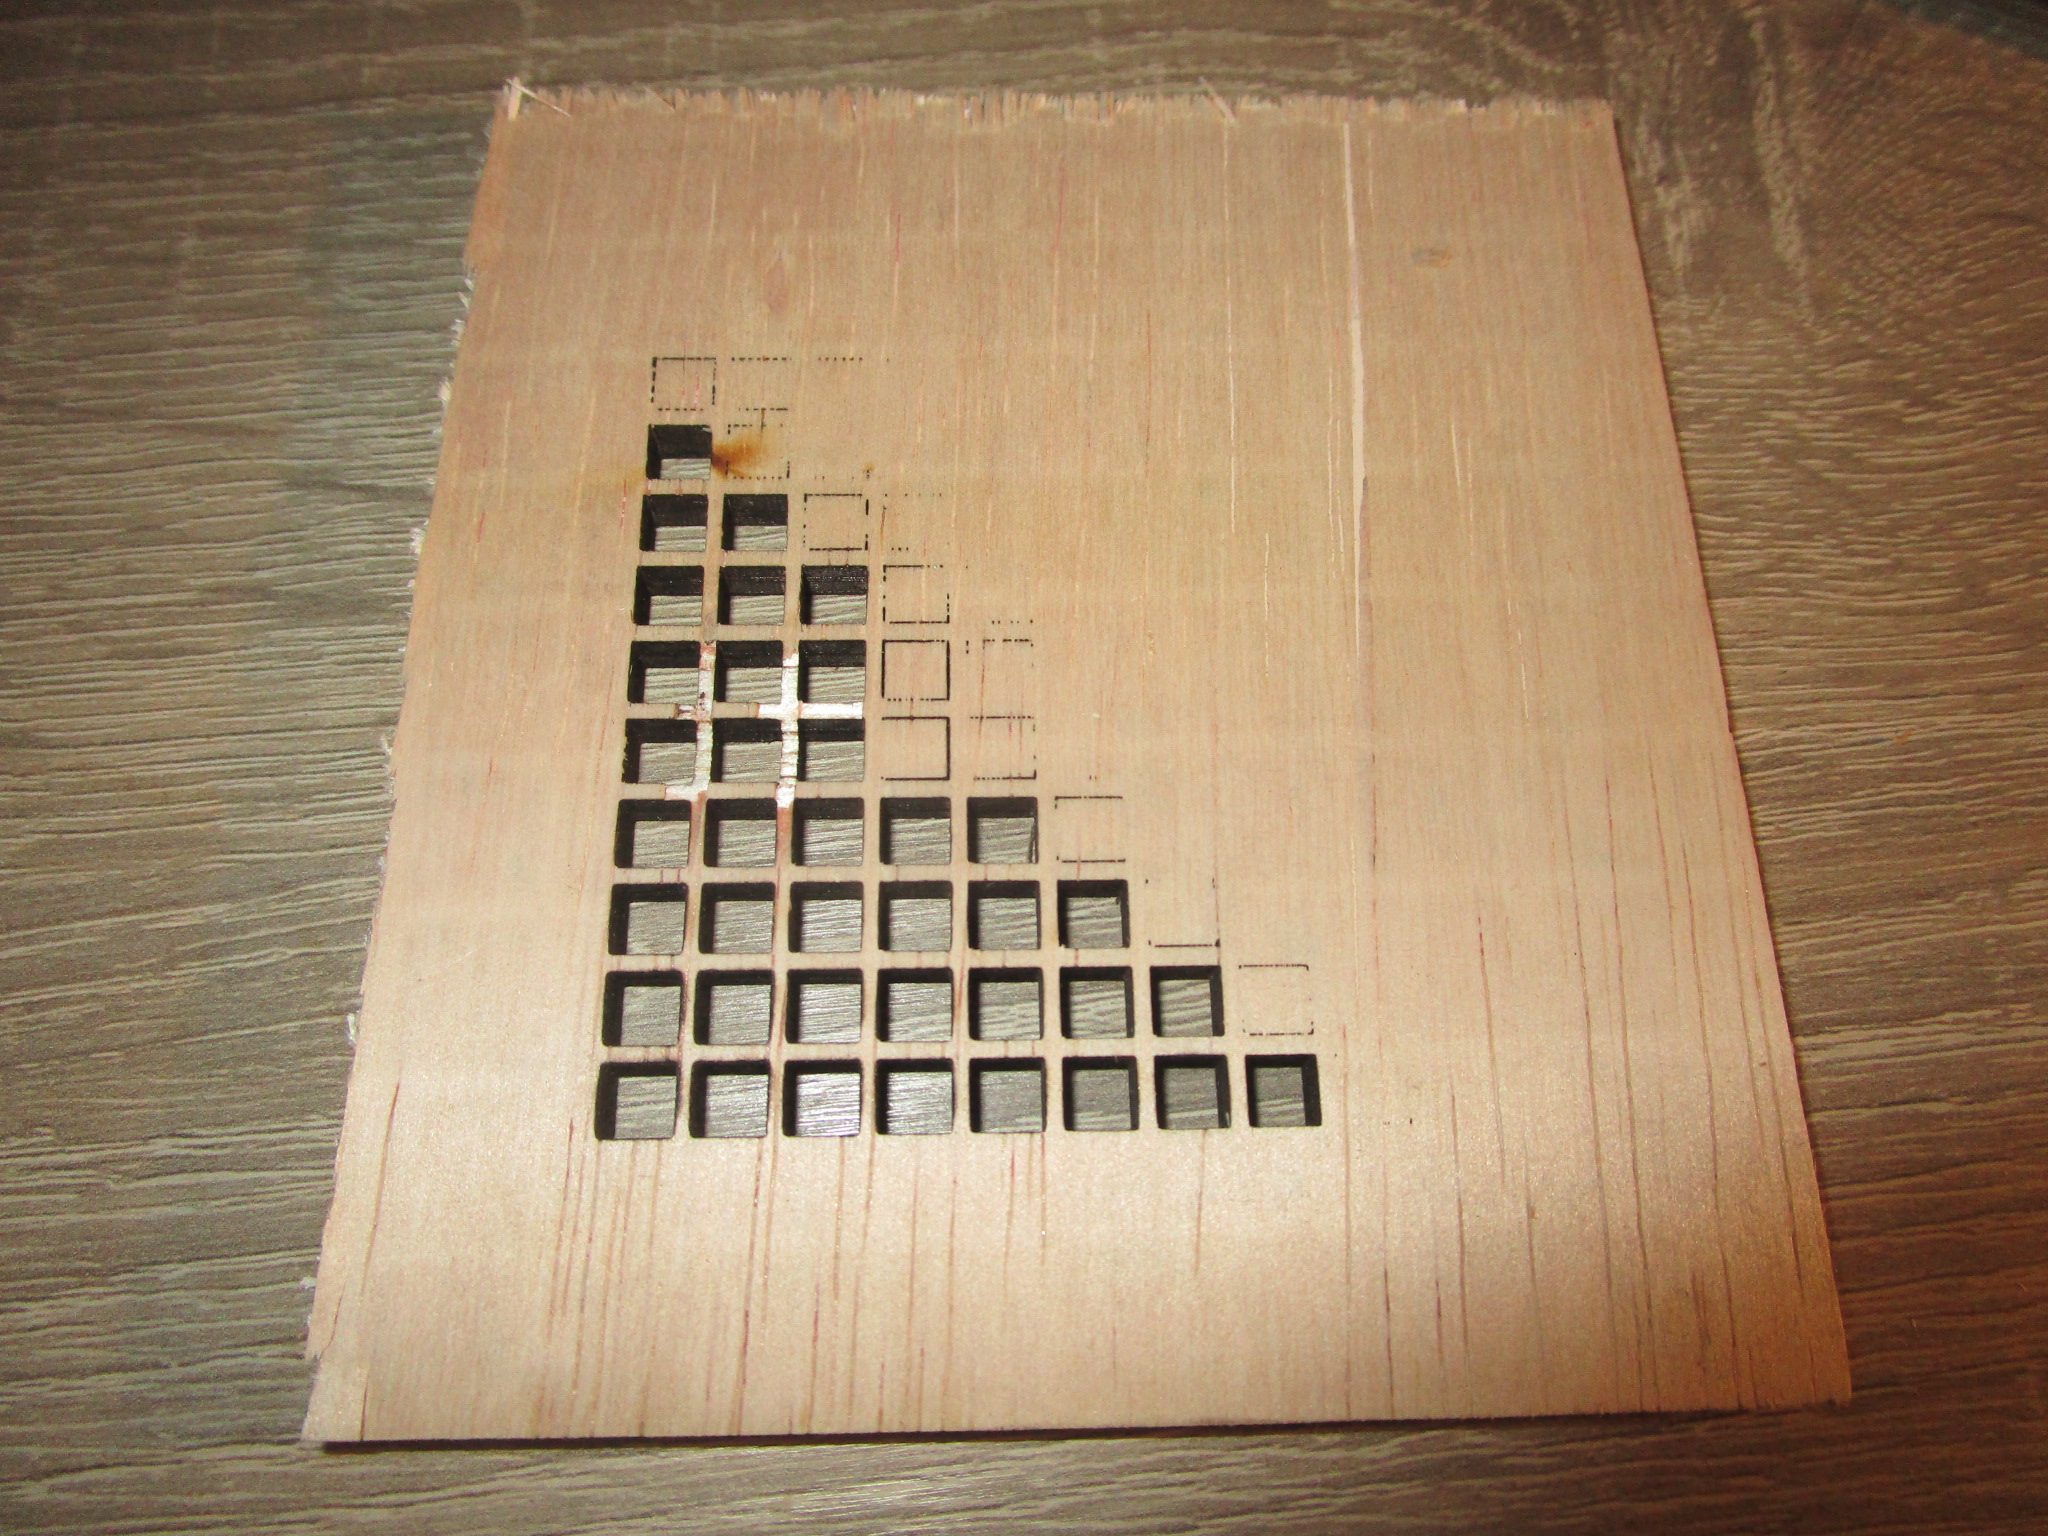
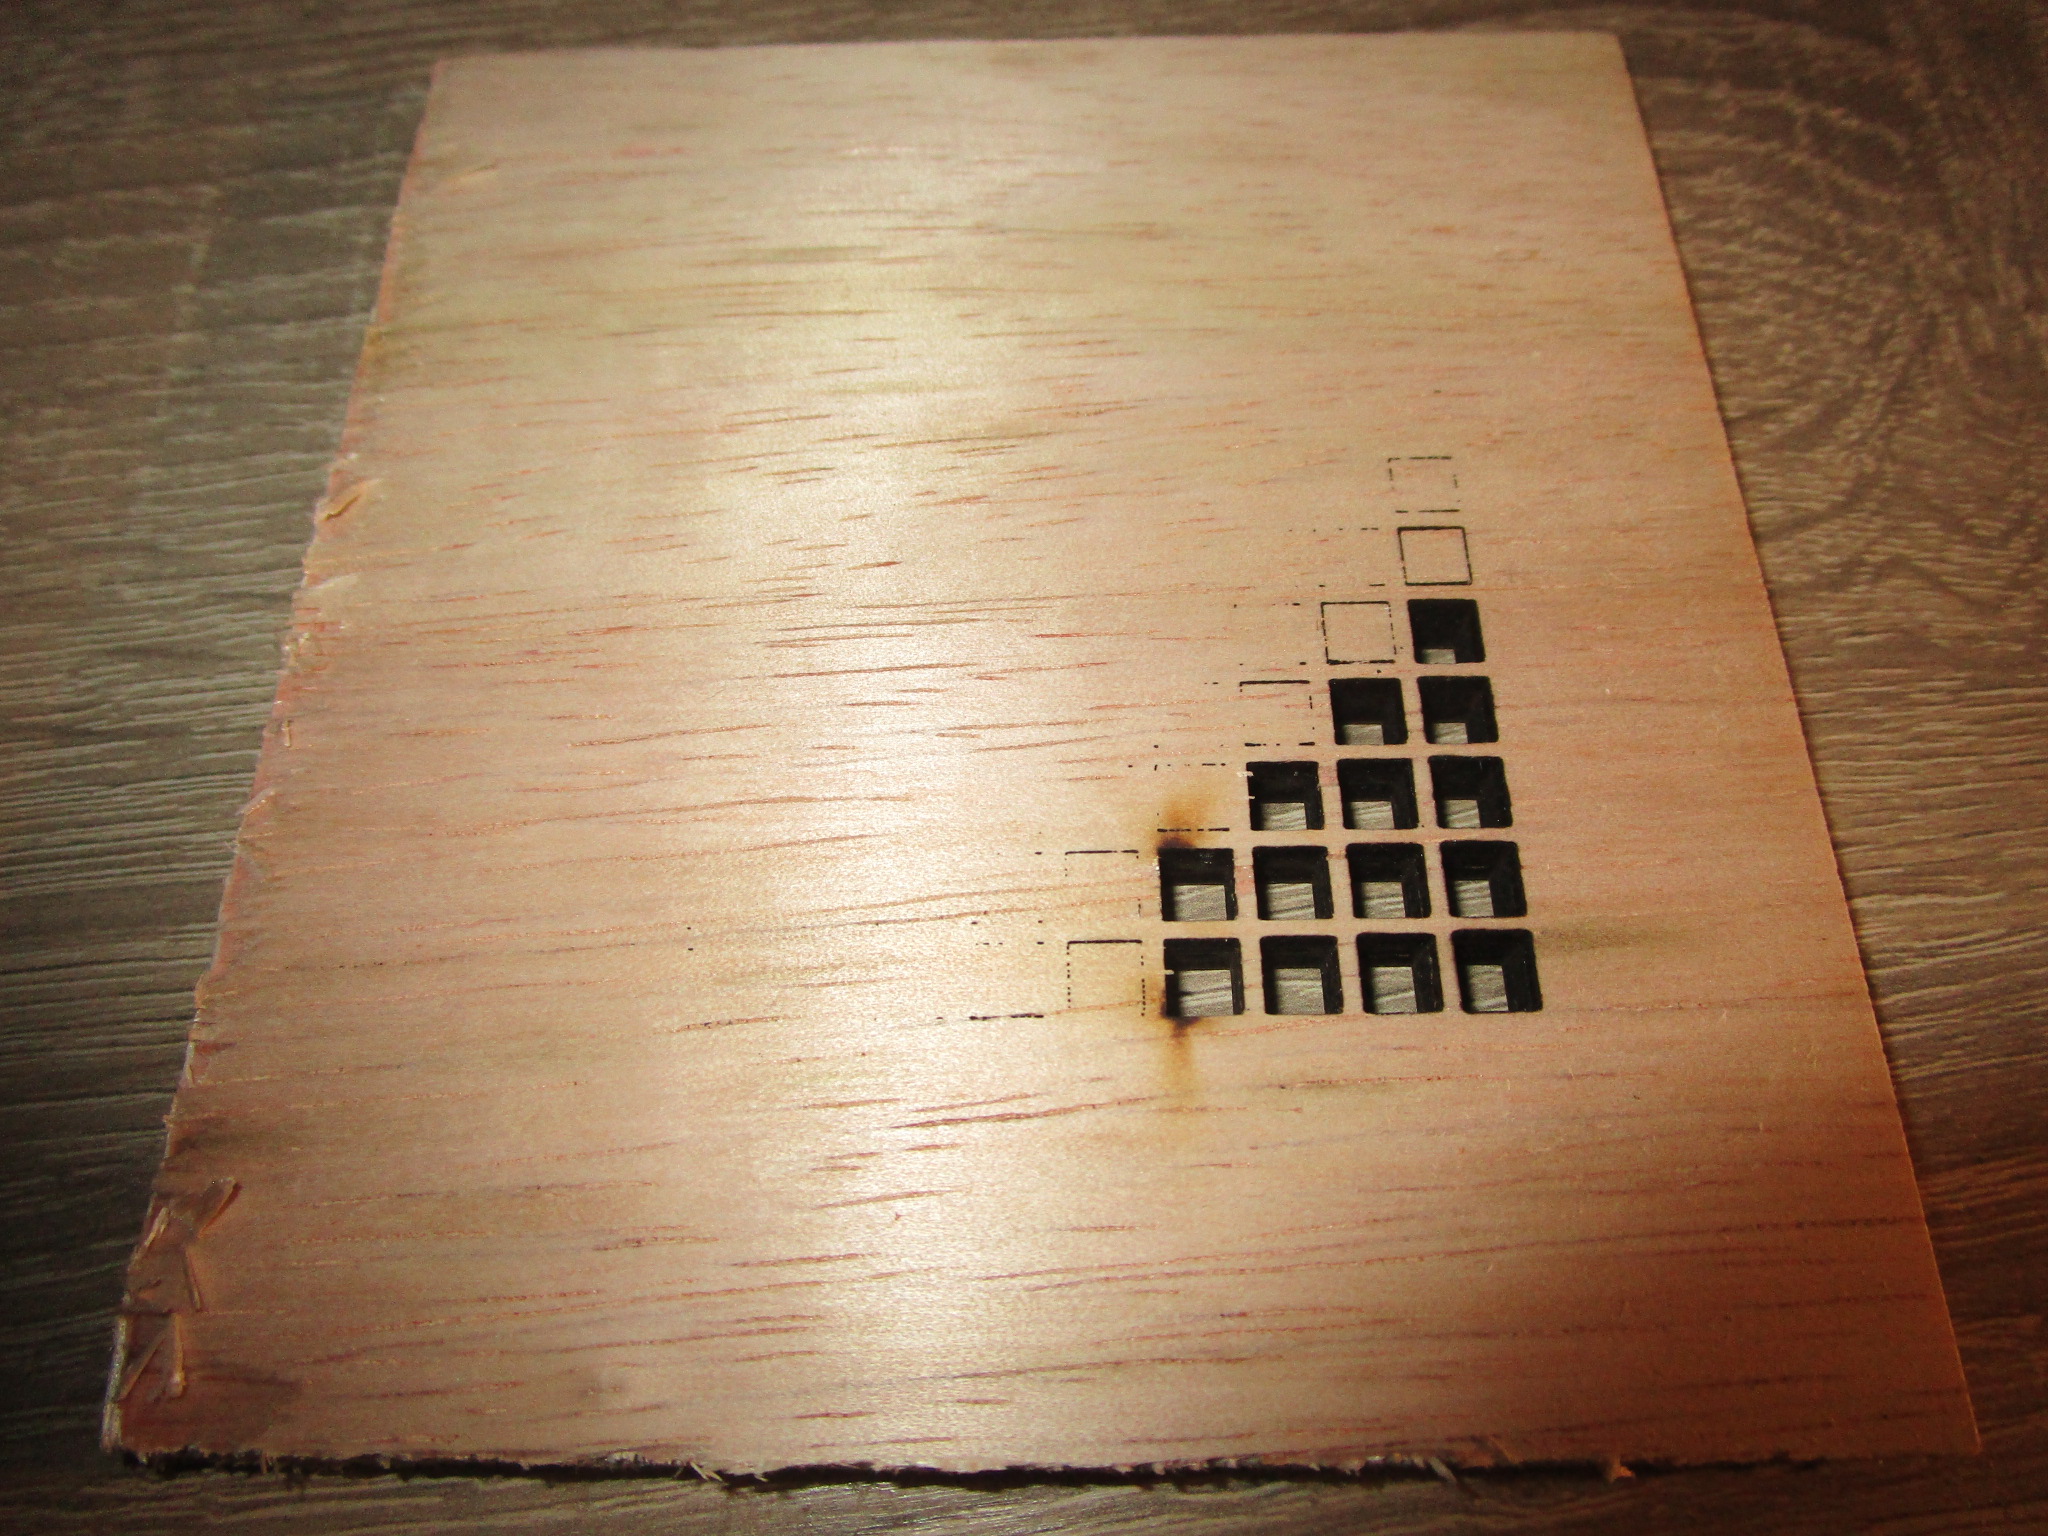
In this extreme close-up of the back of a piece of birch plywood you can see the effect of an asymmetrical spot, the machine clearly favors cutting in the ‘X’ direction because that’s the orientation of the lasers in the head which results in a beam that is slightly wider than tall. In the ‘Y’ direction that causes some of the beam to spill over onto the side of the cut. So you will need to go slower in one direction than the other, but because most software can’t do that what you end up doing is to slow down to the lowest speed that will still penetrate the work piece in all directions of travel. This will result in a slower cutting speed and some loss of accuracy in one dimension. Knowing your cutter intimately will help to identify and correct such issues:
Making the design
To cut any kind of material at all you first need a design. You can make your own designs, you can buy designs made by others and you can adapt designs and artwork that wasn’t necessarily intended for laser cutting or engraving using software. There are also free laser cutter design generators that will generate a bespoke pattern for you on the fly. Software used for the design phase is quite varied, on the one hand there are parametric tools that are closer to programming environments than design software, on the other hand there are fully interactive drawing programs, CAD software, photo manipulation software etc. Depending on your skill level and goals you will select the package most appropriate for your needs. If you are more of an artist than a technology person you will likely gravitate to drawing programs and if you are an engineer you will probably feel most at home with a CAD program. If you’re a programmer then parametric design software may be the thing for you. In each of these categories there are multiple contenders.
The list of subjects of things that you can make is pretty much endless, but things that I keep coming across are all manner of boxes, jigs for other tools, decorative pieces and functional machinery. The longer I work with the laser the more ways I find myself using it.
- Interactive CAD Software
- Tinkercad
- Rhino
- Blender (less suitable in my opinion)
- AutoCad
- Sketchup
- Drawing programs
- Gimp
- Inkscape
- PhotoShop
- Illustrator
- Parametric CAD
For each of these there will be ways to arrive at the two-dimensional intermediary file that will be used by the laser driver software to be converted into G-Code. Common file formats in use for cutting are SVG, DXF and JPG. Usually the software will support quite a few more of these, it is crucial that whatever format the design software exports can be imported into the the laser driver software.
More resources for designs:
Materials
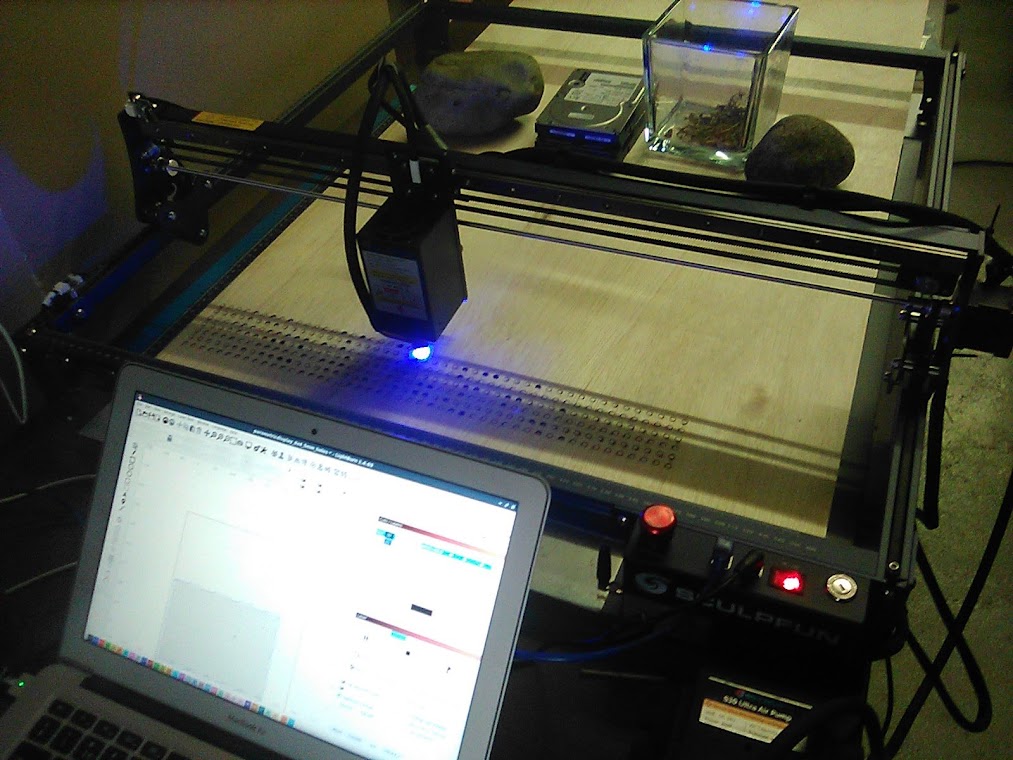
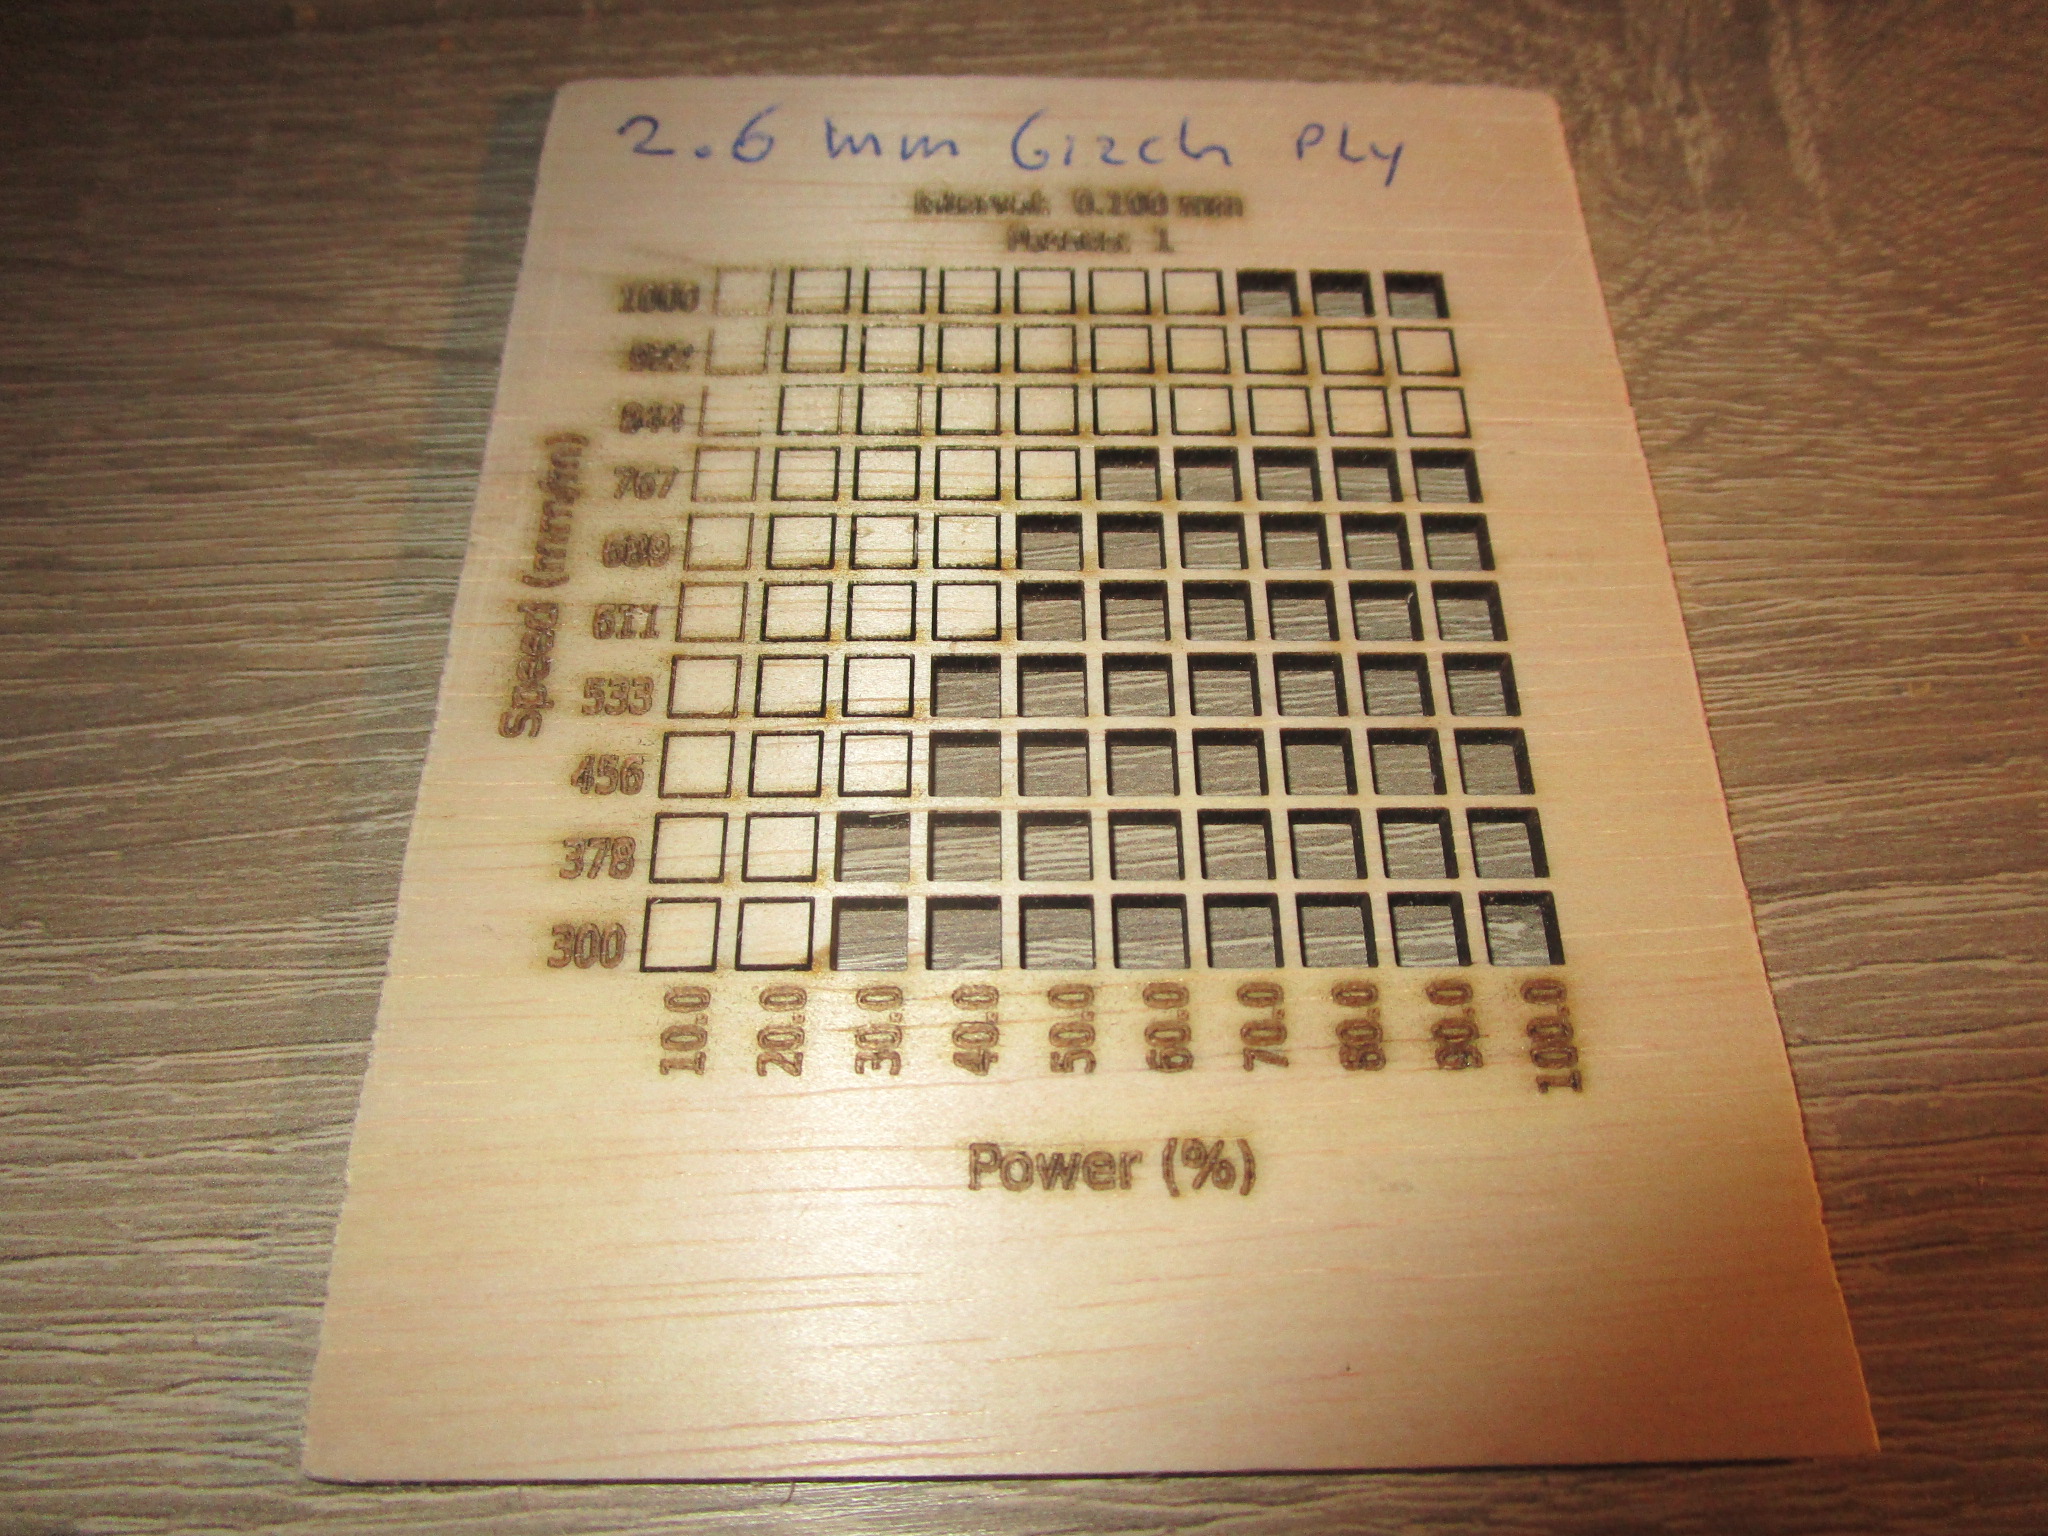
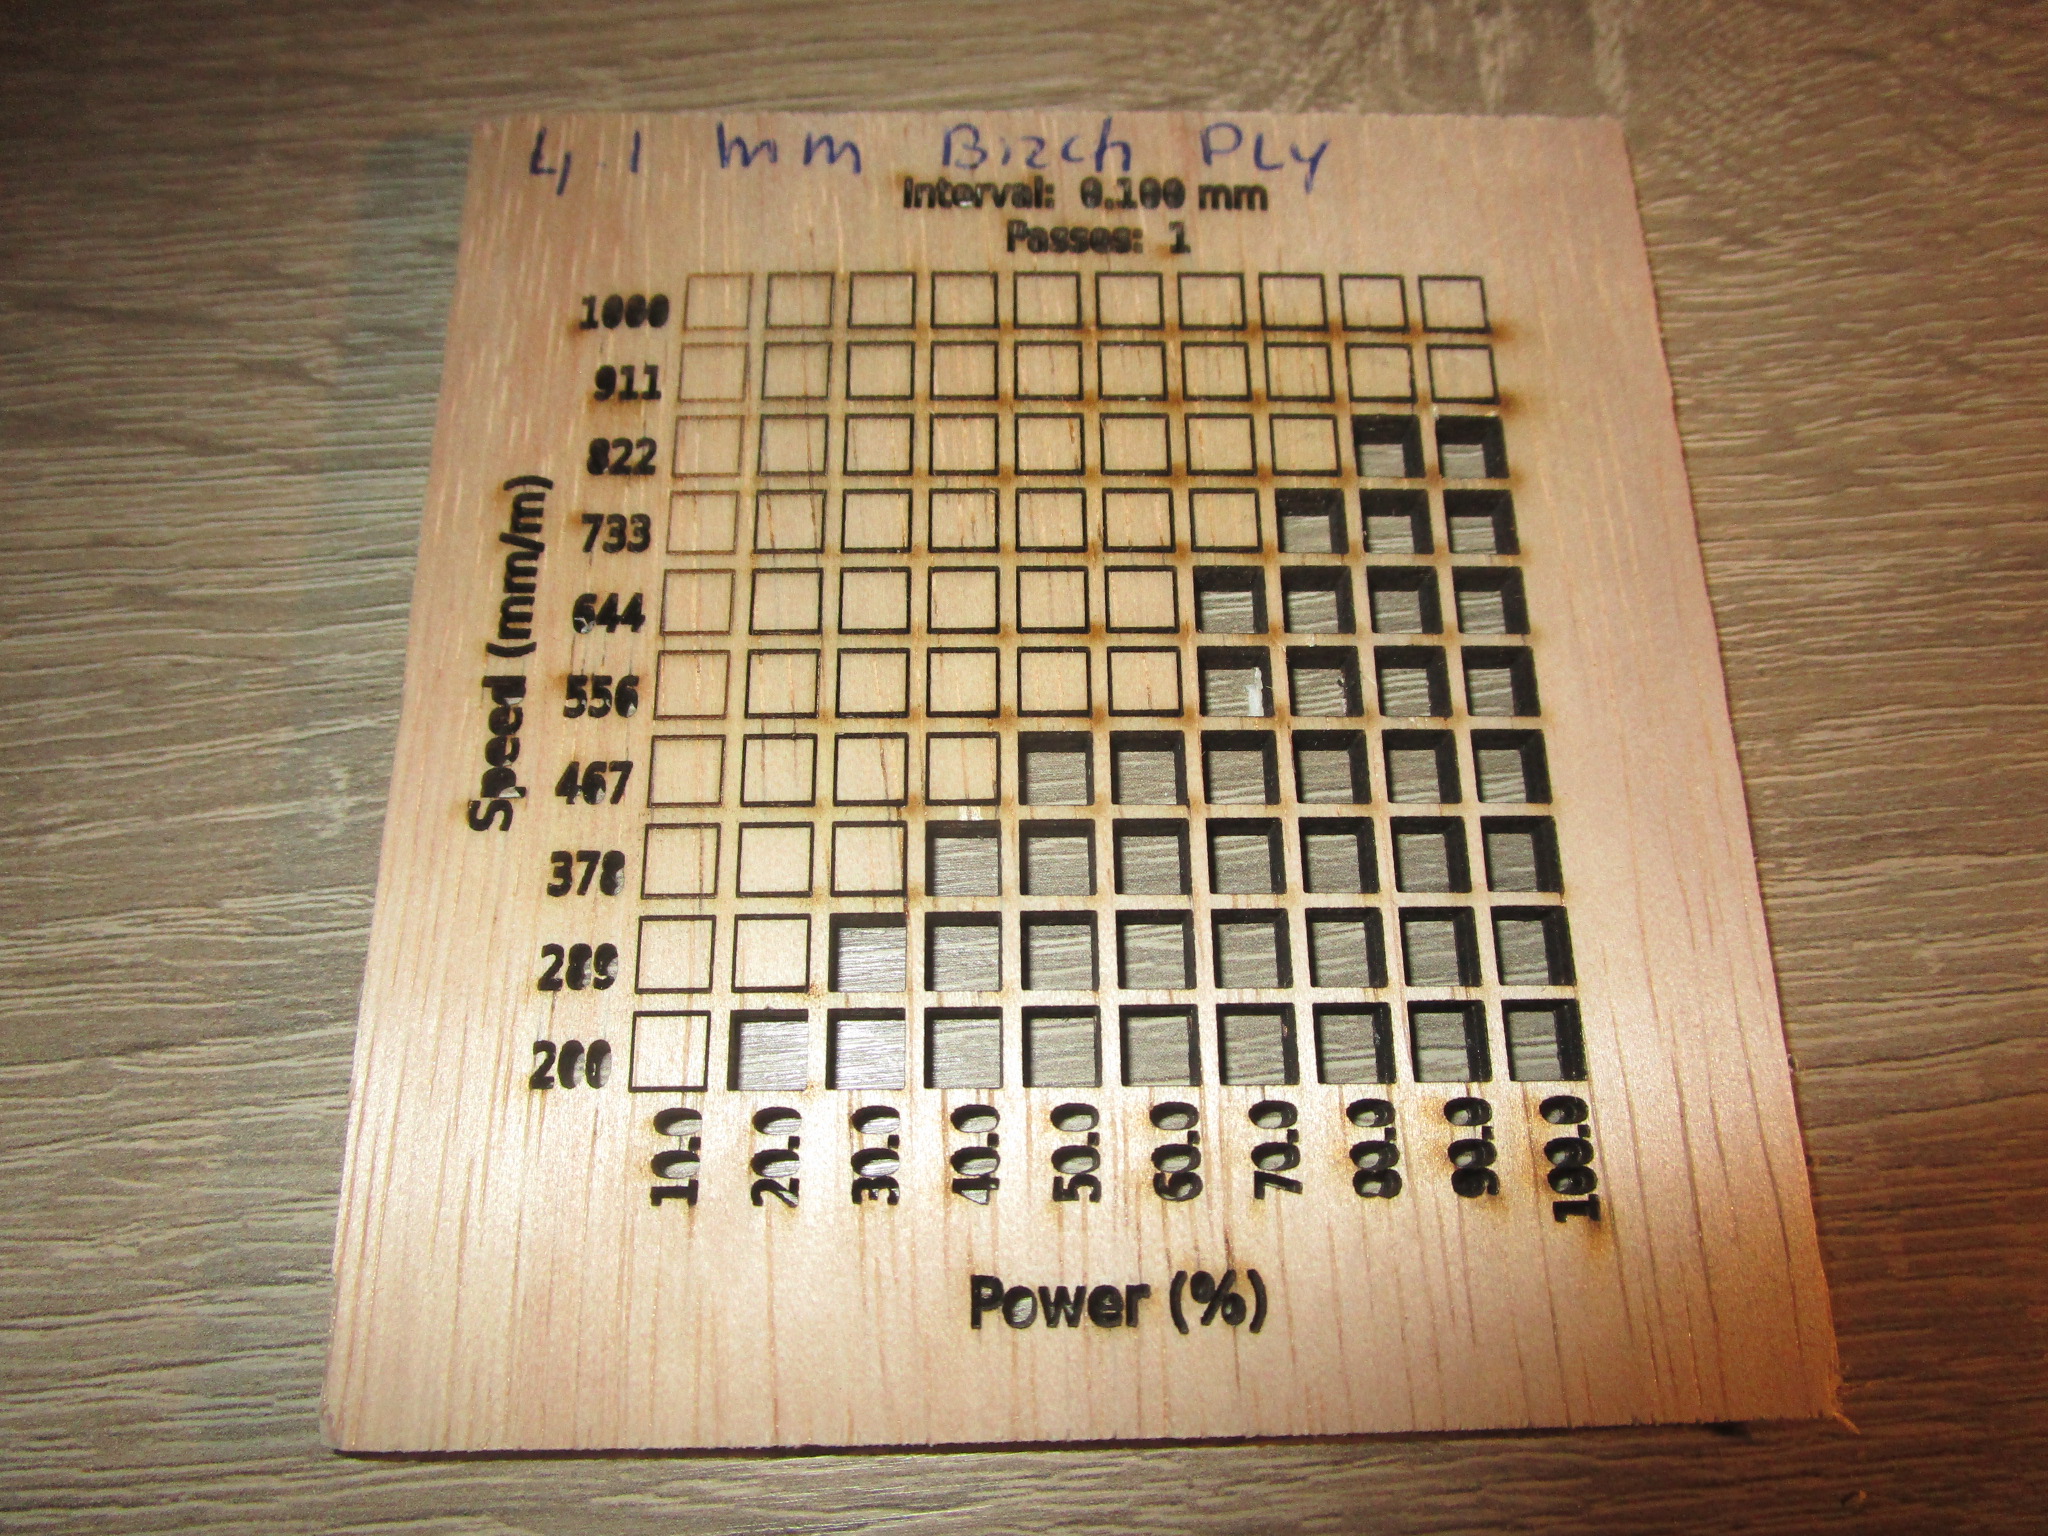
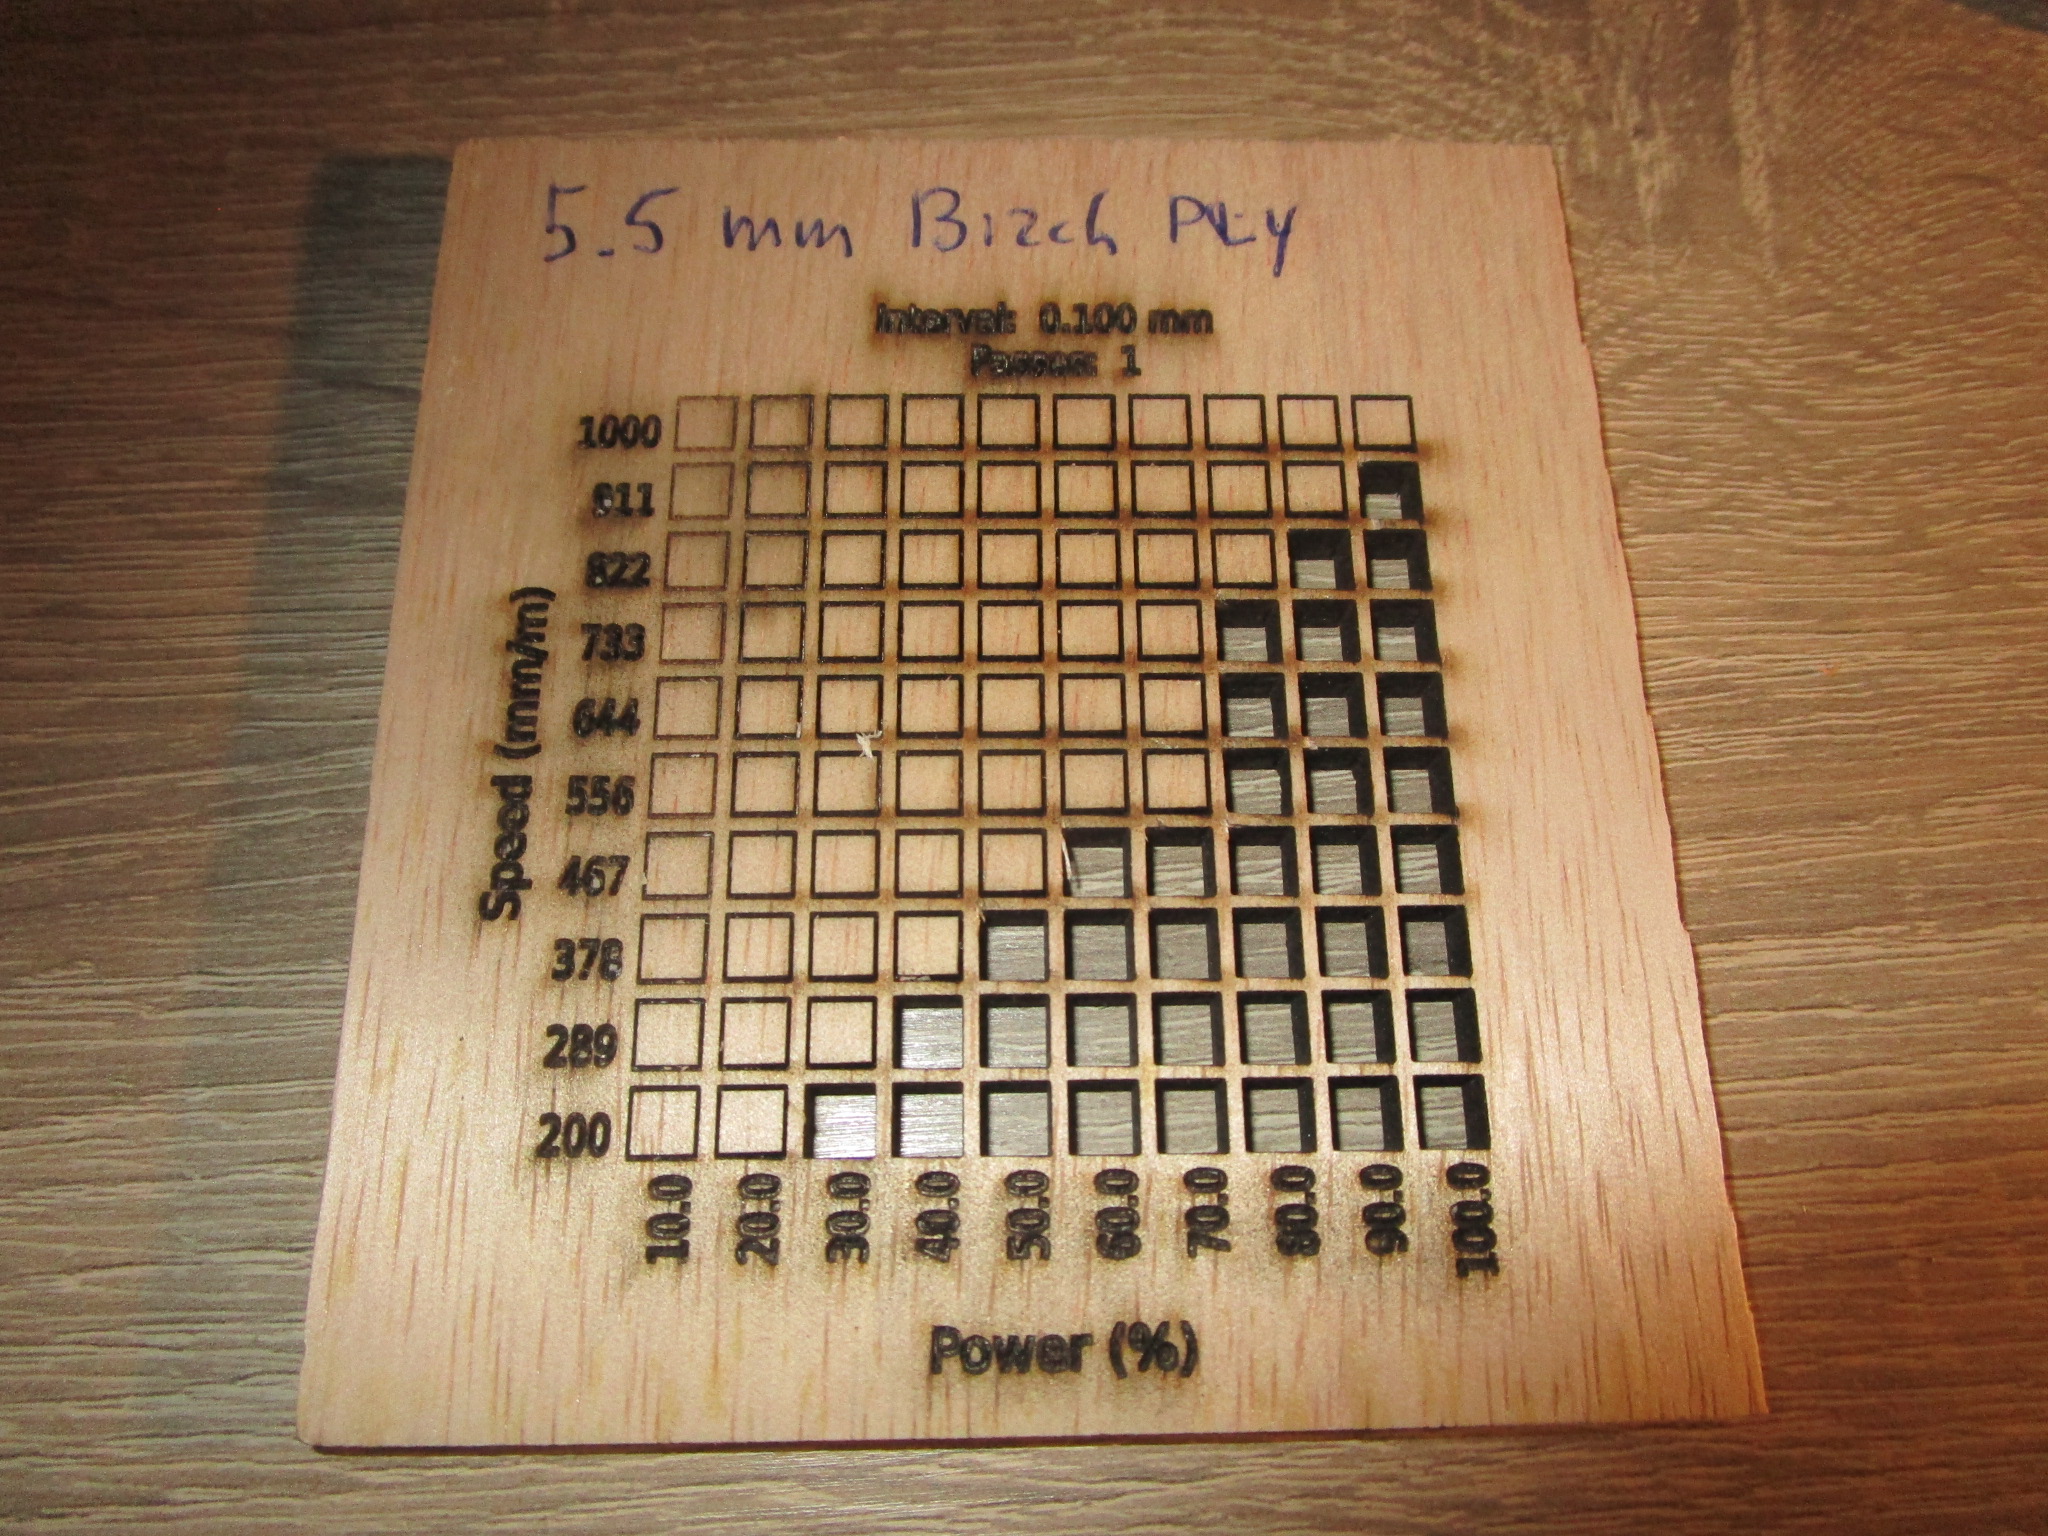
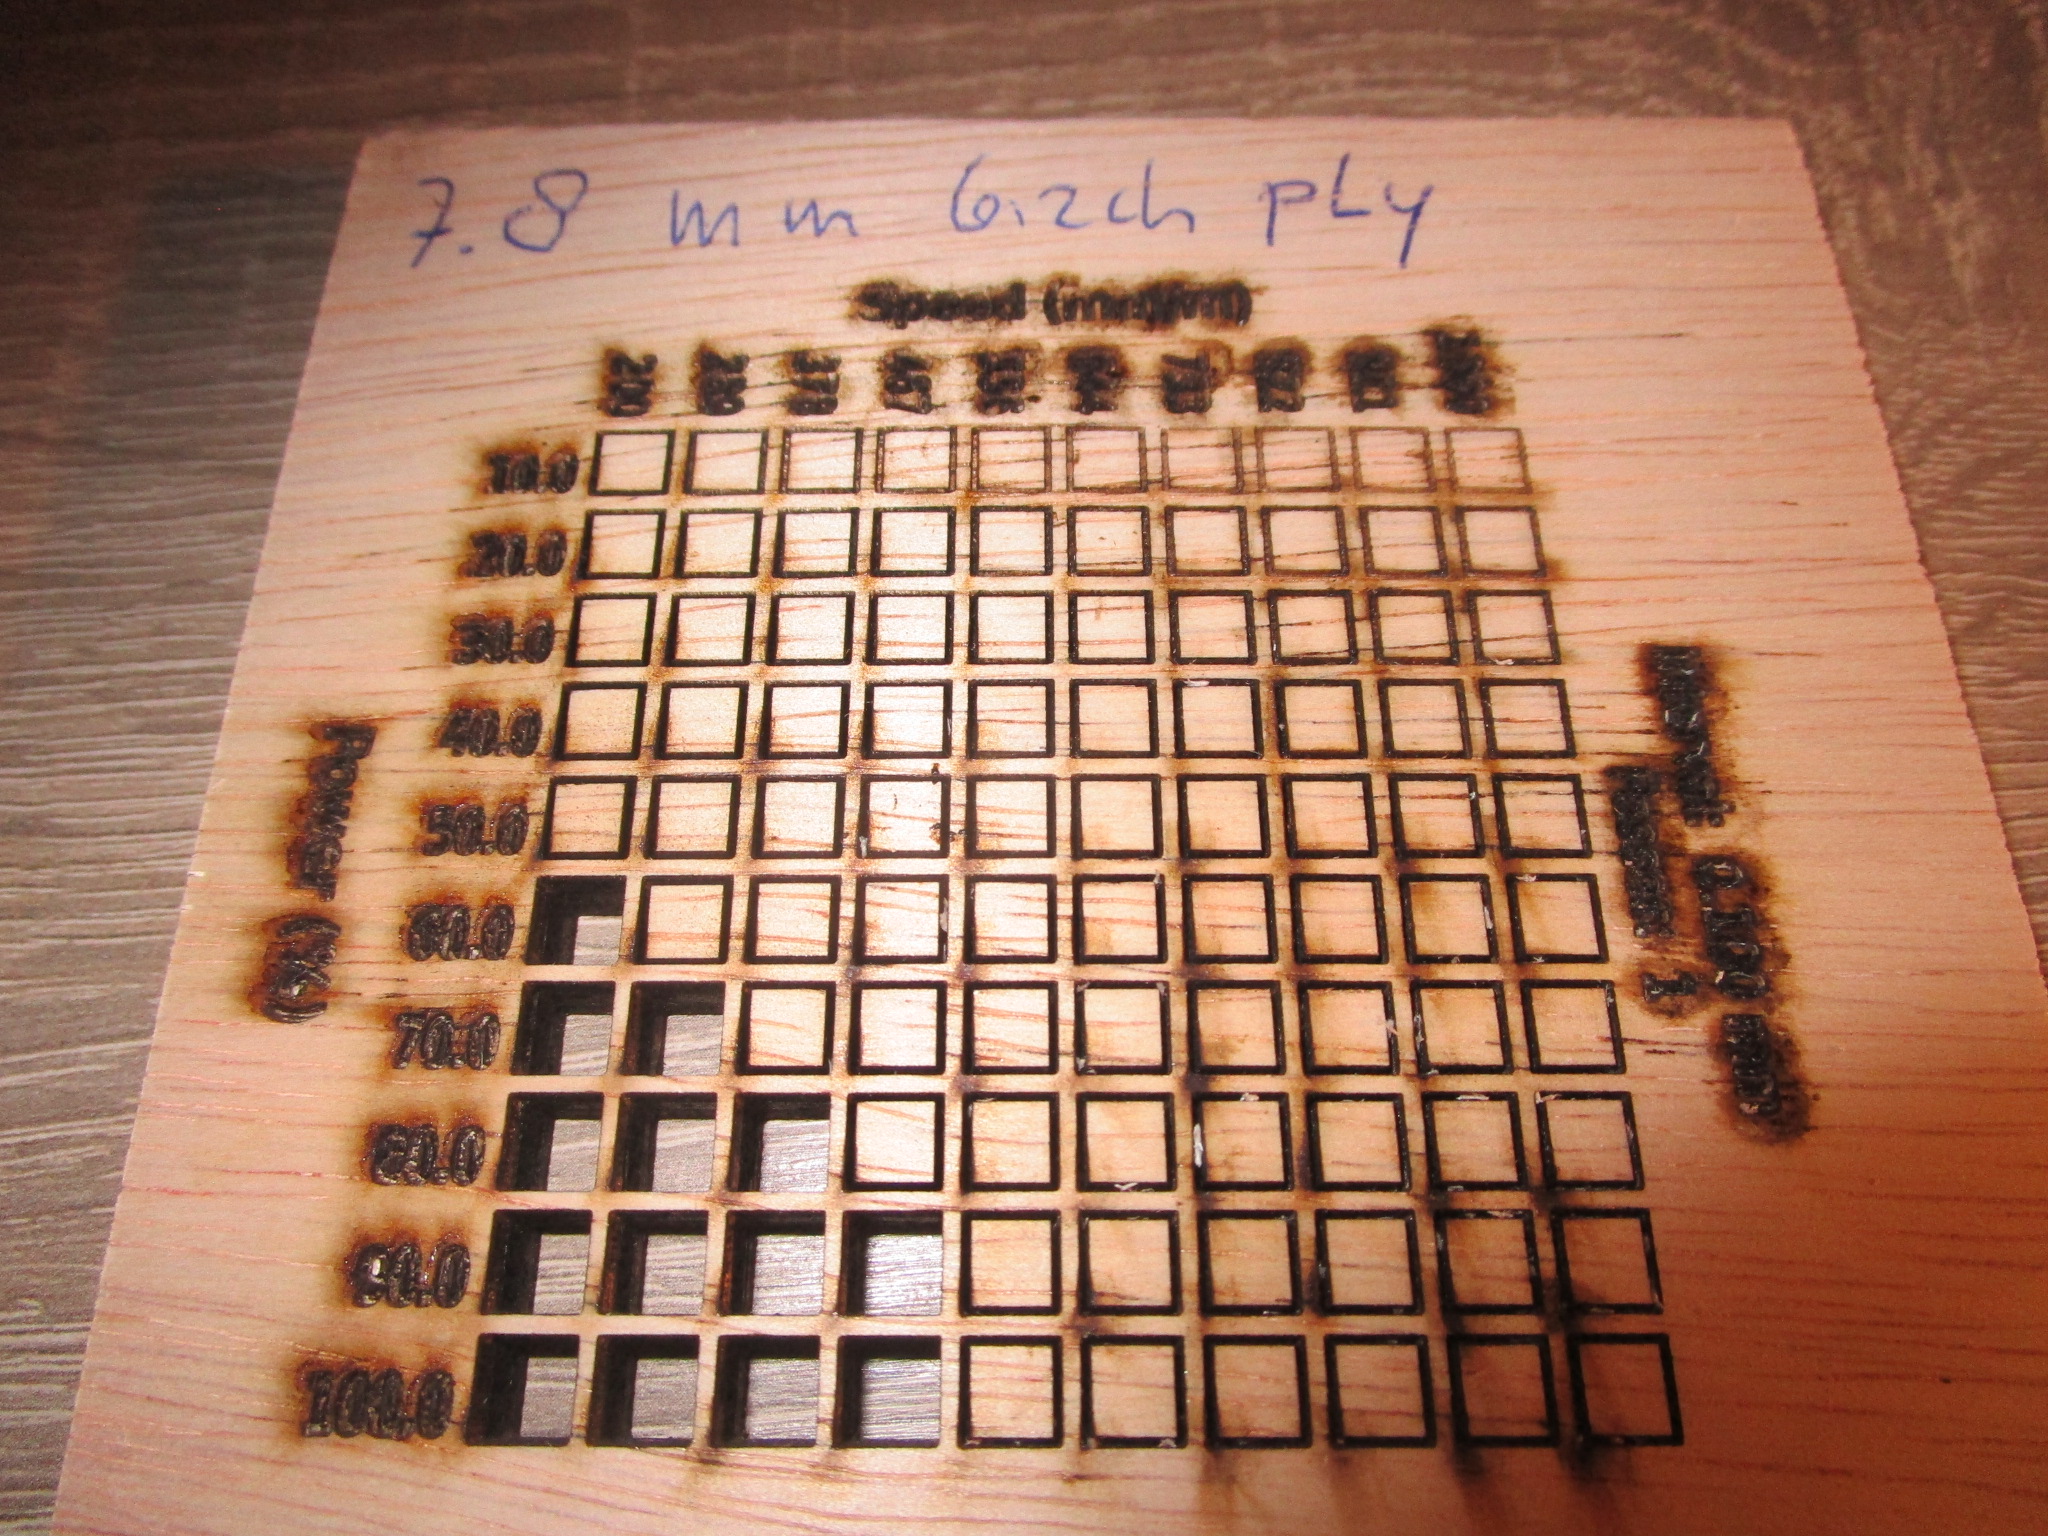
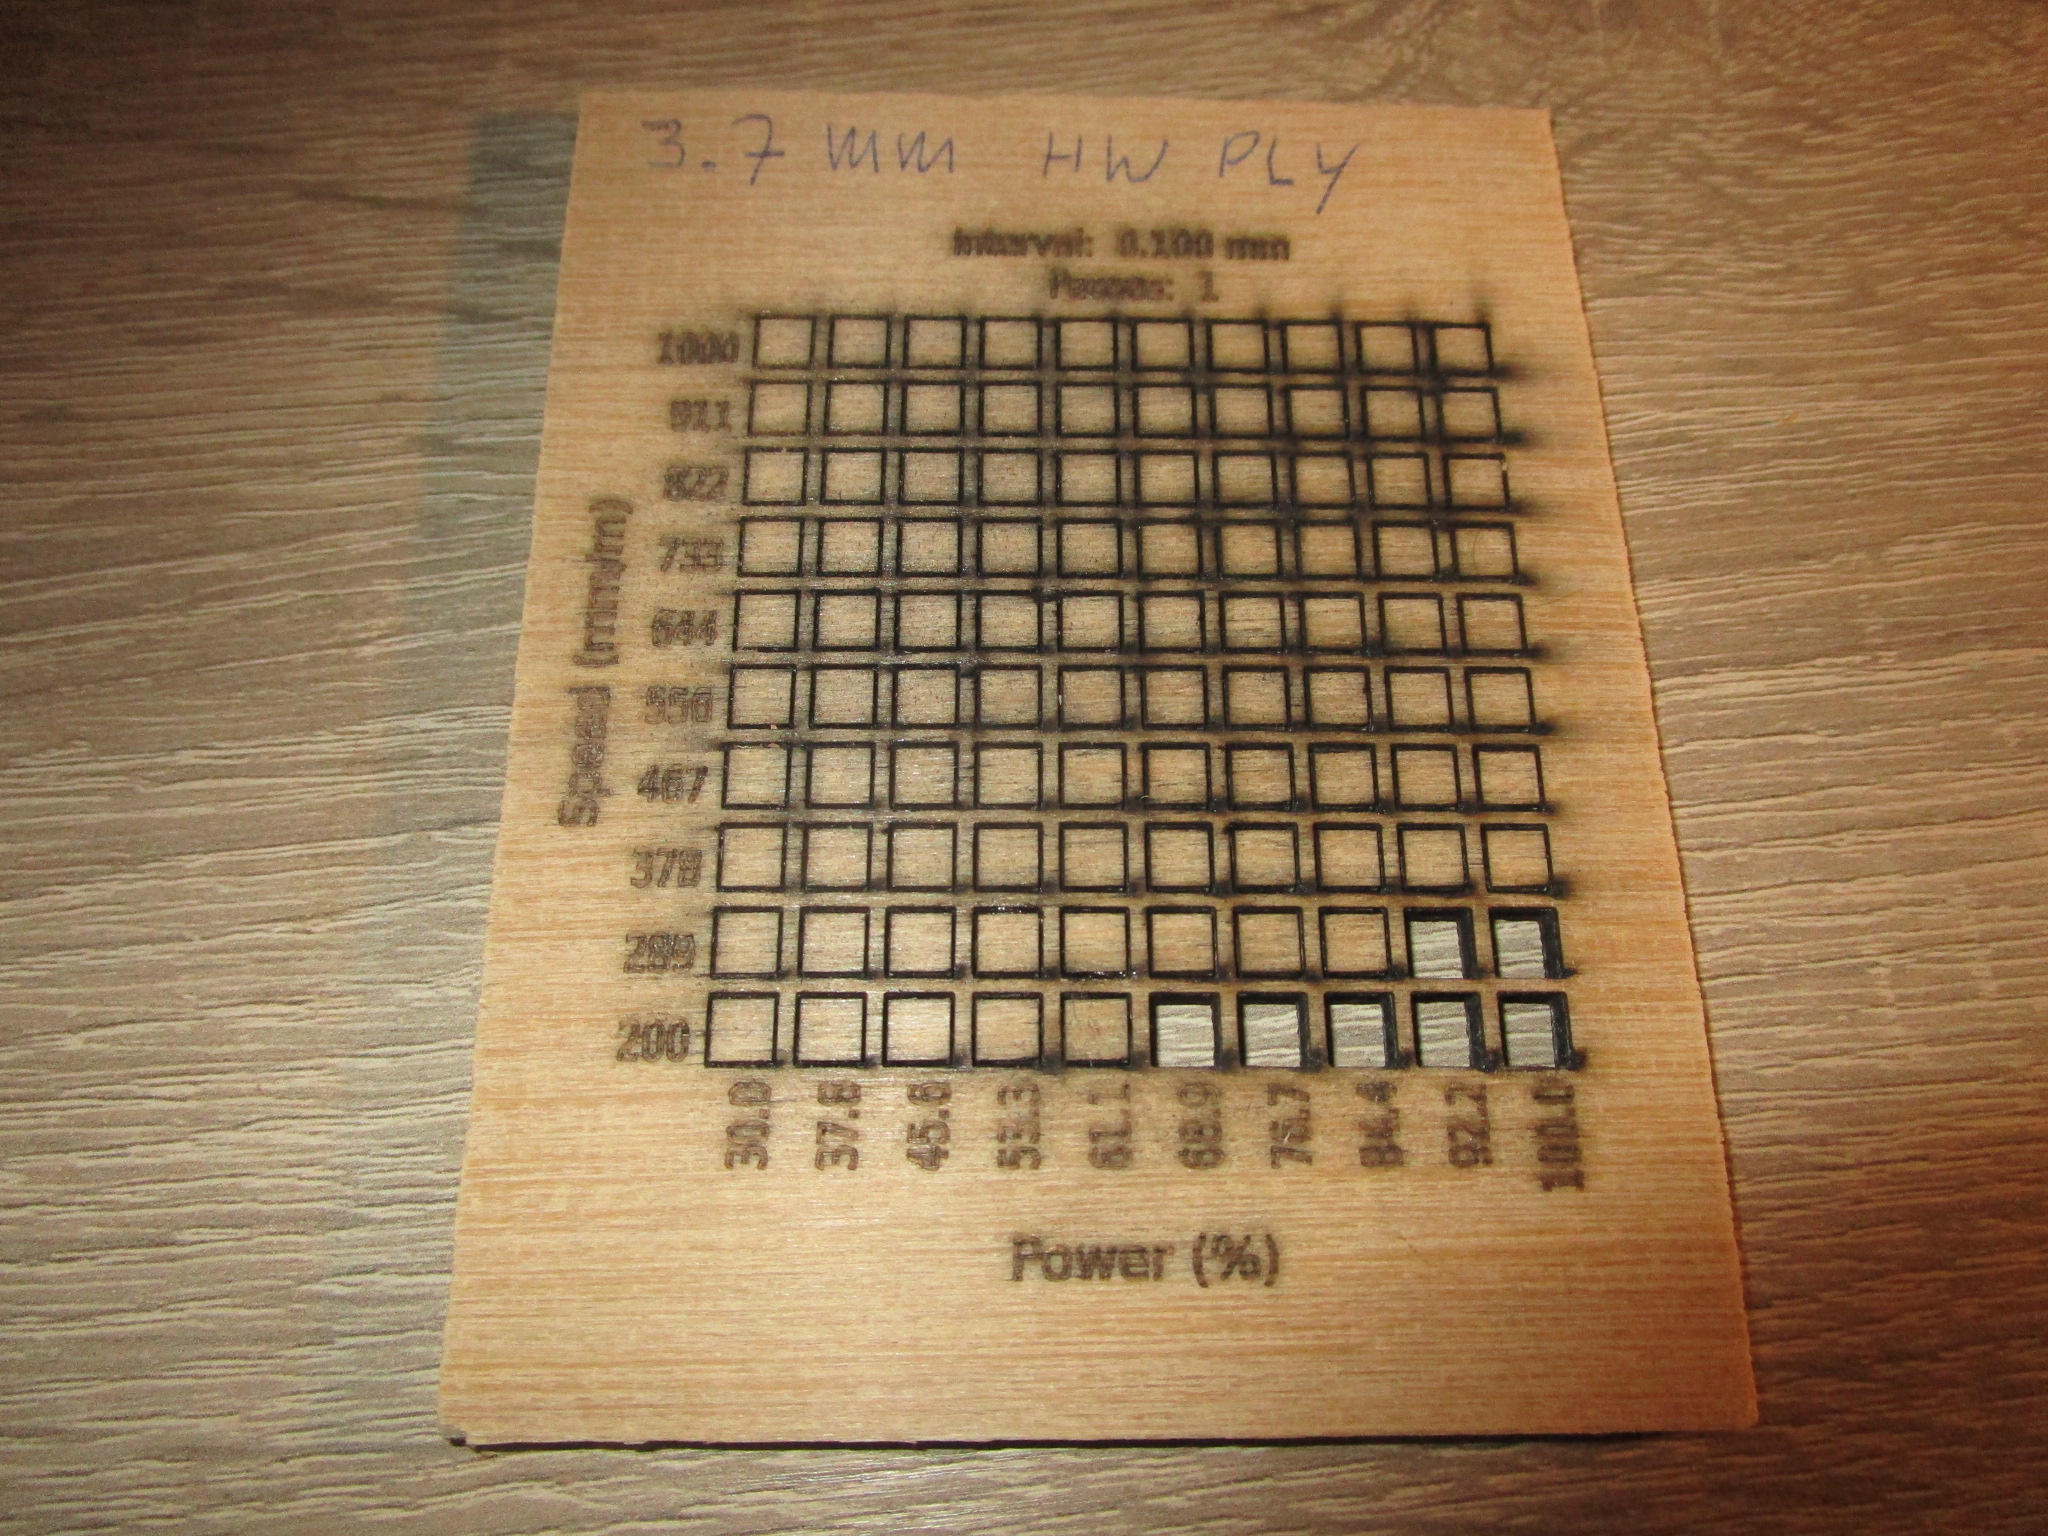
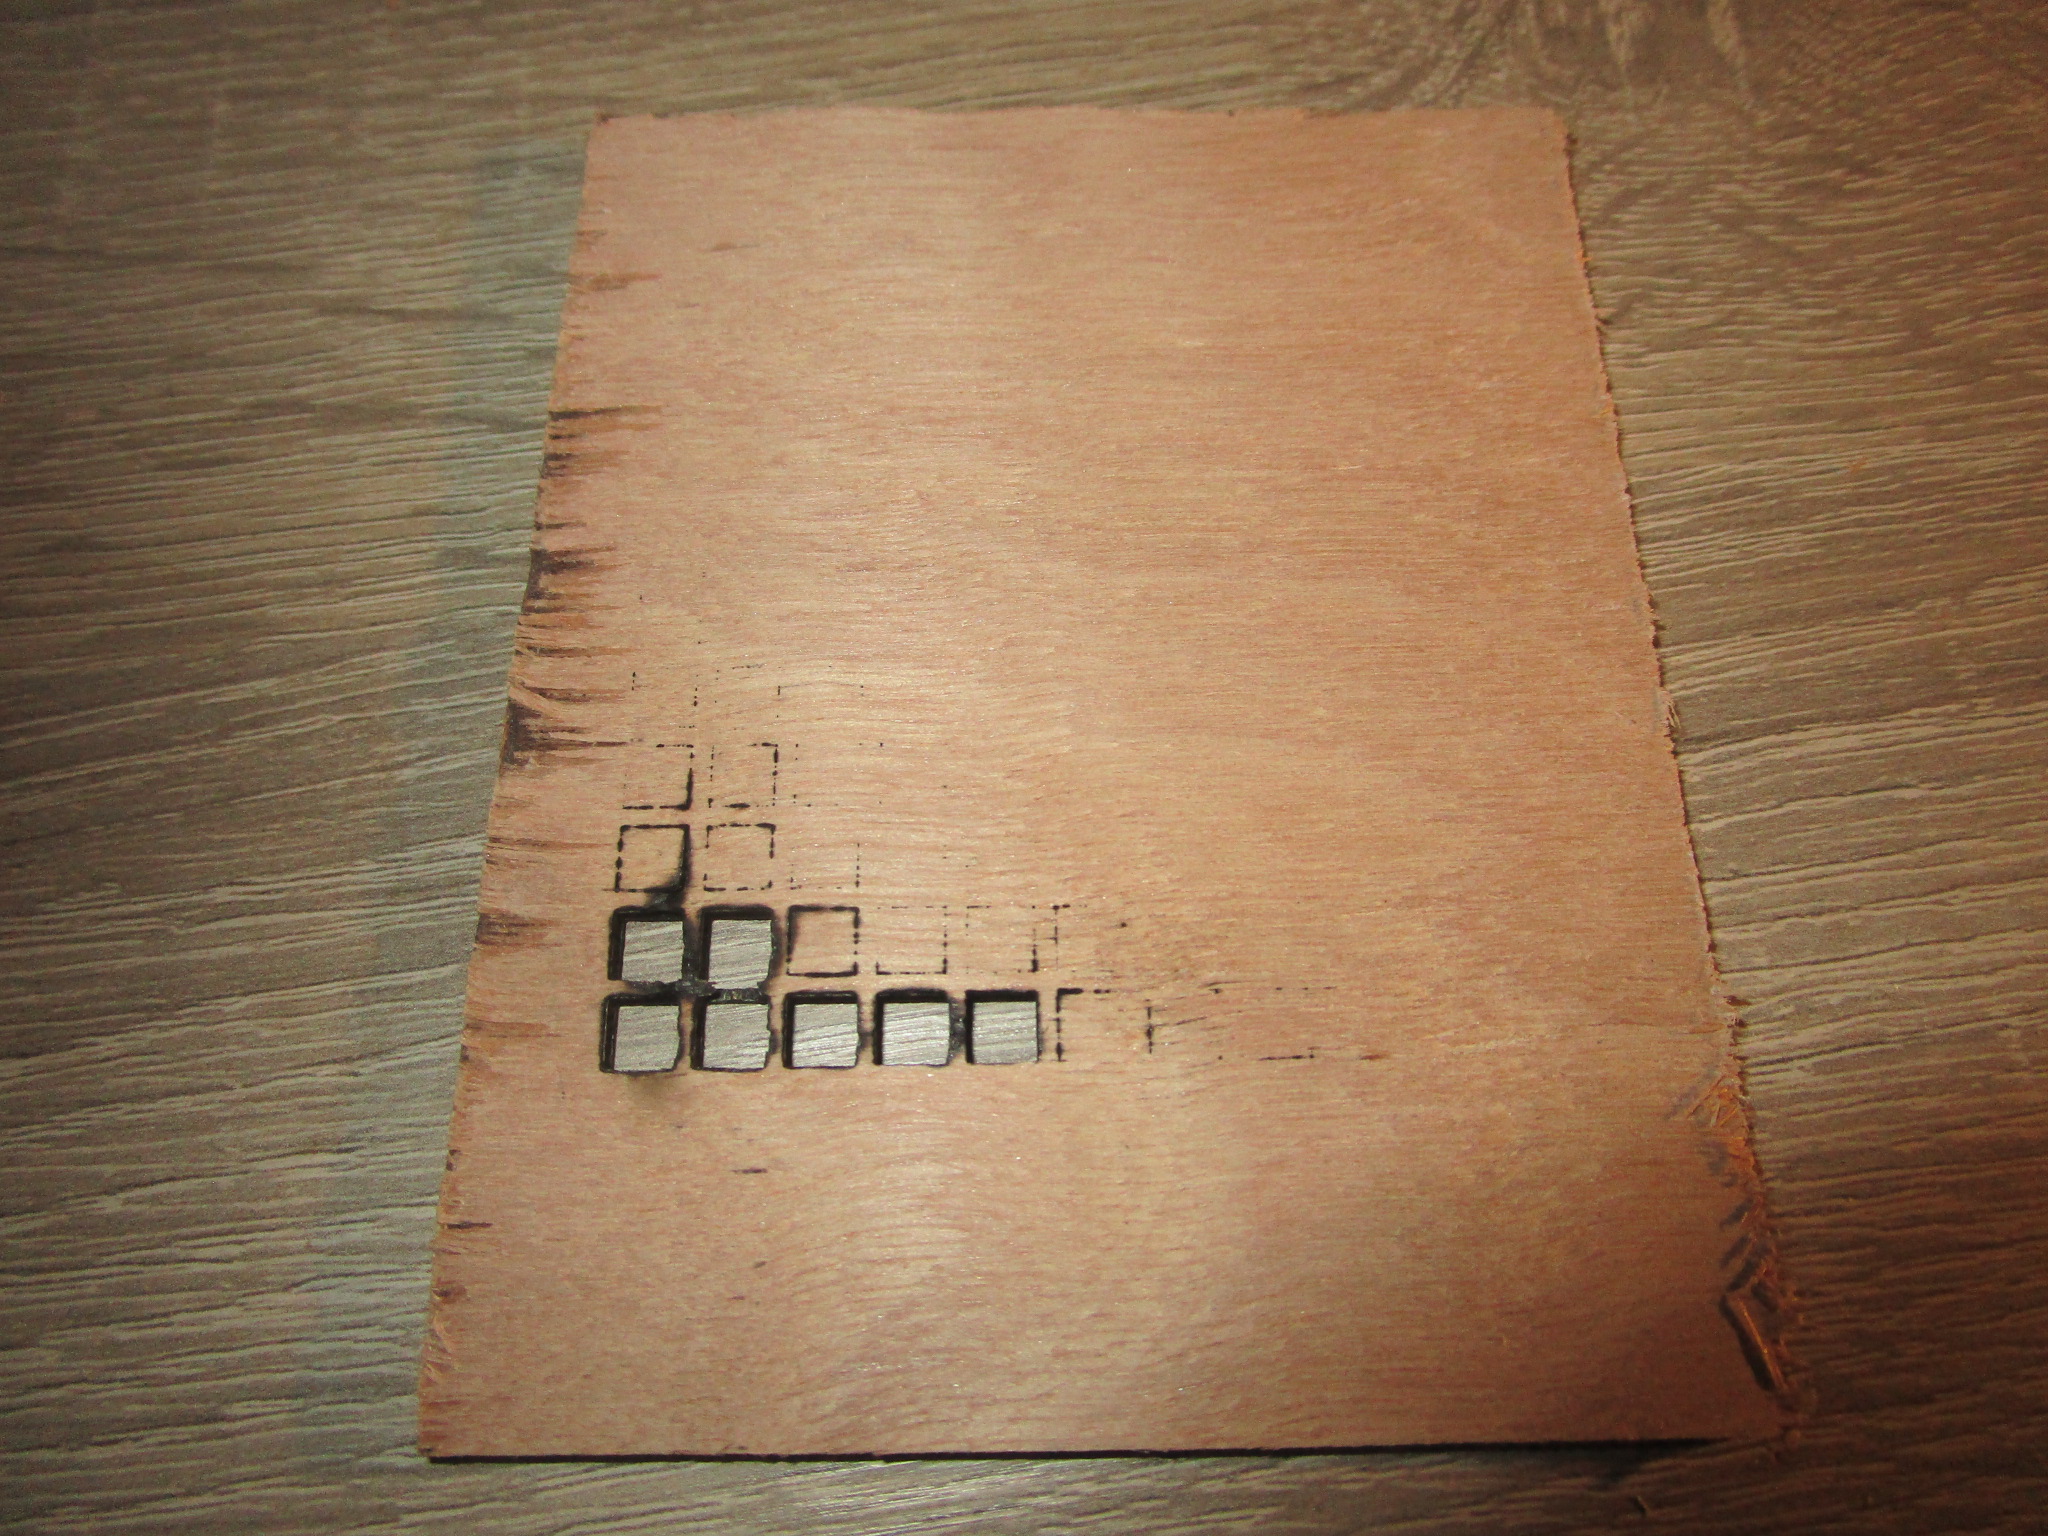
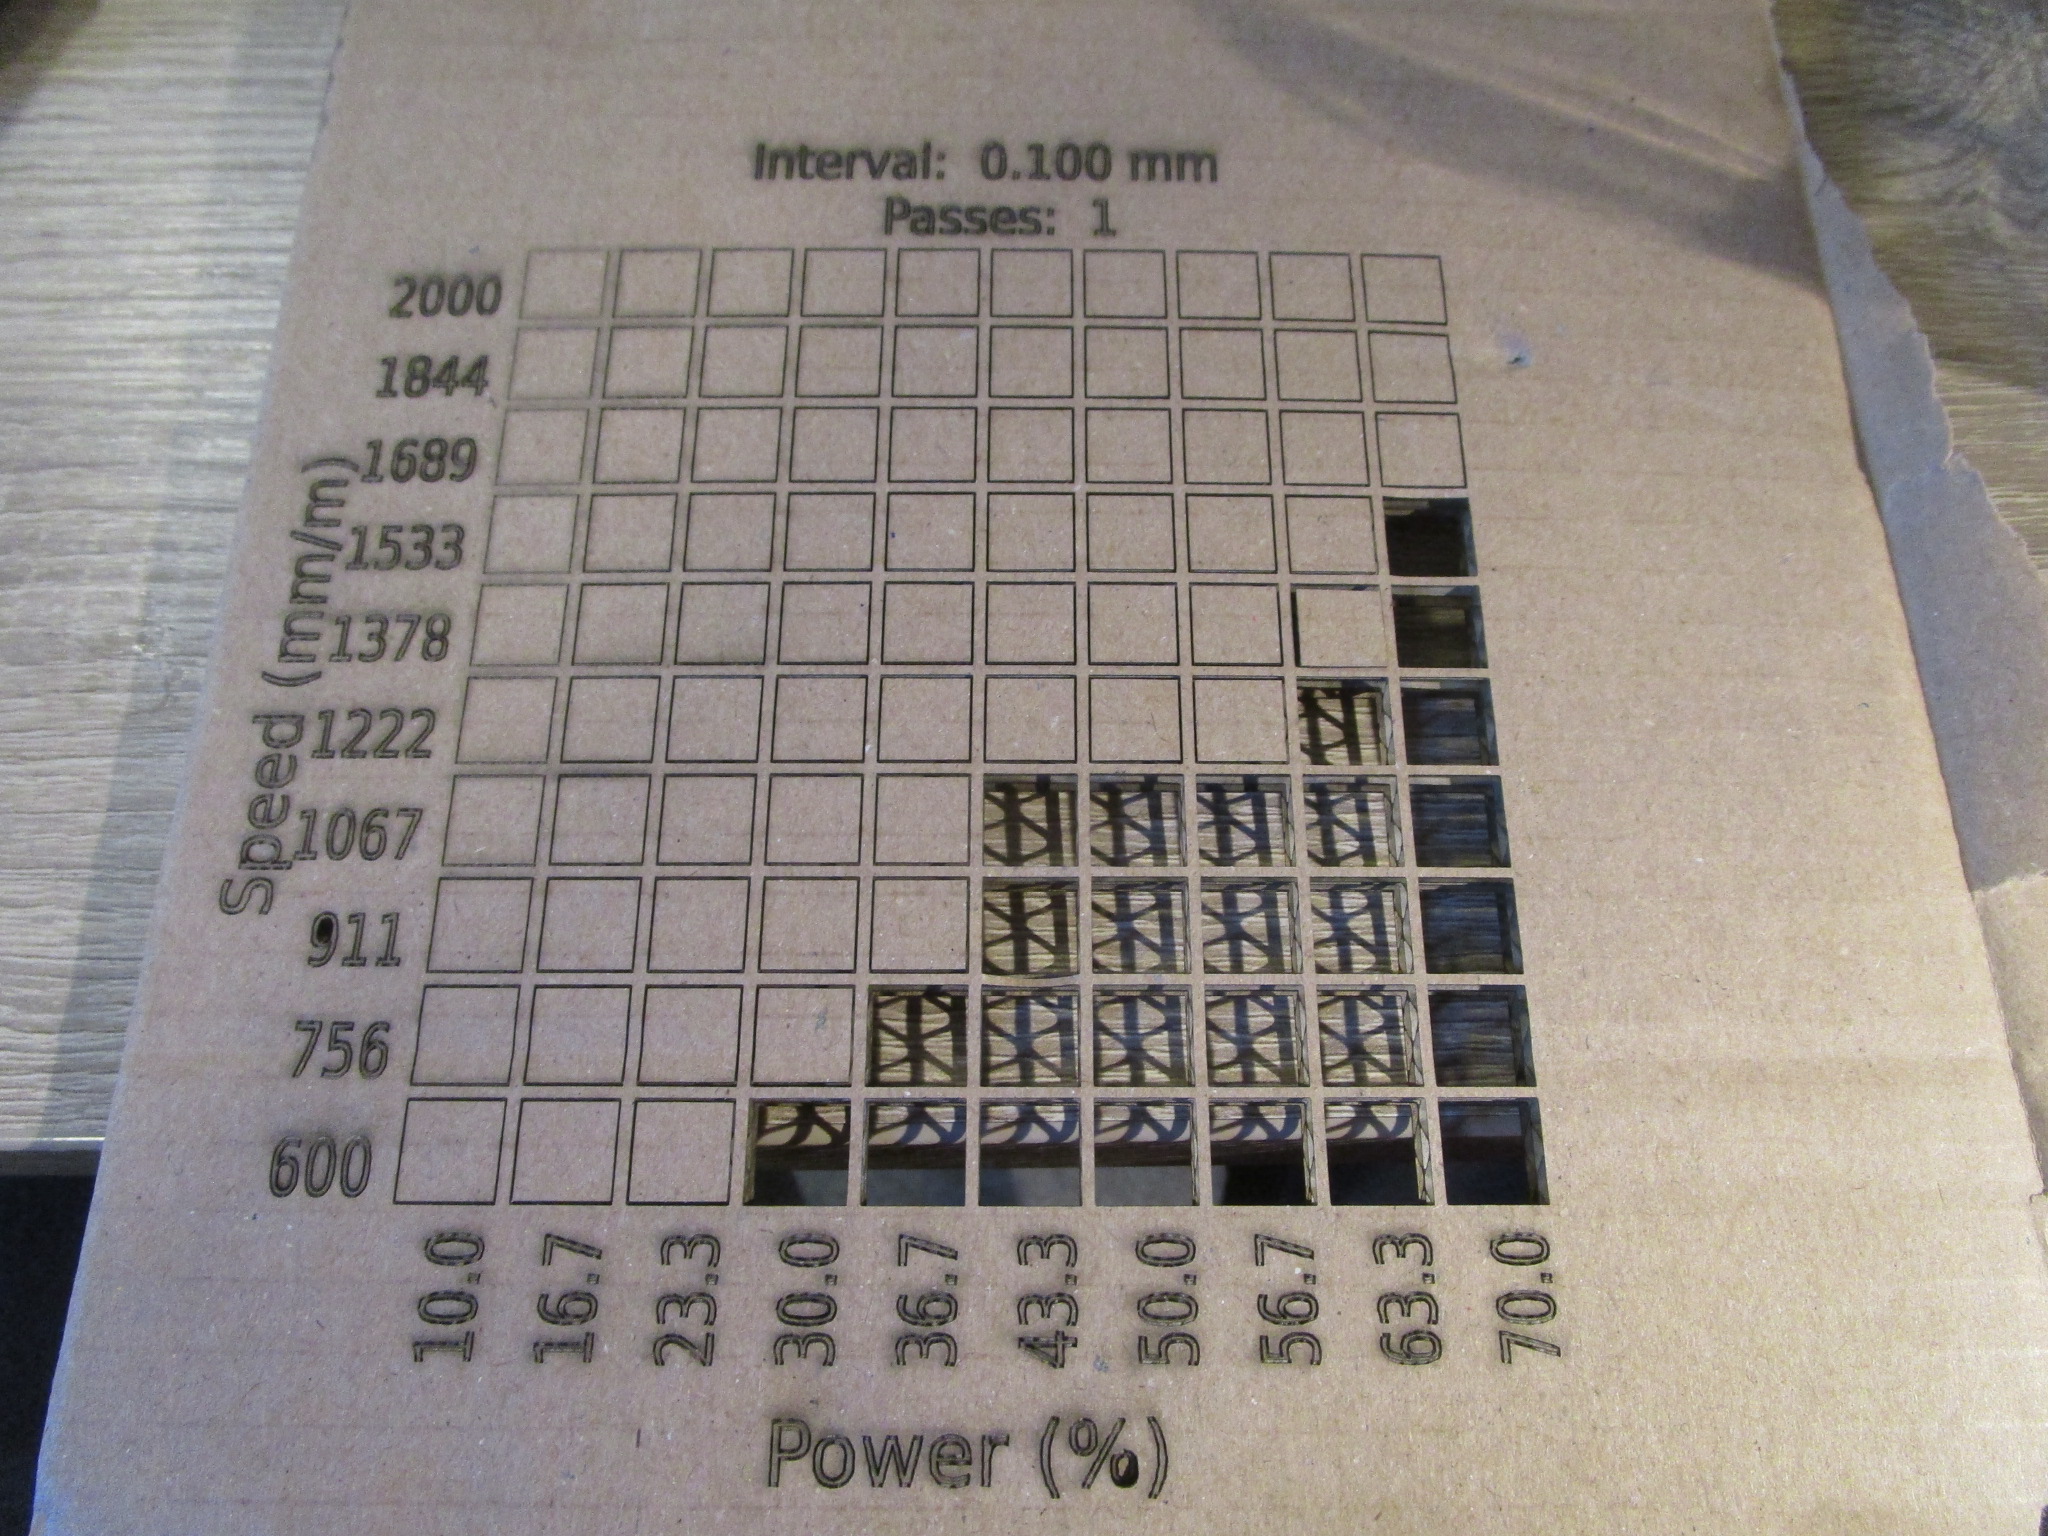
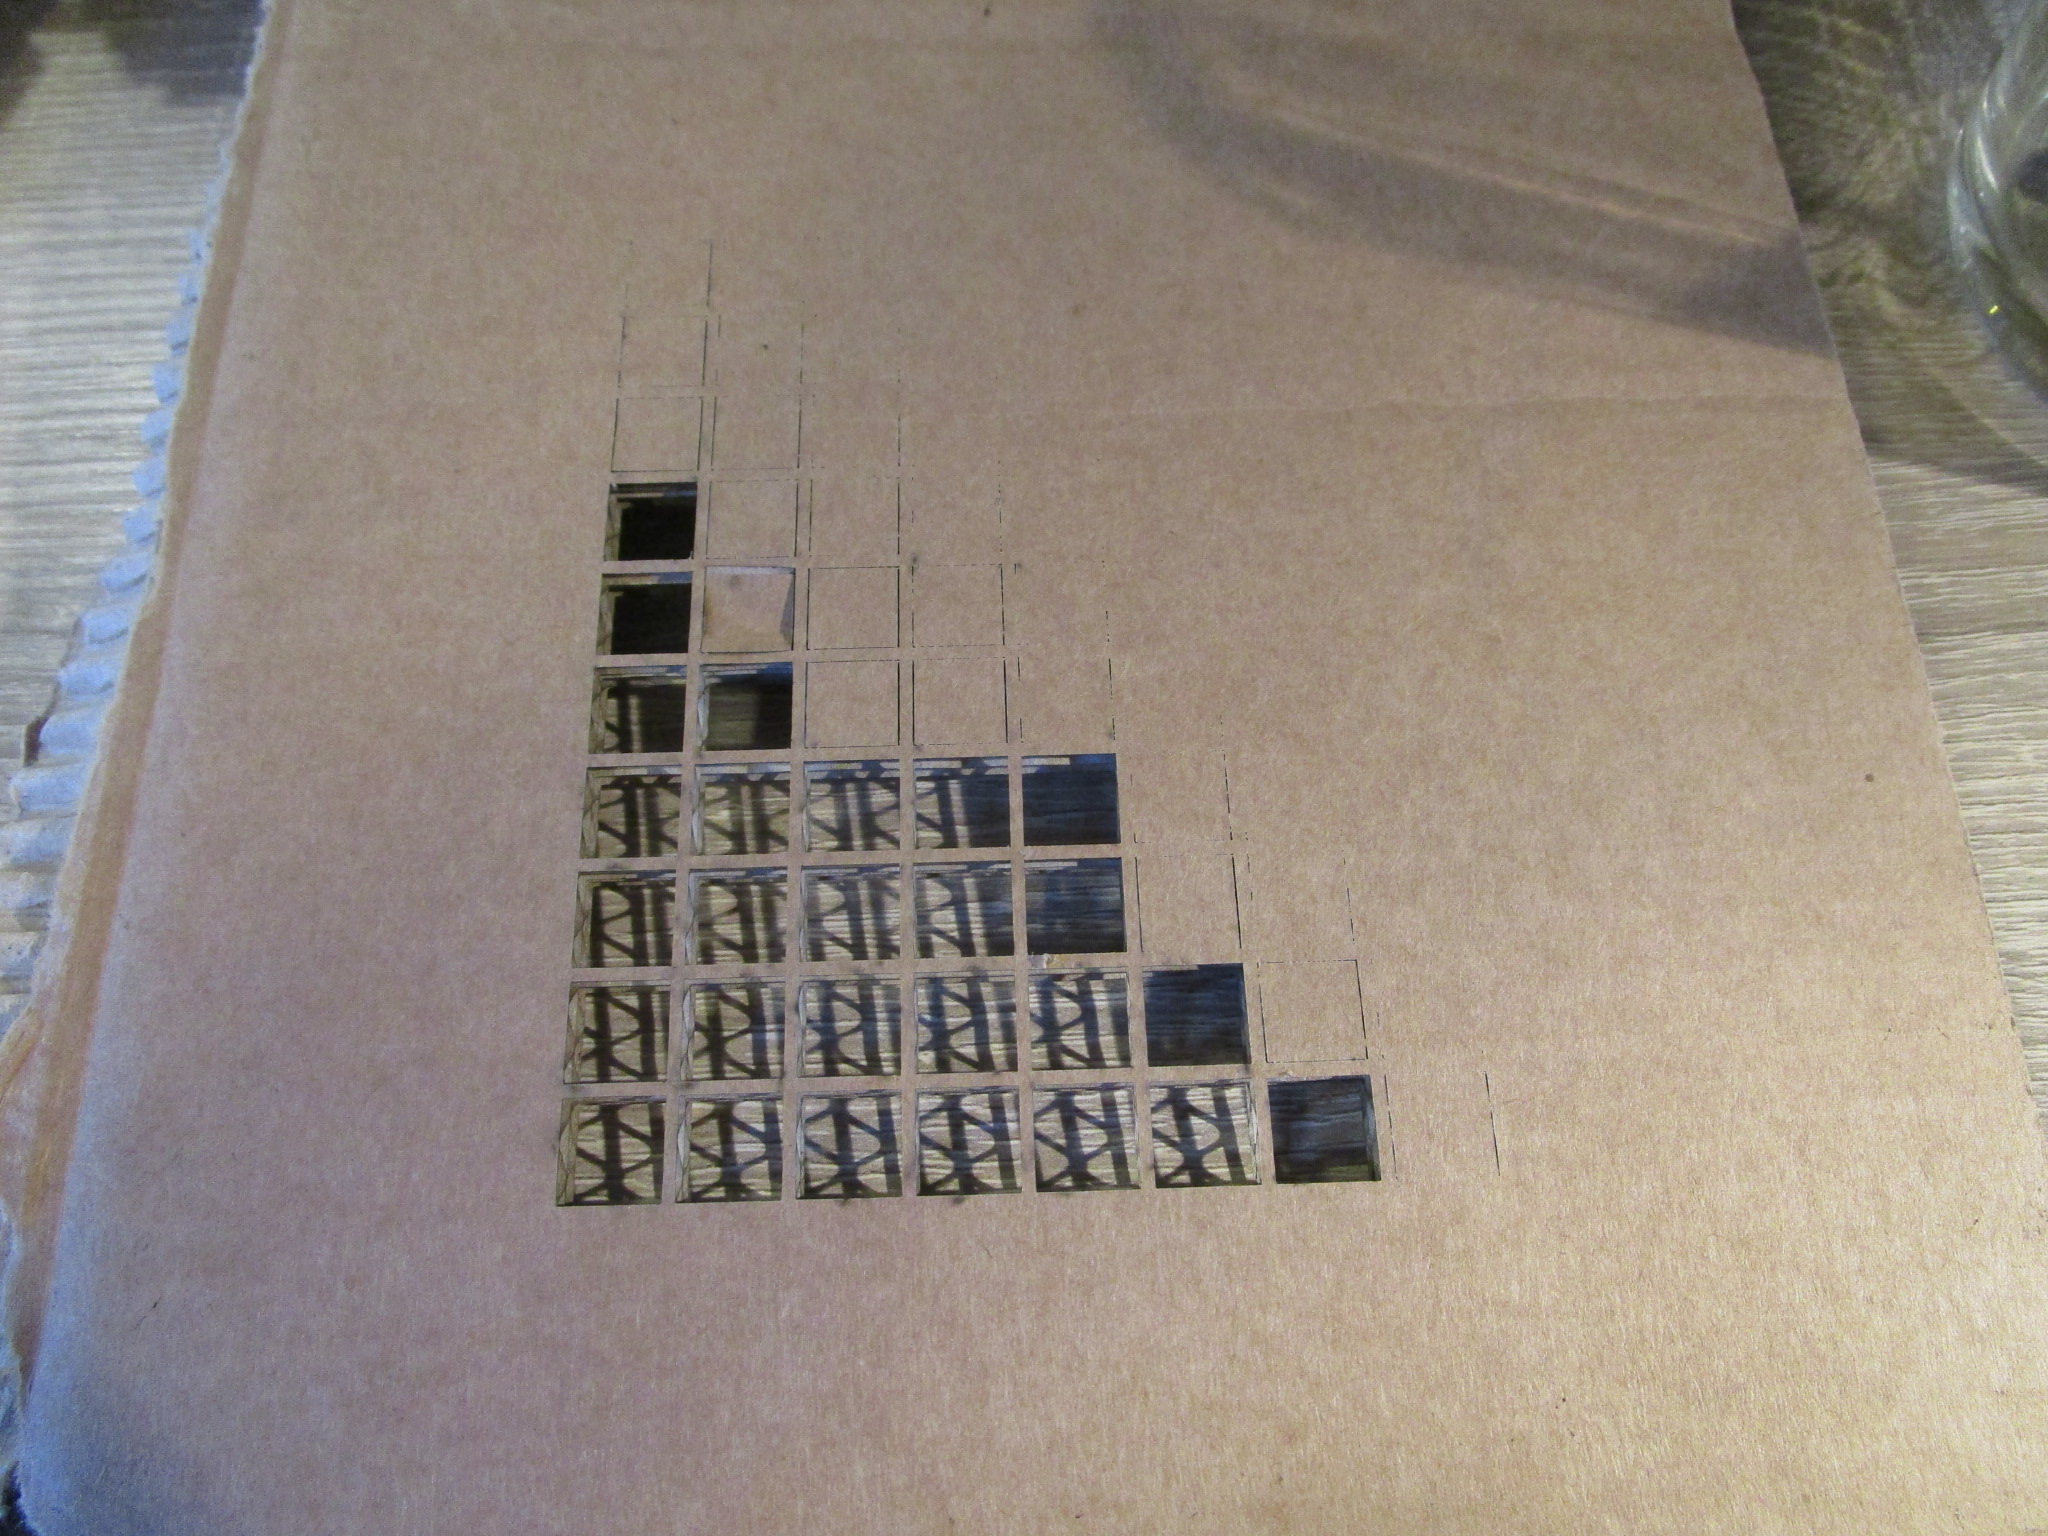
You can cut/engrave a wide variety of materials with results ranging from ‘excellent’ to ‘unusable’ depending on the power of your machine, the speed of the movement of the laser, the state of the optics (clean, undamaged) and the state of the material. I intended to create a catalogue of machines, materials, cutting speeds and power levels here to save everybody the trouble of having to re-run these for normal conditions. In case of troubleshooting or exceptional conditions you may still want to create a materials test. I use ‘LightBurn’, so those are the materials test coupons shown here but most laser driver software will support a similar feature.
I will add photographs of front and back of all materials tests to save you some work.
Note that not all materials are safe to cut with a laser (I’ve added details for those materials that I’m aware of) and not all materials can be cut with a laser. Some materials will give off toxic fumes. These can cause respiratory issues, eye issues, major injury or in an extreme case death. Do not cut materials that you are not 100% sure are safe to cut and don’t try anything new without first consulting the material safety data sheet and at a minimum your friendly local search engine to determine whether or not it is worth trying at all.
If you want me to try a particular material either send me a sample or send me a photograph of front and back of your own materials test (see below for what those look like).
Wood
Wood is an excellent choice for material to be cut. A moderately powered laser cutter will be able to cut through several millimeters of material with relative ease, usually the limiting factor is the cutting speed, a less powerful laser will go slower (and has a higher chance of scorching the material). Diode lasers will happily cut softwoods even at impressive thickness but struggle with hardwoods. Hardwoods are more dense than softwoods so the laser needs more power to do the same job and that power isn’t always available. Also, because more power (or lower speeds) are needed charring can get excessive (or even outright burning). Careful balance in power and speed and sometimes increased numbers of passes can get the job done and there are some tricks of the trade to do the seemingly impossible. Engineered wood is hit-and-miss, you’ll also have to deal with the fumes in a more responsible way because besides carbon from vaporizing wood you’ll also be vaporizing some glue and this can produce some pretty nasty stuff.
If you don’t like the dark edge that laser cutting gives the wood consider oversizing the sides of the work piece by 0.1 mm or so and sanding off the excess. It’s an extra step but the difference in looks may well be worth it. Cut wood can smell burnt for a long time. You can reduce this smell by sanding off the edge, by lacquering or painting the piece or by sandblasting it (lightly, wood abrades very quickly). Lacquer and paint don’t adhere very well to the burned edge because some of it is loose material, that’s also why these particles make it into the air. It is essentially the same as a very thin smoke because of the air movements liberating particles from the workpiece. That’s also why eventually the smell fades (but this can take a long time, up to months).
If you’re going to cut plywood, be aware that not all plywood is created equal and that some is put together with glues that give off bad vapors, if there is a thin black line between the plys that means you probably have plywood with ‘phenolic resin’. It may also result in being harder to cut.
Based on quite a large number of material tests here are the results (nominally 30W cutter, clean optics, air assist on):
- Birch plywood
- 2.6 mm, 60% power, 700 mm/minute, single pass (for more speed: 100% power, 1000 mm/minute, less laser life though)
- 4.1 mm/5.5 mm, 60% power, 450 mm/minute, single pass (for more speed: 100% power, 800 mm/minute)
- 7.8 mm, 60% power, 200 mm/minute, single pass (for more speed: 100% power, 400 mm/minute)
- 11.8 mm, 60% power, 150 mm/minute, single pass (for more speed: 100% power, 250 mm/minute)
- 18 mm, 80% power, 300 mm/minute, three passes
- MDF
- 3.2 mm coated, 80% power, 500 mm/minute, single pass (more power doesn’t seem to help)
- 9 mm, 80% power, 200 mm/minute, single pass (more power doesn’t seem to help)
- Hardwood ply
- 3.7 mm, 70% power, 200 mm/minute, single pass (not a very clean cut)
- 3.7 mm, 50% power, 600 mm/minute, 4 passes (cleaner cut, but a bit more charring at the top, should use masking tape)
- Thicker hardwood ply: terrible results, unusable.
- hardboard
- 3.4 mm, 60% power, 450 mm/minute, single pass (for more speed: 100% power, 750 mm/minute)
- hardwood veneer
- solid hardwood
- Solid harder woods more than a few millimeters thick are difficult to cut using a laser. I’ve tried a few test pieces but nothing usable came out so far. It’s entirely possible that I need to change my approach to this and that the problem lies with me but I suspect that the density of the material is such that the laser simply doesn’t have enough power once you go out of the immediate focus of the beam and so you end up with very little depth of penetration. I intend to set up some tests to determine what exactly the limits are and whether or not something can be done about it.
The following are materials test coupons made using a nominally 30W ‘Sculpfun’ S30 Ultra, it’s sold as an open frame machine with just about zero safety features for $1000 or less. Technically it probably shouldn’t be on the market at all, it is that unsafe but I’m happy that it is and with some work you can make it both safe to use and more effective than what you get out of the box. If you want to inspect a particular coupon more closely just click on the image to open it in a new tab.
| Material | Front | Back |
| 2.6 mm birch |
 |
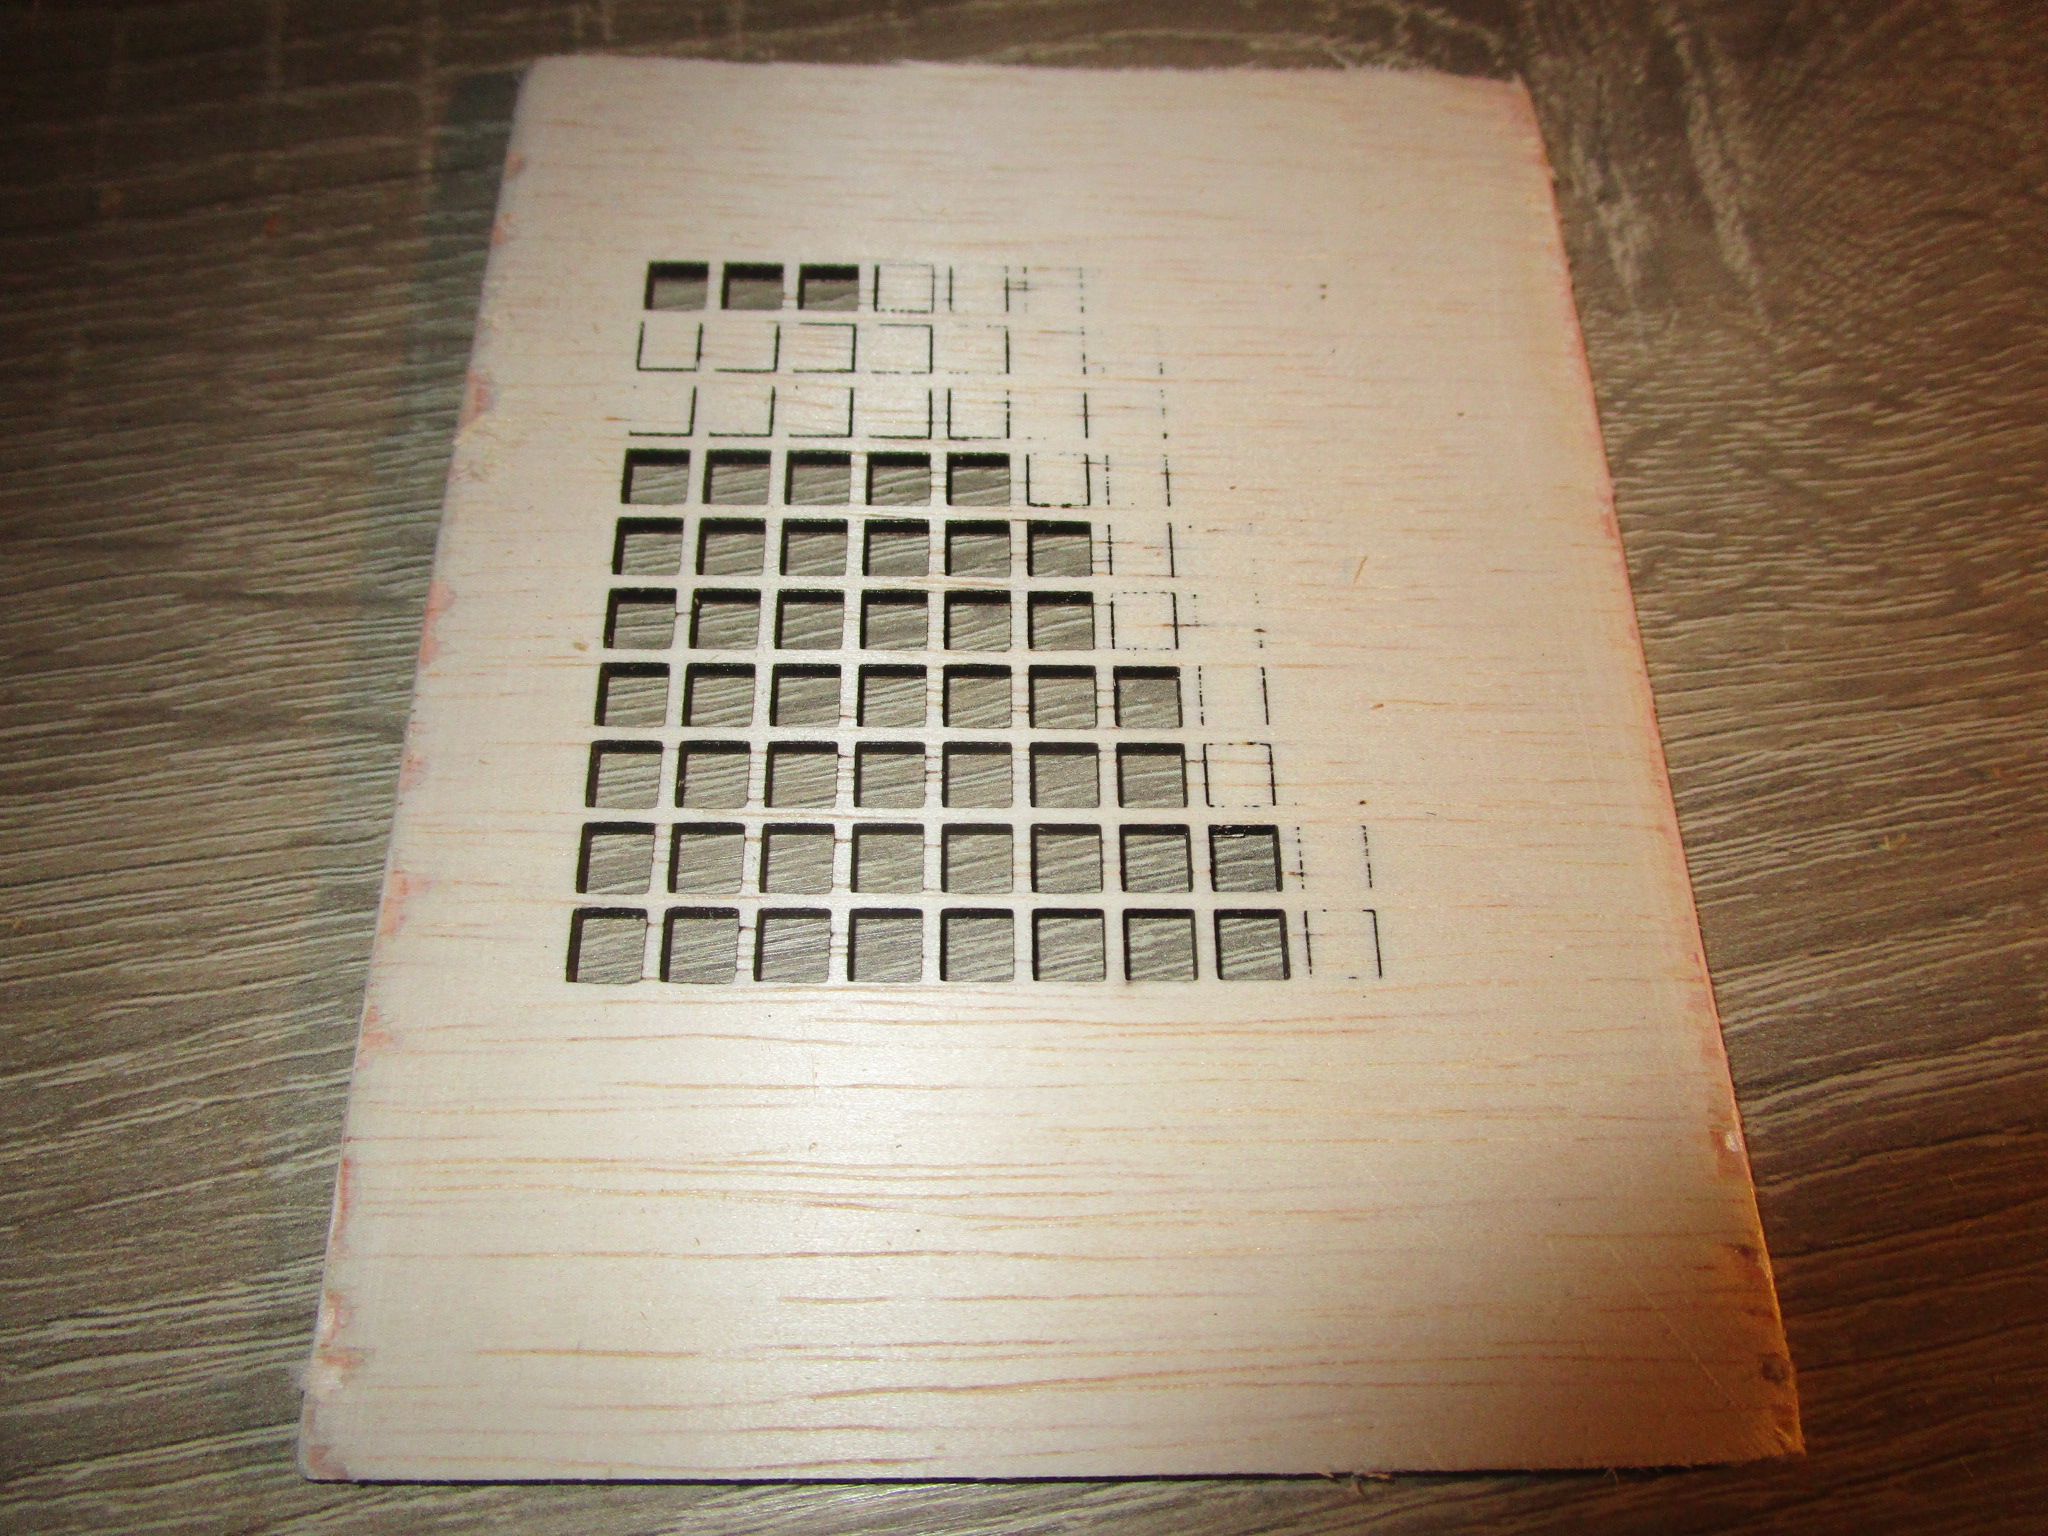 |
4.1 mm birch
Oops... |
 |
 |
| If you look closely you'll see that I forgot to reduce the power for the engraving so the letters have been burned clear through the material! |
| 5.5 mm birch |
 |
 |
| 7.8 mm birch |
 |
 |
| 12 mm birch |
 |
 |
18 mm birch
Some charring at the back, but usable |
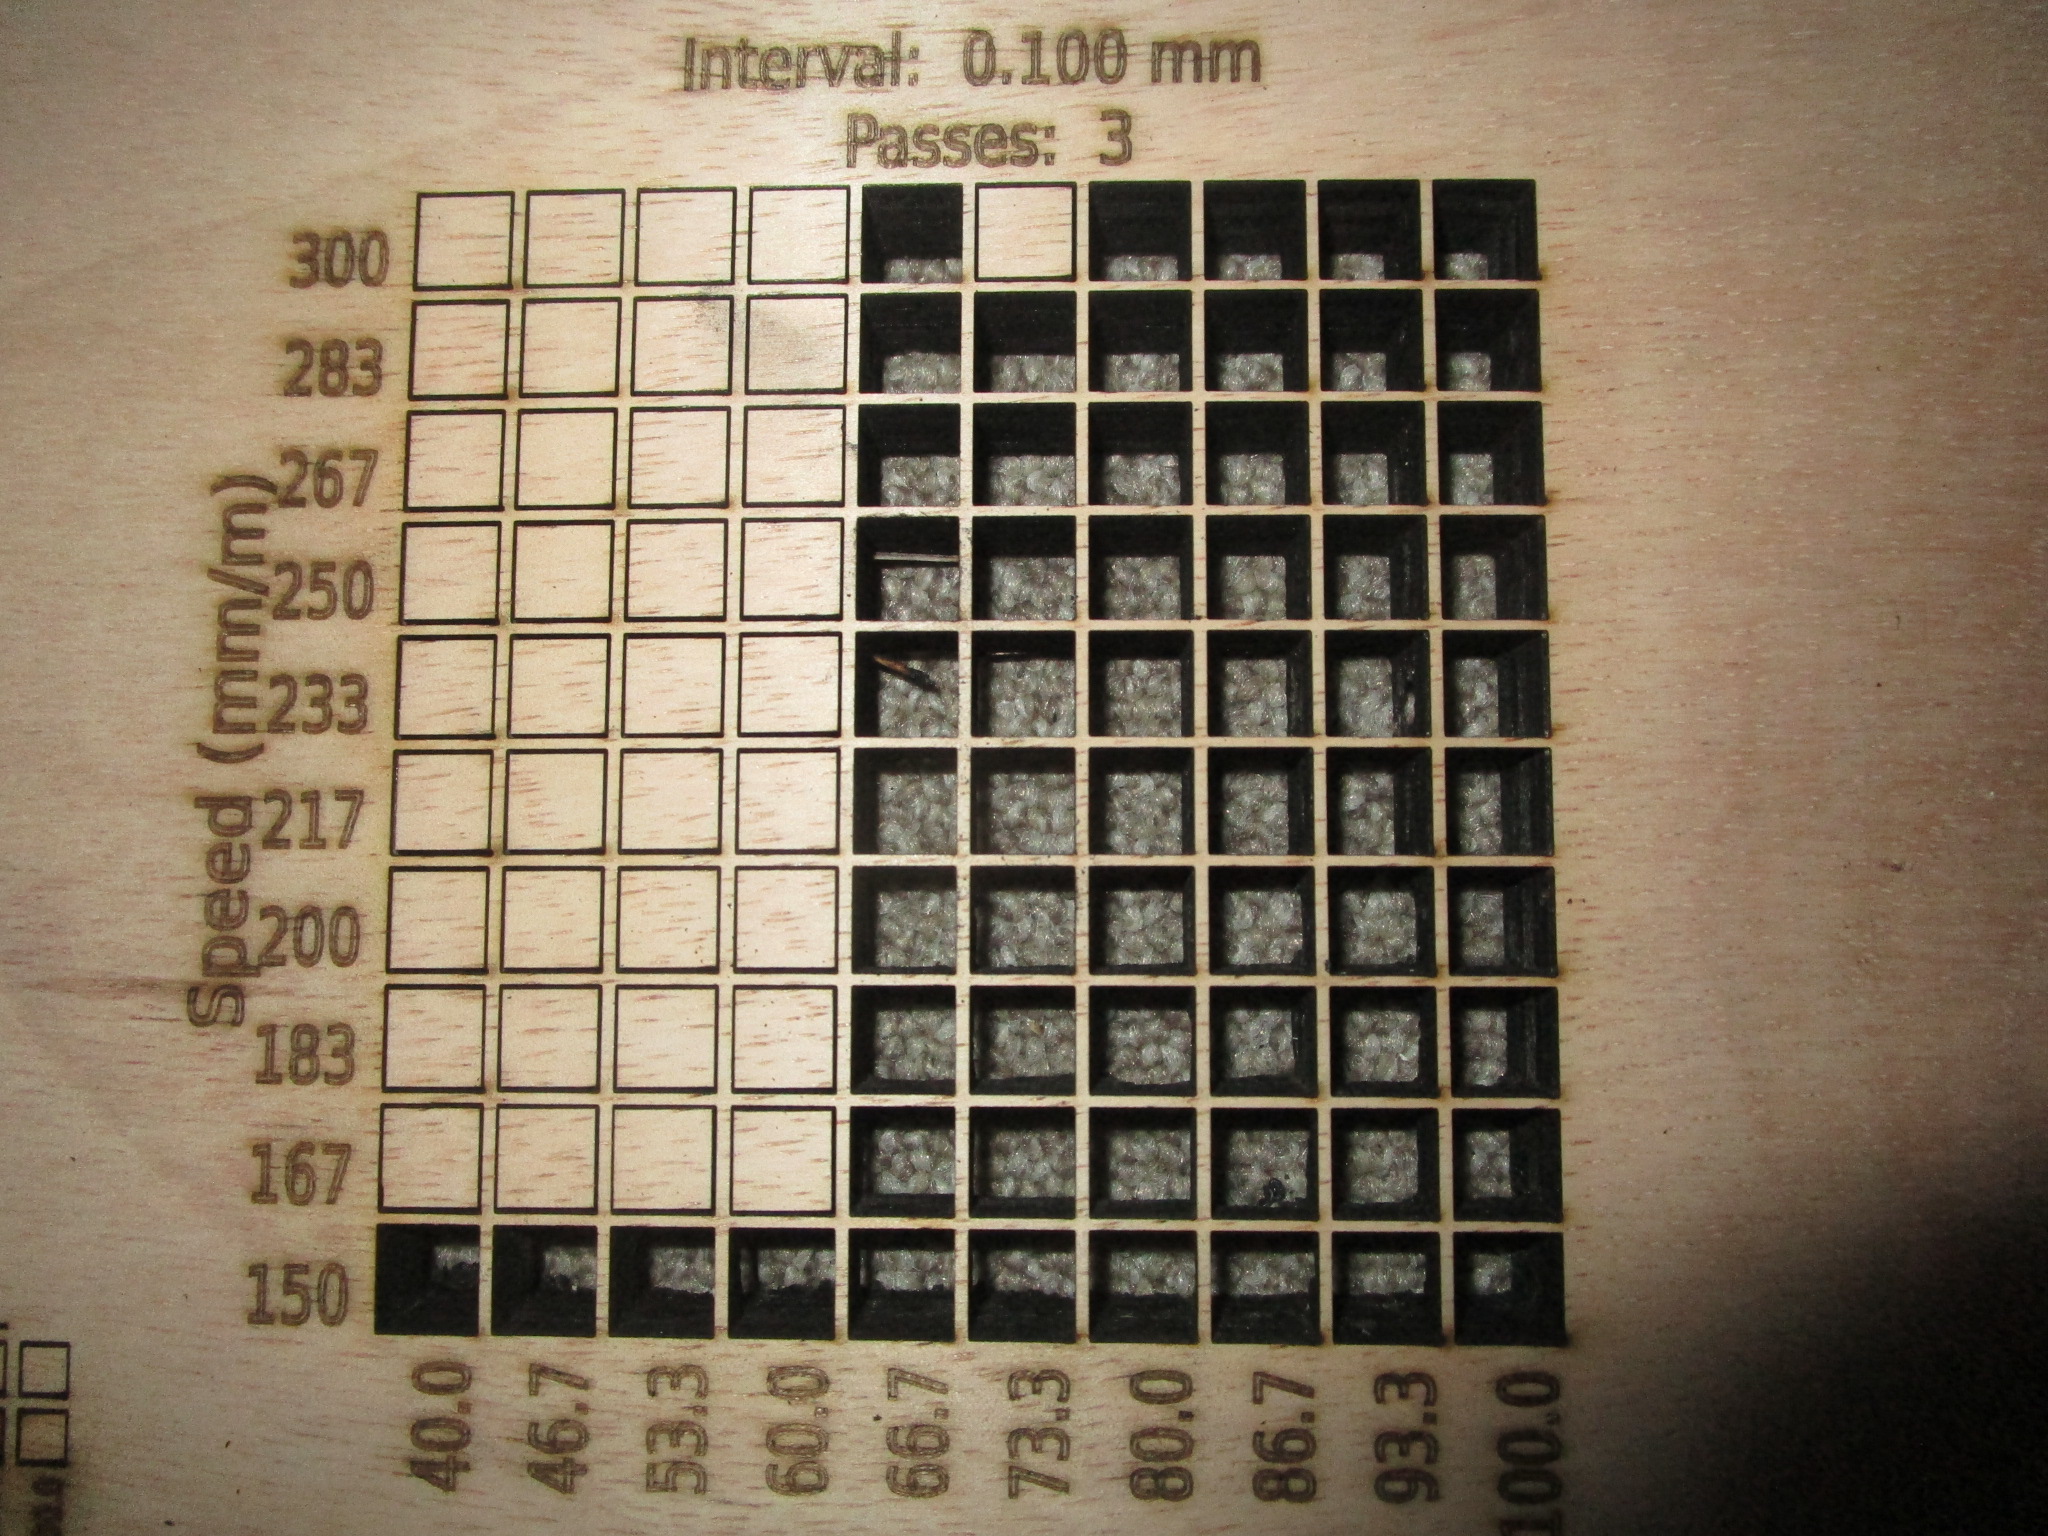 |
 |
| 3.2 mm coated MDF |
 |
 |
| 9 mm MDF |
 |
 |
| 3.7 mm hardwood ply |
|
|
| 3.7 mm hardwood ply, 4 passes |
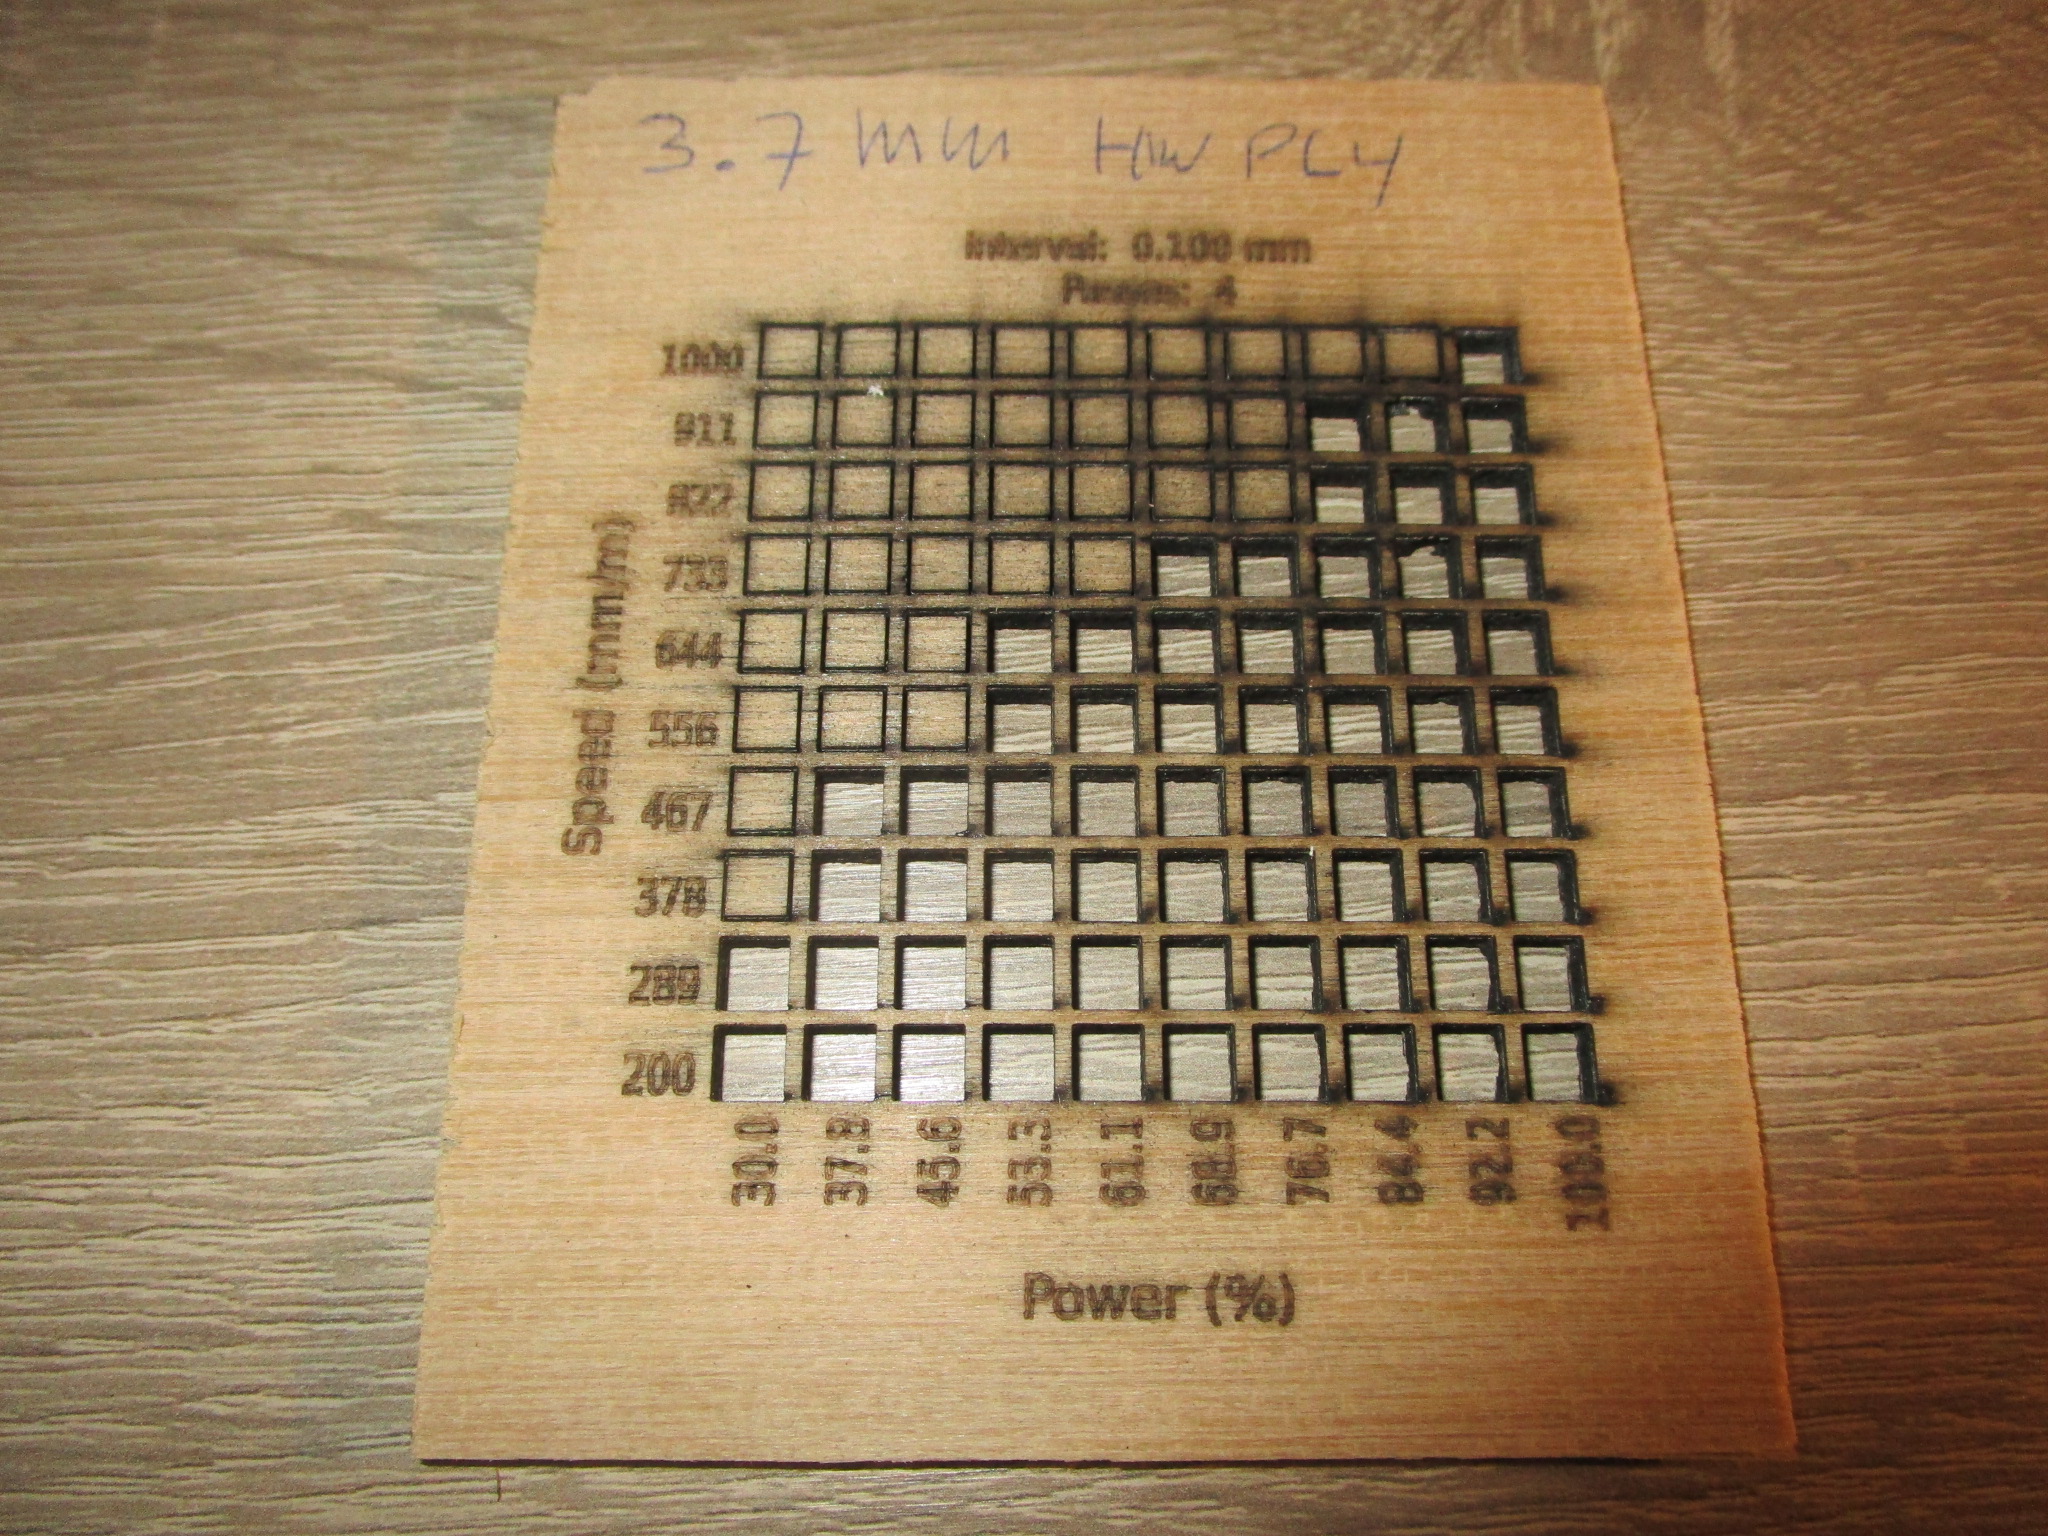 |
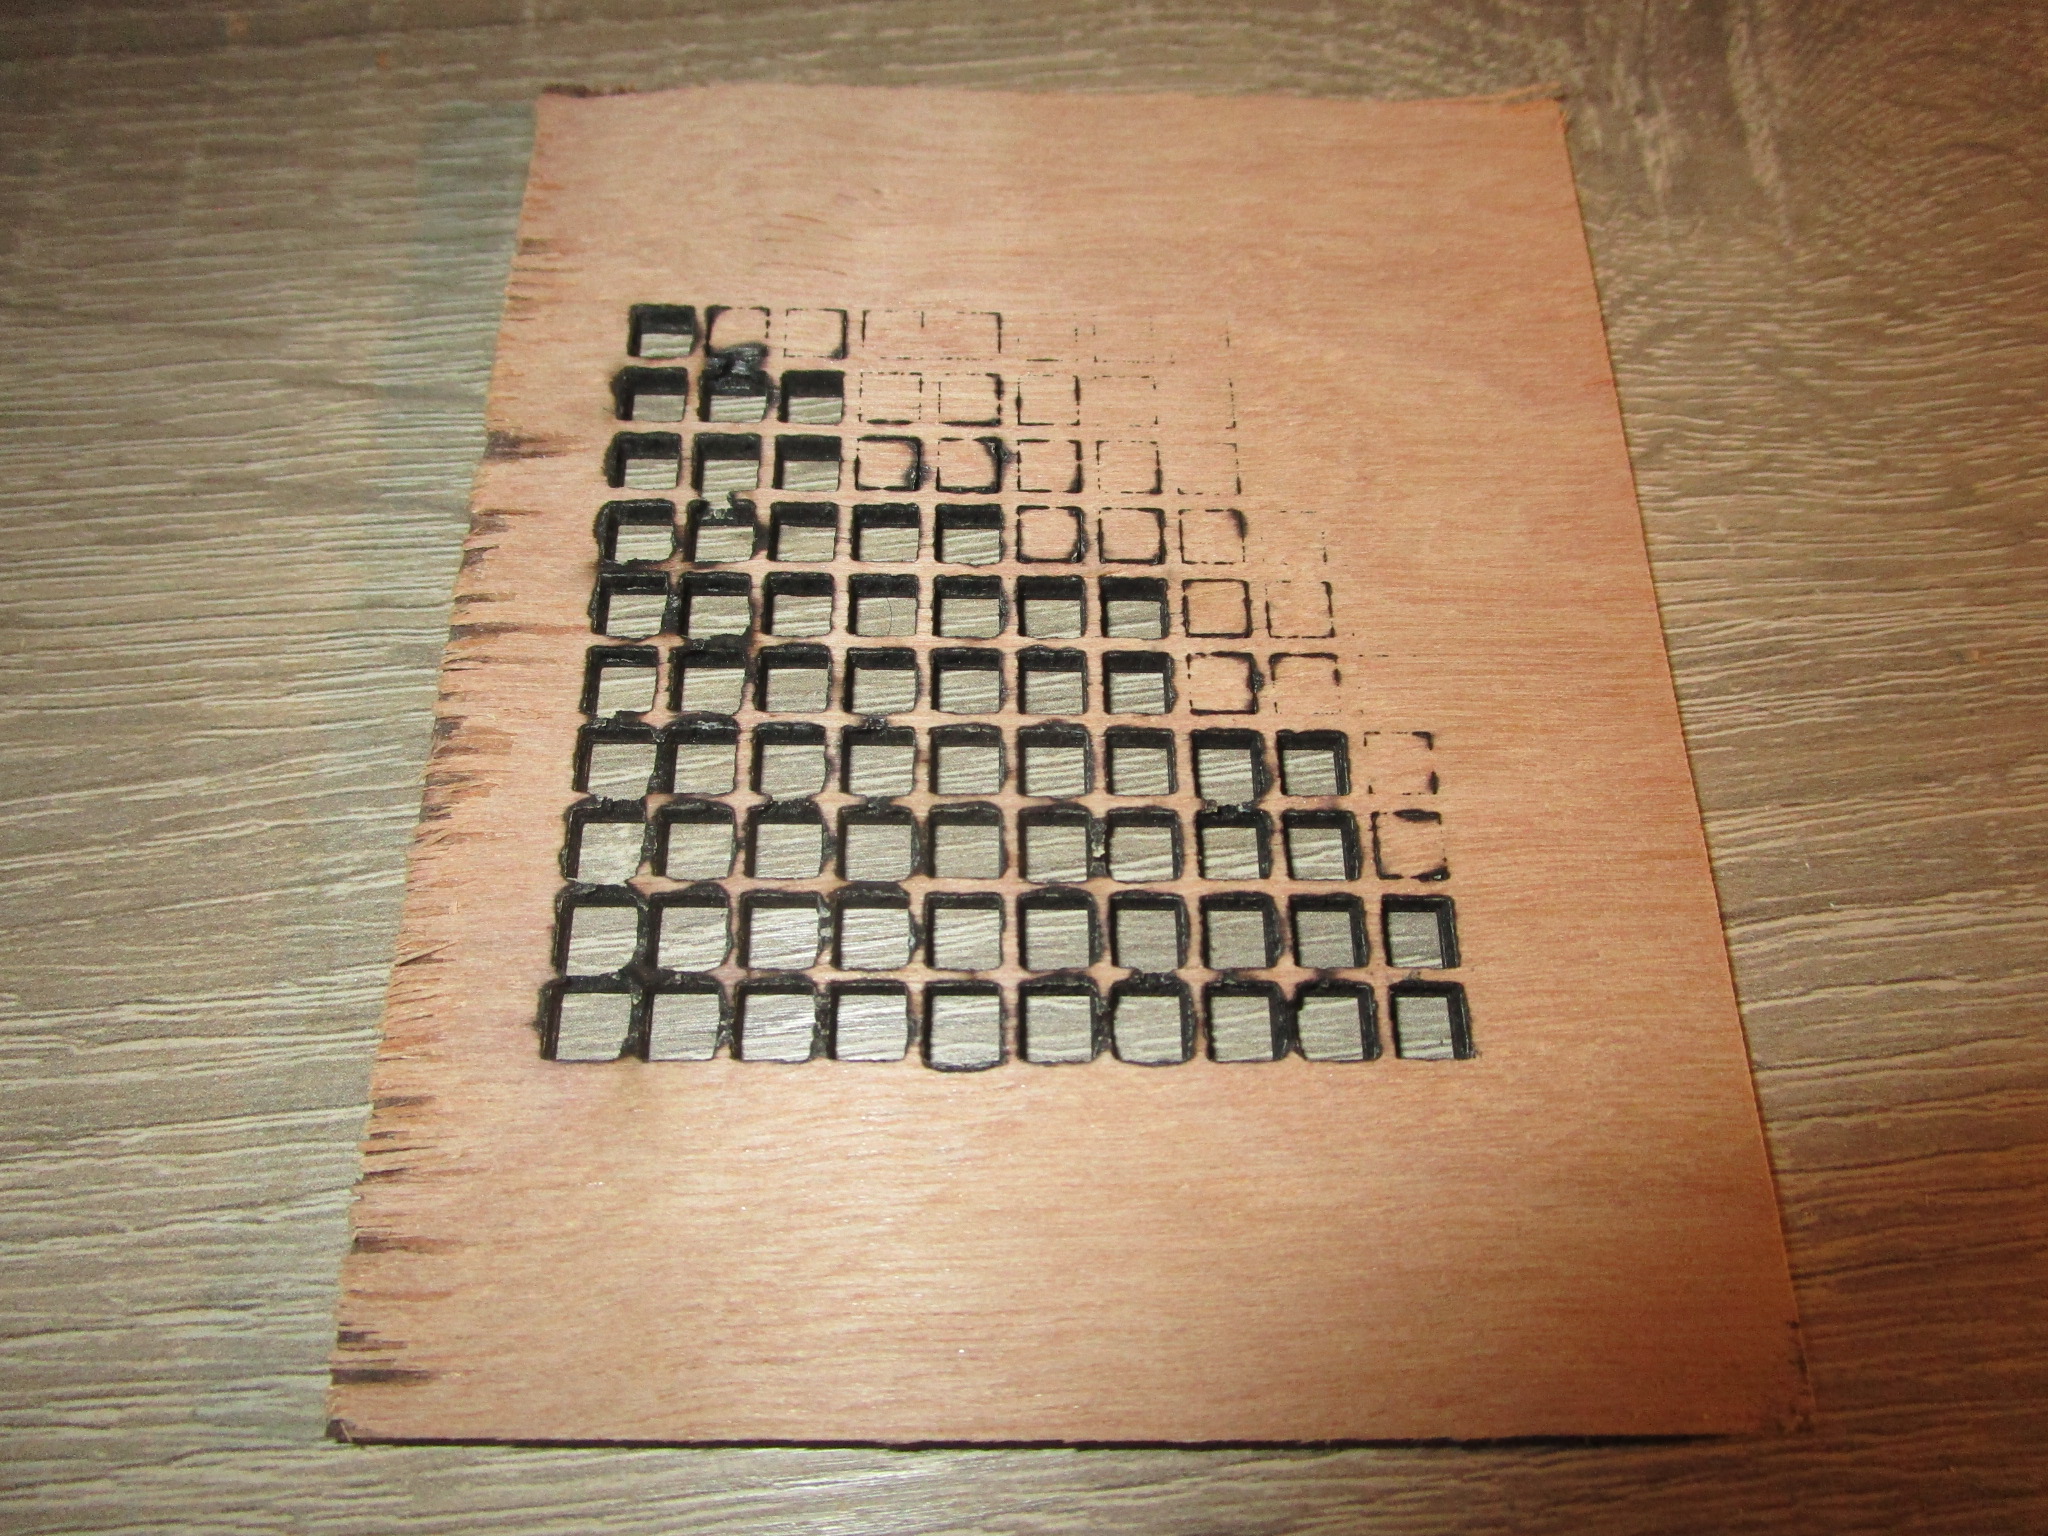 |
| 3.4 mm hardboard |
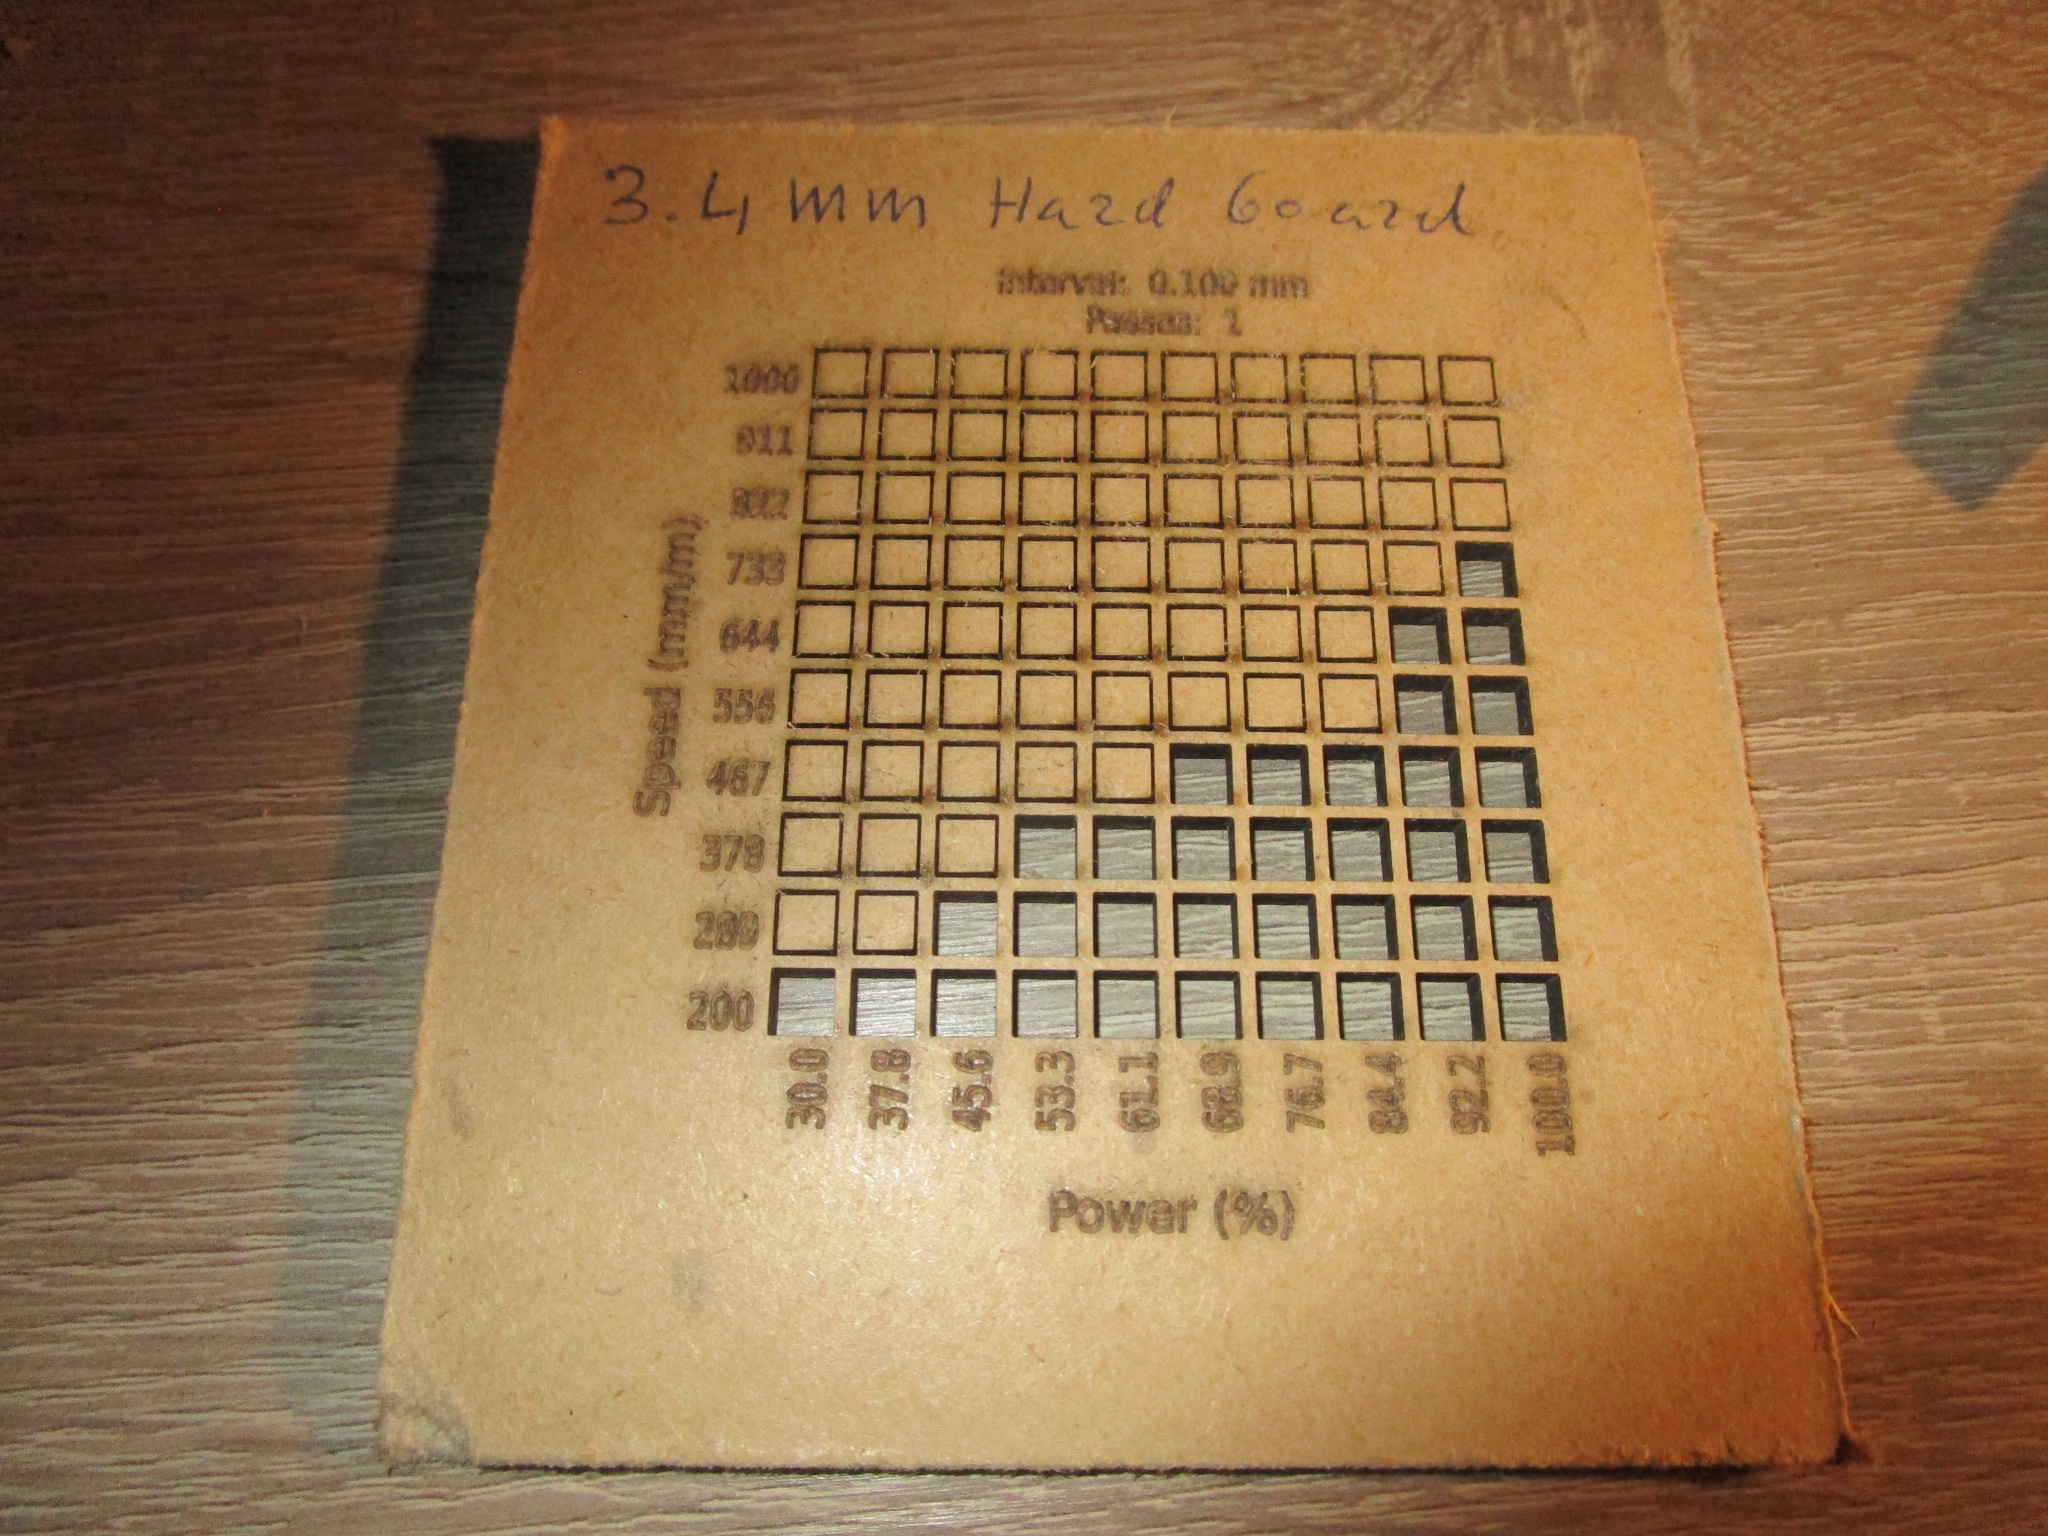 |
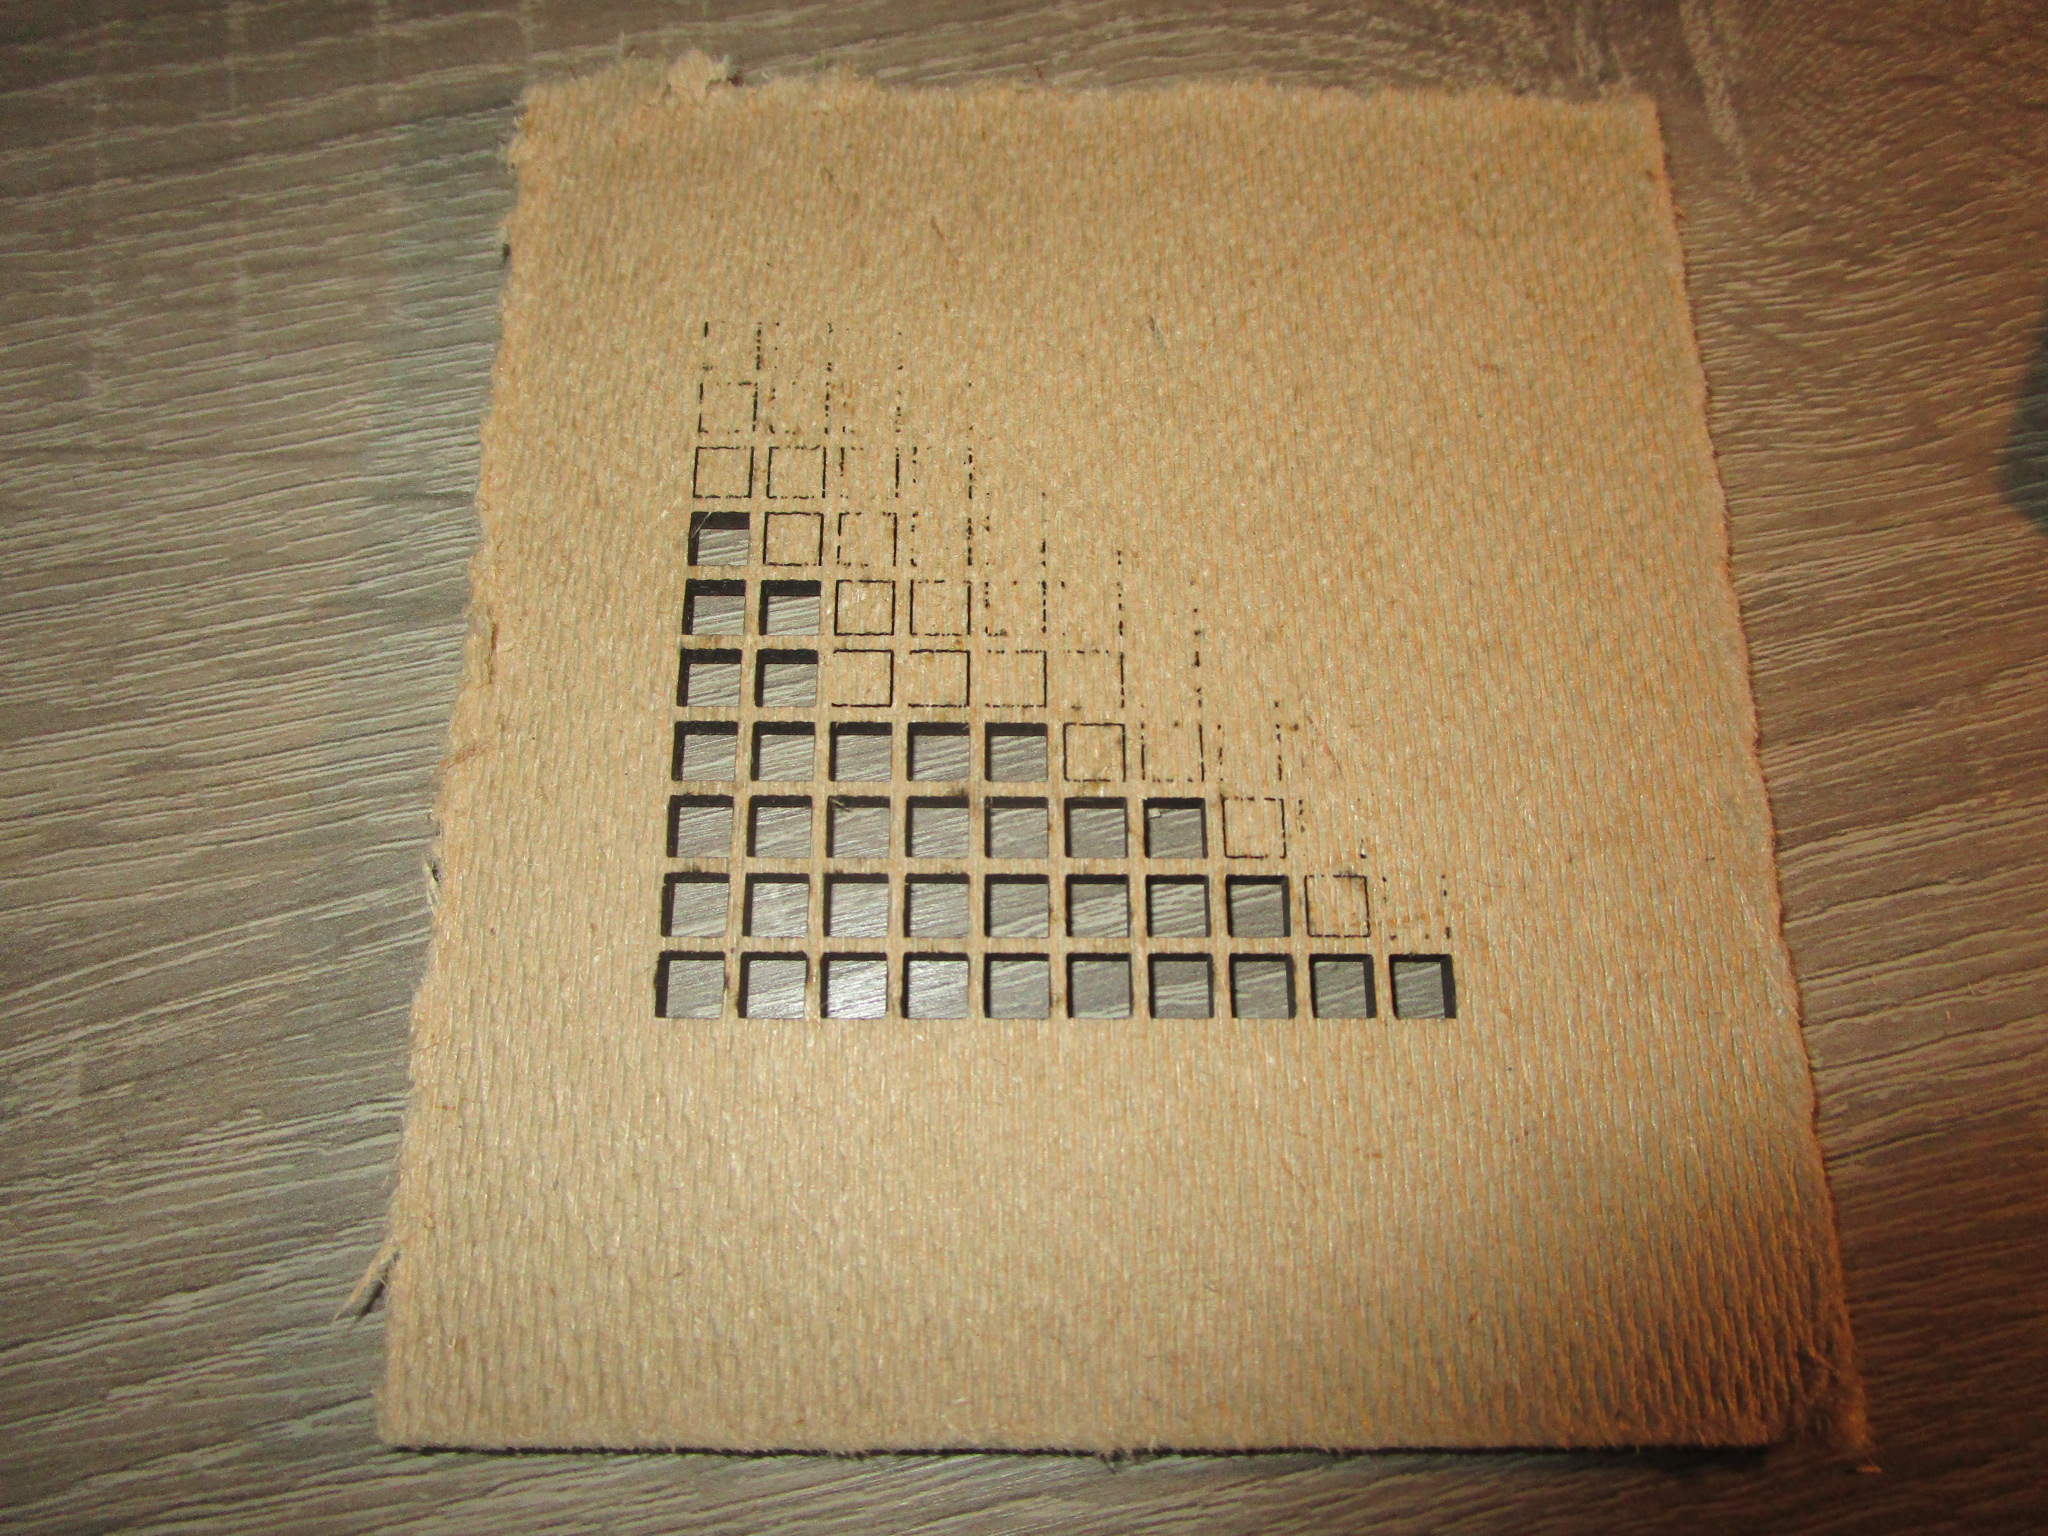 |
Bamboo
I haven’t been able to get my hands on a suitable piece of laminated bamboo yet but it’s an interesting material and I expect it to work reasonably well, though the strong directional nature of the material may require some trickery to get it to work properly.
Paper/Cardboard
Paper and cardboard are fine to cut, you can use pretty high cutting speeds but air should be off to avoid blowing the material away. If you move too slow you’ll end up with too much charring on the edges. It may be possible to stack several layers on top of each other and cut them all at once. Be careful when using air in combination with paper or cardboard, it can hinder more than it can help and it can cause work pieces to be blown away. You can add some tabs to keep things in place but then you’ll have to cut these later to separate the work piece from the scrap.
- Corrugated cardboard
- 5.7 mm 3 ply packaging cardbord, 60% power, 1000 mm/minute, single pass. (for more speed: 70% power, 1400 mm / minute)
| Material | Front | Back |
| 5.7 mm corrugated 3 ply cardboard |
 |
 |
Textile
Organic textile tends to work very well, synthetic fabrics much less so, they tend to melt rather than cut cleanly and the results can be very messy (and hard to separate from the cutting bed).
Leather
I would highly recommend against cutting or engraving leather. It can be done but the results aren’t all that nice to look at and the smell is just horrible. If you want to make a lot of enemies in a short time however, cutting leather with a laser may just be the thing. Leather tanned with Chrome will release highly toxic vapors so unless you have material that is certified safe to be cut with a laser stay away from leather altogether.
Unless the metal is super thin it likely will not work well to be cut using a diode laser. I have yet to try some more exotic materials (such as Titanium) but all of my metal cutting experiments have ended in utter failure. Not a single successful cut, the best I achieved was some minor discoloration on stainless steel at maximum power. It is clear that the short wavelength of the laserhead that I’m using (455 nm) is too short for any serious metal work. A several KW fiber laser is ideal for this kind of work, it will cost a pretty penny and will probably arrive on a flatbed truck. You’ll need tri-phase power and you may need a permit to run one in a residential area because of the metal vapor. I would not recommend this unless you are sited in an industrial area (or in the middle of nowhere).
Anodyzed Aluminum
Some metal, notably anodyzed aluminum can be engraved quite well. You are essentially evaporating the layer on the aluminum exposing the bare metal underneath, which gives a nice effect. You could do the reverse, evaporate all of the cover except for where you want the pattern to appear but this will likely take a long time.
You could also use a marking spray, fluid or paste, these tend to be very expensive though and it may be worth researching alternatives.
Stainless Steel
Cutting stainless steel is probably out of reach for diode based systems, but you may be able to engrave them effectively.
Dykem Red engineering marking fluid makes for an excellent laser engraving on stainless steel, when using these low-power blue diode lasers. You just spray it on, engrave, and wipe off the excess with isopropanol(‘IPA’). The IPA can be a little difficult to remove, so warming it up helps, but it won’t wipe off where the laser has engraved it. It works well in a pinch and creates a nice, reddish permanent mark (that doesn’t come off in IPA).
Acrylic
Haven’t tried this yet but it will happen soon.
Polycarbonate
Hard no, you can not safely cut this with a low cost diode laser/air based system.
Most plastics & PVC
Plastics and PVC should not normally be cut with a laser, they will give off highly toxic vapors and the results will be sub-optimal. There is a fair chance that your work piece will end up welded to the bed (with the risk of damage to the bed) and that it will catch fire, you may not care about this while you are recovering in the ER (or when you’re not recovering in the morgue…). Seriously: stay away from most plastics and all PVC.
Stone & Ceramics
To be tested shortly
Delrin / Acetal
Expensive! To be tested (I first need to find some)
Other online resources
Tricks and tips
This section is dedicated to various little bits of knowledge that may help to extend the life of your machine, extend its capabilities or to make your life easier.
Thicker material
Cutting thicker material in one go isn’t always feasible. The temptation usually is to run the laser for multiple passes but beyond two or three of these it is pointless: the beam will diverge in the cut to the point that you’re only getting a minimal amount of power deeper in the cut (and you’ll be hitting the sides more than the bottom of the cut where you want to be). One way to get past this seemingly insurmountable limitation is to flip the material over and to cut a mirrored pattern from the other side. This ‘one weird trick’ instantly doubles the depth to which you can cut! Registration can be aided by pilot holes and a fixture mounted on the cutting bed. An easy way to achieve this is by sticking two pins (at least two!) through the material to be cut in such a way that when you reverse the material the pins will swap position. That way you have perfect registration provided you don’t move the pins (or the head!!) during the swap. Do remember to mirror the pattern on the second pass.
Laminate!
Another way to change the thickness of the resulting work pieces is by lamination. You cut identical patterns out of thinner wood which you then glue on top of each other under pressure to create a work piece that is much thicker than what your machine can normally produce. This for instance allows you to create hardwood gears from thin slices. Lamination is a very useful technique and if you get good at it you can produce work pieces that would require machines orders of magnitude more expensive than the ones you’ve got or that might be entirely impossible to make. You can also achieve interesting effects by purposefully offsetting the laminations (translation, rotation) or by ‘slicing’ a design in one dimension and then to glue the layers together to achieve a three dimensional effect. If you want to go fancy you could even sand down the steps of the slices to the point where you have a continuous surface.
You can add strength and precision to the laminations by adding registration holes that you hammer hardwood dowels into. This gives you almost perfect overlap between the layers (to within the precision of your machine) and the dowels have their grain oriented in a different axis to give your work piece more strength. Keep the dowels just a bit shorter than the total workpiece thickness so that you can still apply sufficient pressure during the glueing, and put some glue on the dowels as well while you’re at it.
More air
Air assist greatly improves cutting depth but the typical air pump that comes with a laser cutter is anemic and barely has enough airflow for the job. An entry level shop air compressor will do much better, but you’ll need to dry the air and make sure it is oil free. Take care not to overdo it, the hose needs to stay attached to the cutter head and you don’t want to end up cracking your optics. A typical laser head will use anywhere from 10 to 30 liters per minute, which the manufacturer supplied pump may not be able to provide. Some experiementation can help determine the optimum for your laser at a given power level. Higher power levels will tolerate more air, above a certain limit more air actually works against you because the material is cooled too much and below a certain limit you won’t be removing material fast enough to get the full benefit of the air. So there definitely is an optimal amount of air for any particular cutter/material/powerlevel combination.
Longer materials
If your enclosure permits it you may be able to use the registration trick on the same side of the material as well to create work pieces that are longer than the machine can comfortably cut in one go. You’ll need to move the entire support under the cutting head to make sure that you don’t lose the registration for the individual pieces (because presumably the laser has penetrated the material fully, so some of the work piece is now already cut).
Clean your optics!
It happens very gradually so you may not notice but typically it won’t take more than a few hours worth of cutting to have a measurable degradation in cutting power due to contamination on the focusing lens. You’ll eventually notice that you won’t be able to cut materials that you could cut before or that you will need to slow down too much. That’s a sure sign that your optics are not clean. I clean the optics on my machine prior to any major job, it usually takes less than five minutes and the results are so much better. Always be very careful when you put it all back together that you don’t end up cross threading the nozzle onto the head, this is very easy to do (fine thread, large diameter). The best way is to spin the nozzle counter clockwise until it ‘clicks’, this is a sign that the start of the thread has ligned up on both pieces and then to gently rotate the nozzle clockwise to screw it back on.
If you do not periodically clean your lens the fumes deposit will build up on it which will then fuse to the glass of the lens. This makes the damage permanent so better get in there before that happens. In an extreme case a lens could crack because of uneven heating/cooling due to deposit build-up. Clean your lens with a lens cleaning cloth (used for camera lenses, your laser cutter manufacturer may have supplied a small piece of this). If you have a more serious contamination (for instance because your extraction failed or you had a fire in the enclosure) then you may need to use some alcohol, in case the problem is very bad and as a means of last resort you can use some acetone. But make sure the lens is completely clear and dry before closing it all up and using it.
Tie down your material
If the material is light and you’re using air assist or bump the cutter enclosure there is a fair chance that the material will shift a bit as the cut interacts with the air stream coming out of the nozzle. This can shift the material around. It doesn’t have to be much for the effect to be noticeable and in an extreme case could easily ruin your work piece. I use simple 3D printed tie-down pins to hold light materials to the cutting bed. This also helps to flatten the material which ensures that the focus is consistent across the whole material.
Ensure the air flow is unobstructed
It probably seems obvious but more than one tricky problem ended up being related to the air hose being kinked, sometimes in places where it was hard to see that this was the case (at the pump exit). You can also have fouling on the nozzle (usually carbon deposits, more likely to happen after periods of cutting without air assist) and obstructions (dust, other stuff) on the air intake of the pump. All of these will reduce or even completely stop the flow of air to the nozzle. A missing O-ring on the nozzle could cause air to leak out of the top of the nozzle rather than that it is all directed out of the bottom.
Painters tape against scorching or as a stencil
If the surface finish of the work piece is critical and you don’t want to sand it a layer of painters tape can help protect the surface, any scorch marks will be on the tape (which burns through easily). This is more of an issue with diode array based heads because they tend to ‘spill’ a bit more off to the side of the cut. So called ‘Transfer Tape’ sells in rolls up to 30 cm wide and is cheap. If the material underneath is something you can’t engrave on directly consider spraying through the removed transfer tape effectively using it as a stencil.
Coating the surface may help
Both for engraving and for cutting if the surface is reflective it may help to have a matte coating on the surface you intend to cut or engrave, this can aid absorption of the energy the laser delivers resulting in more work being done.
Periodically re-tighten belts, keep an eye on set-screws
The belts that come with diode laser cutters tend to stretch a bit and slip over time so it will pay off to re-tighten them periodically, especially the ones connected to the main gantry because these are hauling quite a bit of weight endlessly back-and-forth across the table. In a very bad case you’ll see overshoot and undershoot when moving in the y-direction (usually visible as a little vertical squiggle at the beginning of a new horizontal line). In my machine there are in total 6 set screws that all have the potential to come loose over time, this can cause excessive wear and slop in the affected axis. Check that your set-screws are still tight (but don’t overtorque them!) every couple of months or so or if you suspect there may be an issue.
Changelog
- 2024/Jan/26 first version of this document
References:
Since the outbreak of the war in Ukraine the price of gas and electric power in the European Union has gone up enormously. Russia, a major supplier of gas to the EU has been sanctioned heavily, buying natural gas from Russia effectively pays for them to wage war on Ukraine and the price of electricity is tied to the price of natural gas, which has been going up and down like a jo-jo, but far more up than down. Not all countries are equally affected by this, countries that have a large proportion of hydro power and countries that have their own - and still usable - supplies of natural gas have an easier time to deal with this than countries that do not. The EU energy market - not the most transparent affair for mere mortals - which allows foreign suppliers access to the domestic markets can cushion some of these aspects but the difference in average price as well as the various means offered by governments to take the edge of for their citizens vary greatly, as do the individual contracts and the options offered by the various suppliers.
Ever since the beginnings of the COVID crisis we have worked from home, which means that all of the gear that used to sit in our offices is now here in the house and obviously that uses quite a bit of power. The house has four occupants, two adults, two teenagers and is about 200 square meters divided across three levels. The house has 25A x 3 phase 240V service and a natural gas line, which is used for both domestic hot water, some of the cooking (a hybrid gas/electrical stove) and the water based central heating system.
A typical setup in the Netherlands, where I live is that you have a network that serves your region and a choice of various suppliers. Once the price of energy started to go up faster than anticipated several of the suppliers here went bankrupt overnight, forcing their customers to re-negotiate with a different supplier at an entirely different rate. The practice effect is that for many households here since Jan. 1st 2022 the price of energy delivery has gone up tremendously, factors of five are not exceptional though in many cases - fortunately - it is still less than that and people that had the foresight to lock in their contracts prior to the outbreak of the war are sitting pretty, for a while at least.
Our household was not one of those, so when in August, after the annual adjustment we received the new tarifs it was bad. Our energy bill basically tripled overnight and roughly 1/3rd of my take-home salary would have gone towards the energy bill without some countermeasures. The plan we came up with was to create a mixture of savings measures and to install some generating capacity of our own, and to offset some of our heating requirements with an air-air heatpump that we already had but only used in airconditioning mode.
This house was built in the early 1970’s, it is not insulated all that well between the inner and the outer wall, and fixing that is a very expensive affair, both because of how the house was built as well as because there is already (bad) insulation in there. Removing the old insulation and replacing it with something better would be nice but from a cost-benefit perspective it is not the best investment right now (though we may still opt to do this in the future). What we could do fairly easily is to drop the temperature that the gas fired central heating system operates at. The default the heater was programmed to was 65 degrees Celsius, we dropped that to 45 degrees which had an immediate effect on the gas consumption. We also dropped the thermostat from a toasty 20 degrees to 18 degrees, which may not seem like much but the difference was very noticeable. Lower than that is not an option, for one humidity would become a problem, for another the house is very unevenly heated and 18 where the thermostat is can mean anywhere from 16 to 20 depending on where (how high up) you are in the house. But the every room has thermostatic valves on the radiators and those we adjusted to try to get the rooms as close to each other as possible temperature wise. Another thing we did was to change from using the front door of the house to using the backdoor, which does not sit next to the stairwell. This reduced the amount of air exchange every time someone came into or left the house. For myself, I have tried to take shorter showers, though I definitely miss them (joint issues). Together these simple measures shaved off more than half of our gas consumption.
On the electrical side there was a lot that could be done as well. First we made inventory of all of the consumers that we had, and decided whether or not we really needed them, if they could be replaced by something less power hungry if we did and if not if we could reduce our usage. We replaced all of the remaining halogen bulbs (we still had quite a few) with LEDs, in some cases this required some minor rewiring because not all of the power supplies for the halogen bulbs liked the LEDs but because they draw so much less power it was easy to move some of these to supplies that worked well. For some bulbs finding an LED replacement was quite tricky but in the end we found a way to get rid of all of them. Identifying consumers can be quite hard, we installed a ‘Smile P1’ interface to our distribution point to determine momentary power draw and flipped circuit breakers one-by-one until we had a reasonable insight into how much power each circuit was using. The worst consumers: my main computer (a beefy I7 with a very large amount of RAM and a 1080ti graphics card that I used for the machine learning portion of the Lego sorting machine), our NAS (a 12 bay Synology) and a domestic water heater in the kitchen (which took forever to find). The second fridge/freezer was switched off as well, and a whole slew of ghost loads was killed off by simply pulling the wall warts when the devices are not in use. My computer was replaced by an old laptop that I still had but did not use, it has a provision for dual monitors (besides the built in LCD) so I still have more or less the same setup as before, with just half the RAM. I did replace the rotating rust drive with an SSD, which was surprisingly affordable given the capacity.
All of these changes together cut our monthly consumption from about 800 KWh on average (which is insane) to a much more reasonable 270 KWh. And the solar panels completely offset that during the month of October. Another batch of 10 panels will arrive next week, which will allow us to heat part of the second floor using an air-conditioner run in reverse (a split air conditioning unit is essentially just a heatpump and you can run those in reverse). This should further reduce the gas bill.
When we bought this house it had 16 solar panels installed, but we had to take those down to modify the attic space. The plan always was to put them back up once that work was done but we had simply not gotten around to it yet, just prior to removing them the inverter broke and since the start of the war in Ukraine the availability of solar panels and inverters is quite bad, lead times are several months. After searching on the local equivalent of Ebay I found one party that still had a slightly older model inverter sitting around, a 3 Phase 4KW unit that they somehow never sold. I don’t particularly care for the latest and greatest in inverters so I was happy to take it off their hands at a bit of a discount. When it arrived it turned out the inverter had been dropped, and quite badly, the casing was cracked, the DC disconnect had been bent out of shape and a bolt had broken out of the cast aluminum housing. It must have taken quite a fall given the amount of foam that the inverter came packed in, weirdly enough the cardboard box was fine though it did look as if the inverter had been re-packed at least once before (judging by the amount of packing tape on the box). I contacted the company and they were super reasonable about it, they offered me to either take it back for a full refund or a 50% discount if I wanted to keep it. I’m not afraid of power electronics, wired up a test installation and inspected the inverter mechanically, it worked in spite of the damage and did not get overly hot or let out any magic smoke, so I took the discount. This allowed me to re-install the 16 panels that I had before on the roof of our garage.
I then ordered another batch of panels, much more modern (the other ones are about a decade old, 265 Watts each), 400 W AEG units that I found a reliable supplier for and went to pick them up, then installed those on a covered area outside in the garden. 10 of those comes to 4000 Watts installed power, plus the 16 265 Watt ones, another 4250 Watts (but given their age I would derate those to probably closer to 200 Watts today, so say 3200 Watt). Adding all of that up gives you a bit over 7000 Watts in installed power, much more than the inverter could handle. Another trip through the second hand listings and I found a single phase unit that will do 3000 Watt. The panels are mounted flat on the garage and lean-to roofs, so that’s a double penalty, first there is the problem of the angle at which the sun shines on those panels, and second the houses here will shade the panels during part of the day. But it makes a nice bit of power,
From an initial 1500 euros / month we are now down to about 350 euros ex government rebates, and that is in the bad part of the year. Obviously, December, the worst month for solar is still to come and I definitely don’t expect miracles, but as long as we still have net-metering here (until Dec 2024 at a minimum) we can compensate for that during the summer. The total cost of the installation was about 10K, which I expect - assuming prices remain steady - to pay for itself in less than four years. Clearly, the energy savings are a major factor in the whole picture, without that the effect of the solar installation would be far less. But the two combined meant that for October our electricity usage relative to the grid was negative, resulting in a portion of our gas usage being offset by electricty over production.
There are some things that helped which may make this hard to replicate: the first, and most obvious one is that we had enough savings to make all of this happen on short notice. we also had a lot of surface area to play with, 60 square meters of flat roof which is now completely covered with panels, and another 30 square meters higher up on the roof of the house which will soon be covered as well. Not every location has such a large amount of usable roof area. The second factor is that even though there is some shading we don’t have any really high buildings nearby that shades the whole installation. Mounting panels flat is not ideal, for one they make less power than when they are properly ‘aimed’, for another they can easily foul up (leaves, bird droppings and so on). But even if the panels are positioned less than ideal, are partially shaded and need periodic cleaning (or are simply not perfectly clean) the sheer quantity of them means that even of the whole setup is operating at 10% efficiency it still handily outstrips our usage during the day with the sun this low in the sky. Once we’re past the solstice it will get better day-by-day and during February and March (when we consumed the most gas in other years) I expect to be able to use the air-air heatpump for heating purposes a lot. Finally, not everybody is able to adjust the temperature just like that, if you have health issues or if your house is even more humid than this one you may have to keep up the heat just to avoid ending up with fungi or damage. But even then a critical look at your power consumption may help identify some areas where you can save.
I hope this article will help someone looking to do something similar, if you have questions or feedback feel free to reach out to jacques@modularcompany.com.