Electric cars are fantastic compared to ICE vehicles, but E-Bikes are even better. Much lower environmental impact and far more suited to medium range travel such as commuting. Here in NL they sell in huge numbers, far faster than electric cars. But they also have their limitations: a regular e-bike tops out at 25 Kph, and will do a very limited distance on a single charge. What powers your average e-bike are Lithium-Ion cells, usually of the 18650 variety, capacities vary but the very best cells you can get at the moment that are still affordable top out at about 3400 mAh per cell. A typical e-bike has about 40 to 50 of these, in a 10S4P or 10S5P arrangement.
My first e-bike, a pretty crappy one but enough to get my appetite whetted had a 500 Wh battery, enough for a 55 km trip one-way, and it would be dead on arrival, range anxiety to the max. After shopping around for a bit I bought a secondhand second battery to give me either more range or a way to get back home if the first one ran out. This works, after a fashion. But 25 kph isn’t a lot, on my (very) elderly 10 speed I would be way faster than that. The good bit about that e-bike for me wasn’t the speed but the fact that I didn’t need to exert as much force when starting up, which as the result of a previous bike accident is still hard for me (lots of steel and screws in one of my legs).
Doing this for six months was an exercise in frustration, I’d always be tempted to use my ‘normal’ bike because cycling an e-bike ‘over the top’ of the motor is something that gets old very fast. But my car usage dropped by more than half and that by itself was enough of a reason to further pursue this project.
Some more searching and I hit on the concept of a S-Pedelec. It’s a pretty weird cross-over between a bicycle and a moped, top speed 45 kph, but the range is even worse. Other issues that that technically it is a moped (it needs insurance and a license plate) and in many places you are forced to ride in traffic, which is anything but safe. Even so, I got one, a Riese & Mueller ‘charger’. Fantastic build quality, super good brakes, really stable to ride. But the range is even worse than with the normal e-bike on account of going faster. A full 500 Wh battery will take you 45 Km on a good day. Driving around with three spare batteries in bags and swapping them out is not nice and the weight distribution on the bike also wasn’t ideal, especially not because there is some slop in how the bags are mounted and with that kind of weight in them you get a real kick every now and then.
So I decided to increase the range of the bike by building a larger battery. This is where I pretty much dropped into the rabbit hole of battery pack manufacturing and the Bosch e-bike system in particular. I made a giant file of notes on how these batteries work (I’ll post this separately one of these days), how the BMS in them works and talks to the main controller (which is located in the motor) and how the charging process works, as well as how to repair them after they - inevitably - break. After documenting all that I realized there are a couple of major sticking points: for one, the Bosch BMS is part of a DRM setup that pretty much prohibits using 3rd party batteries, for another, adding many cells to the existing BMS is risking it bricking itself due to its inability to balance such a large pack, the Bosch BMS is a bit nervous about changes to it’s world as perceived through the sense wires that it does not understand and the easy way out is to shut down completely. I have a couple of these BMS’s now that refuse to release the battery to the high voltage bus even when connected to perfectly good battery packs.
I found part of the solution on Ali Express, a device known as an external balancer. As a neat little extra it has a bluetooth comms module built in that allows me to monitor pack voltage and the cell groups just in case it breaks or I messed up something during the build. I built a small (10 cell) test pack, tested it with the BMS and the bike recognized it, even while the external balancer was running.
Then I ordered 190 Samsung E35 cells (from nkon.nl, which are a fairly standard thing in e-bike battery packs. This cost a pretty penny, close to 600 euros. But given that a 500 Wh battery pack costs roughly the same its still a bargain. A BMS was sourced from a defective pack (busted cells due to water ingestion, a common problem with the Bosch rear carrier mounted battery packs).
I watched endless youtube videos on pack manufacture, spot welding techniques, troubleshooting and most interestingly, what tends to go wrong with battery packs. After a number of videos on this theme I realize that this isn’t exactly safe. You are connecting 10’s to 100’s of batteries in series and parallel configurations that allow the liberation of all of that energy in a very short time. Working on a pack that size is like working on a live bomb. I have great respect for Lead-Acid batteries, Lithium-Ion is at another level still.
Bit by bit the geometry was worked out, with some false starts and then it all came together, a 10S17P configuration was possible, but the pack geometry came out really weird. The reason why is that the pack lock and pack connector stayed in place on the bike, I did not want to butcher it and there is a limited amount of space in the frame. Initially I wanted to mount the pack on the rear carrier but some conversations on Hacker News and a test ride with some bricks on the back convinced me that this was a bad idea. Center of Gravity too high, and too far towards the back changed the riding characterists in a way that made the bike unpredictable and dangerous in wet or slippery conditions. So in the frame it all went, and my 190 battery plan changed into a 170 one. More Ali Express safari sessions sourced a suitable welder, battery supports and sturdy adhesive paper for insulation purposes.
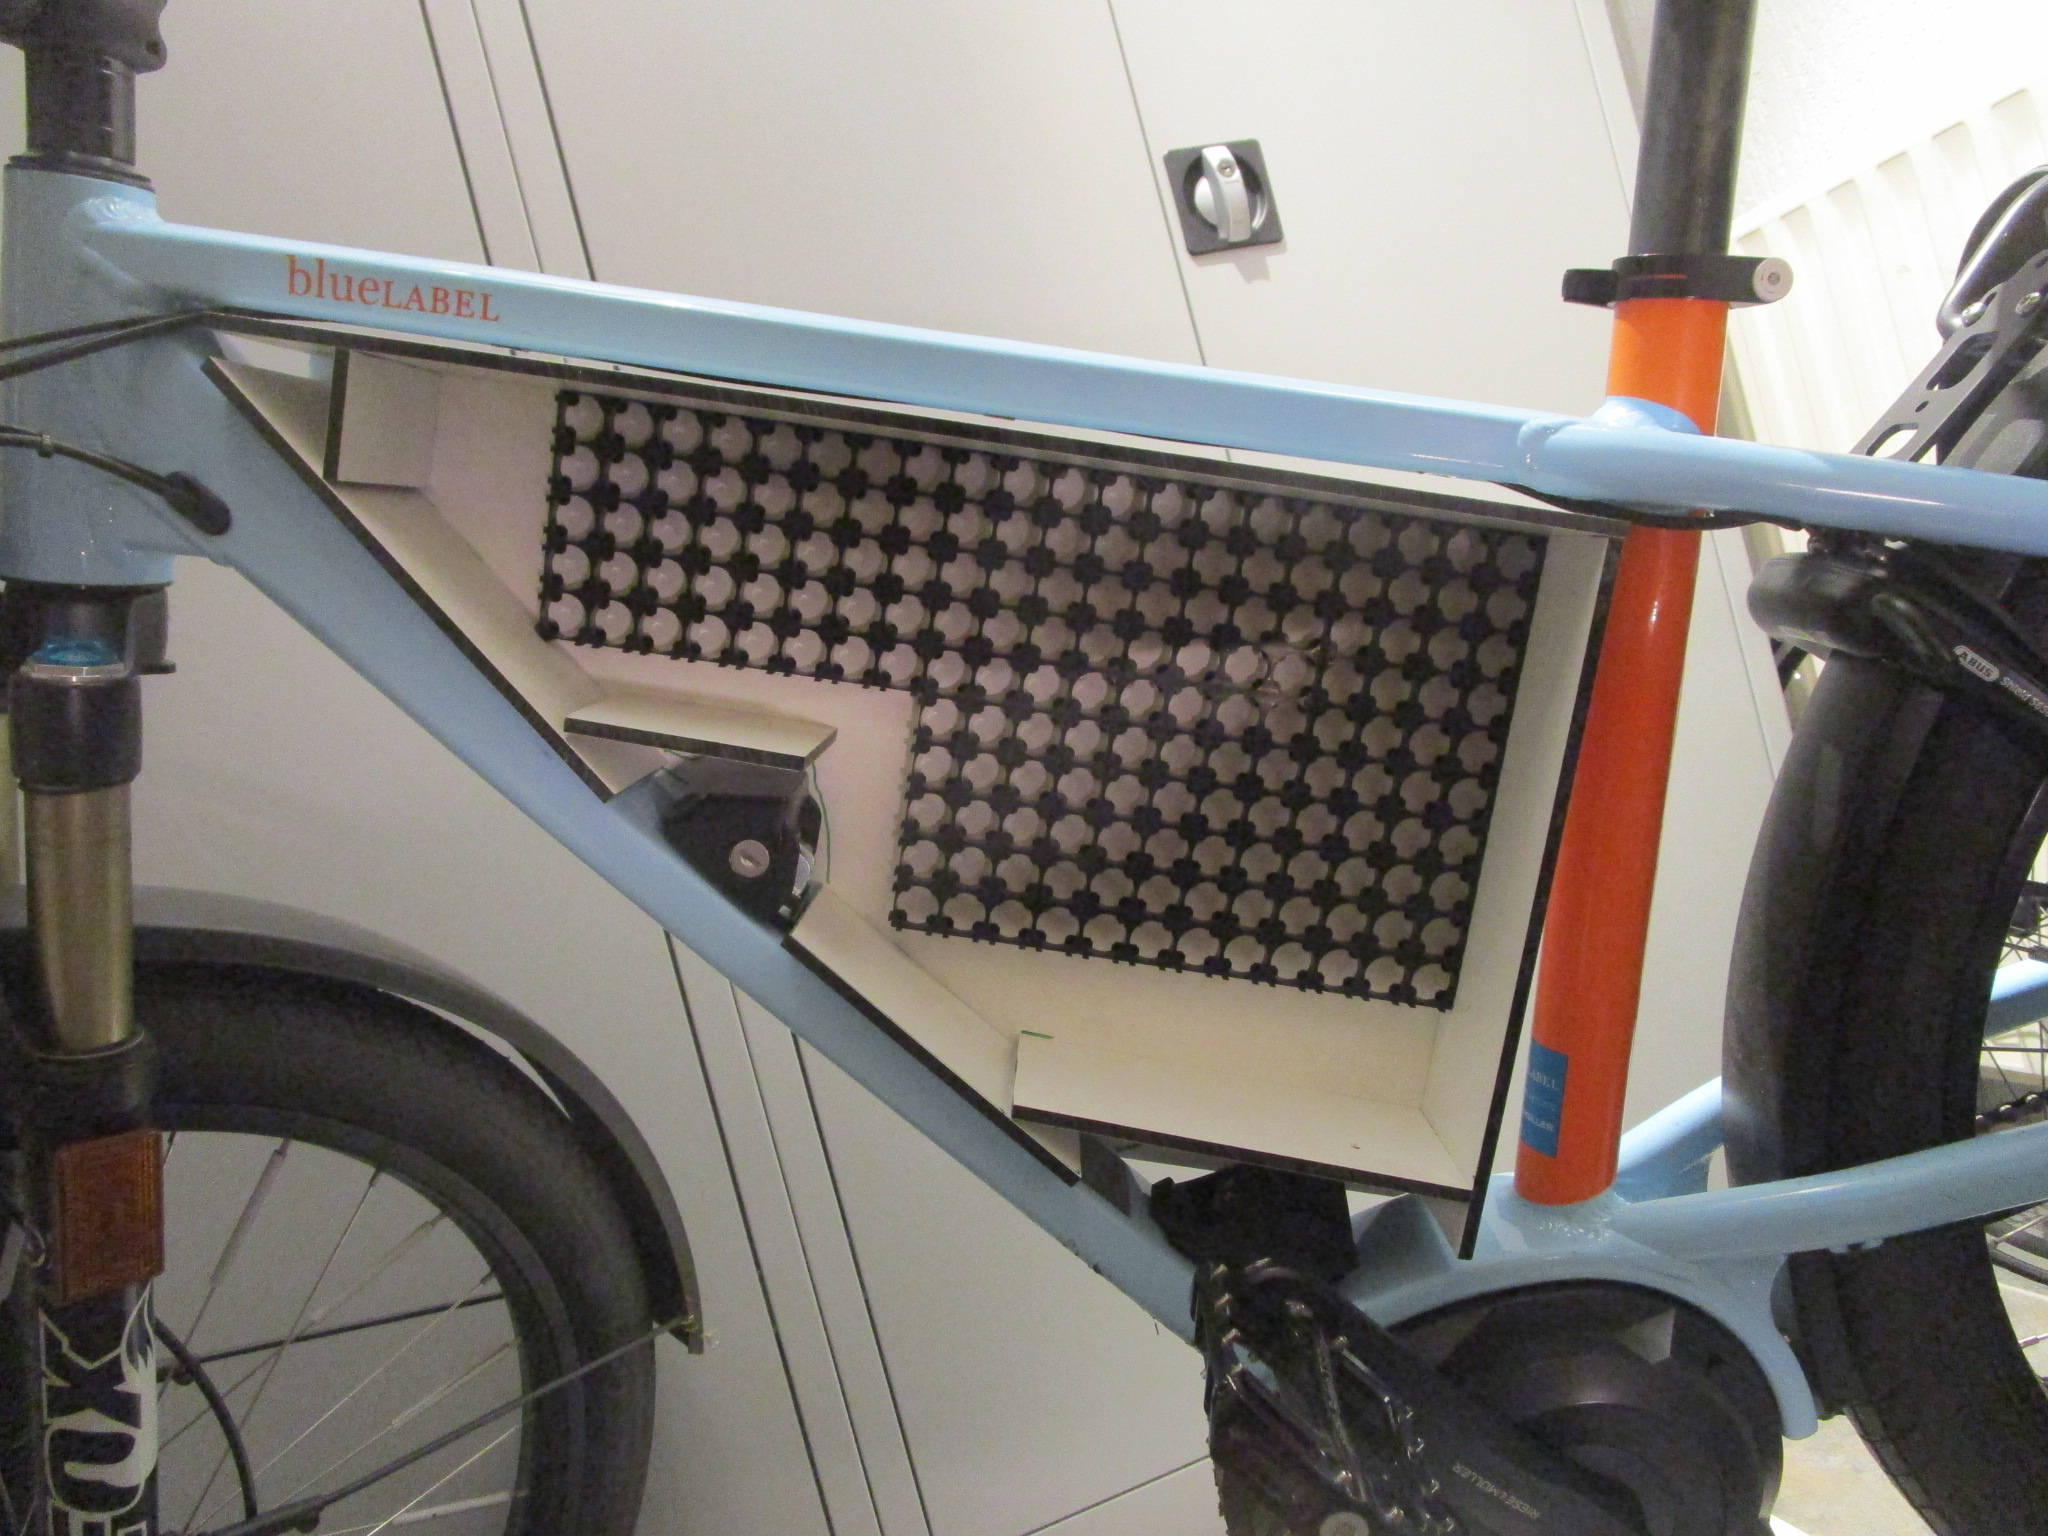
Making the enclosure was quite simple, some trespa and polymax joined with pvc angle made a strong and pretty precisely shaped box. The prototype was made from cardboard so I had high confidence that it would fit. Another major advantage of trespa is that it is non conductive. I’ve seen quite a few people building major cell packs in metal enclosures and that seems like a recipe for disaster in an environment where vibration is the norm rather than the exception.
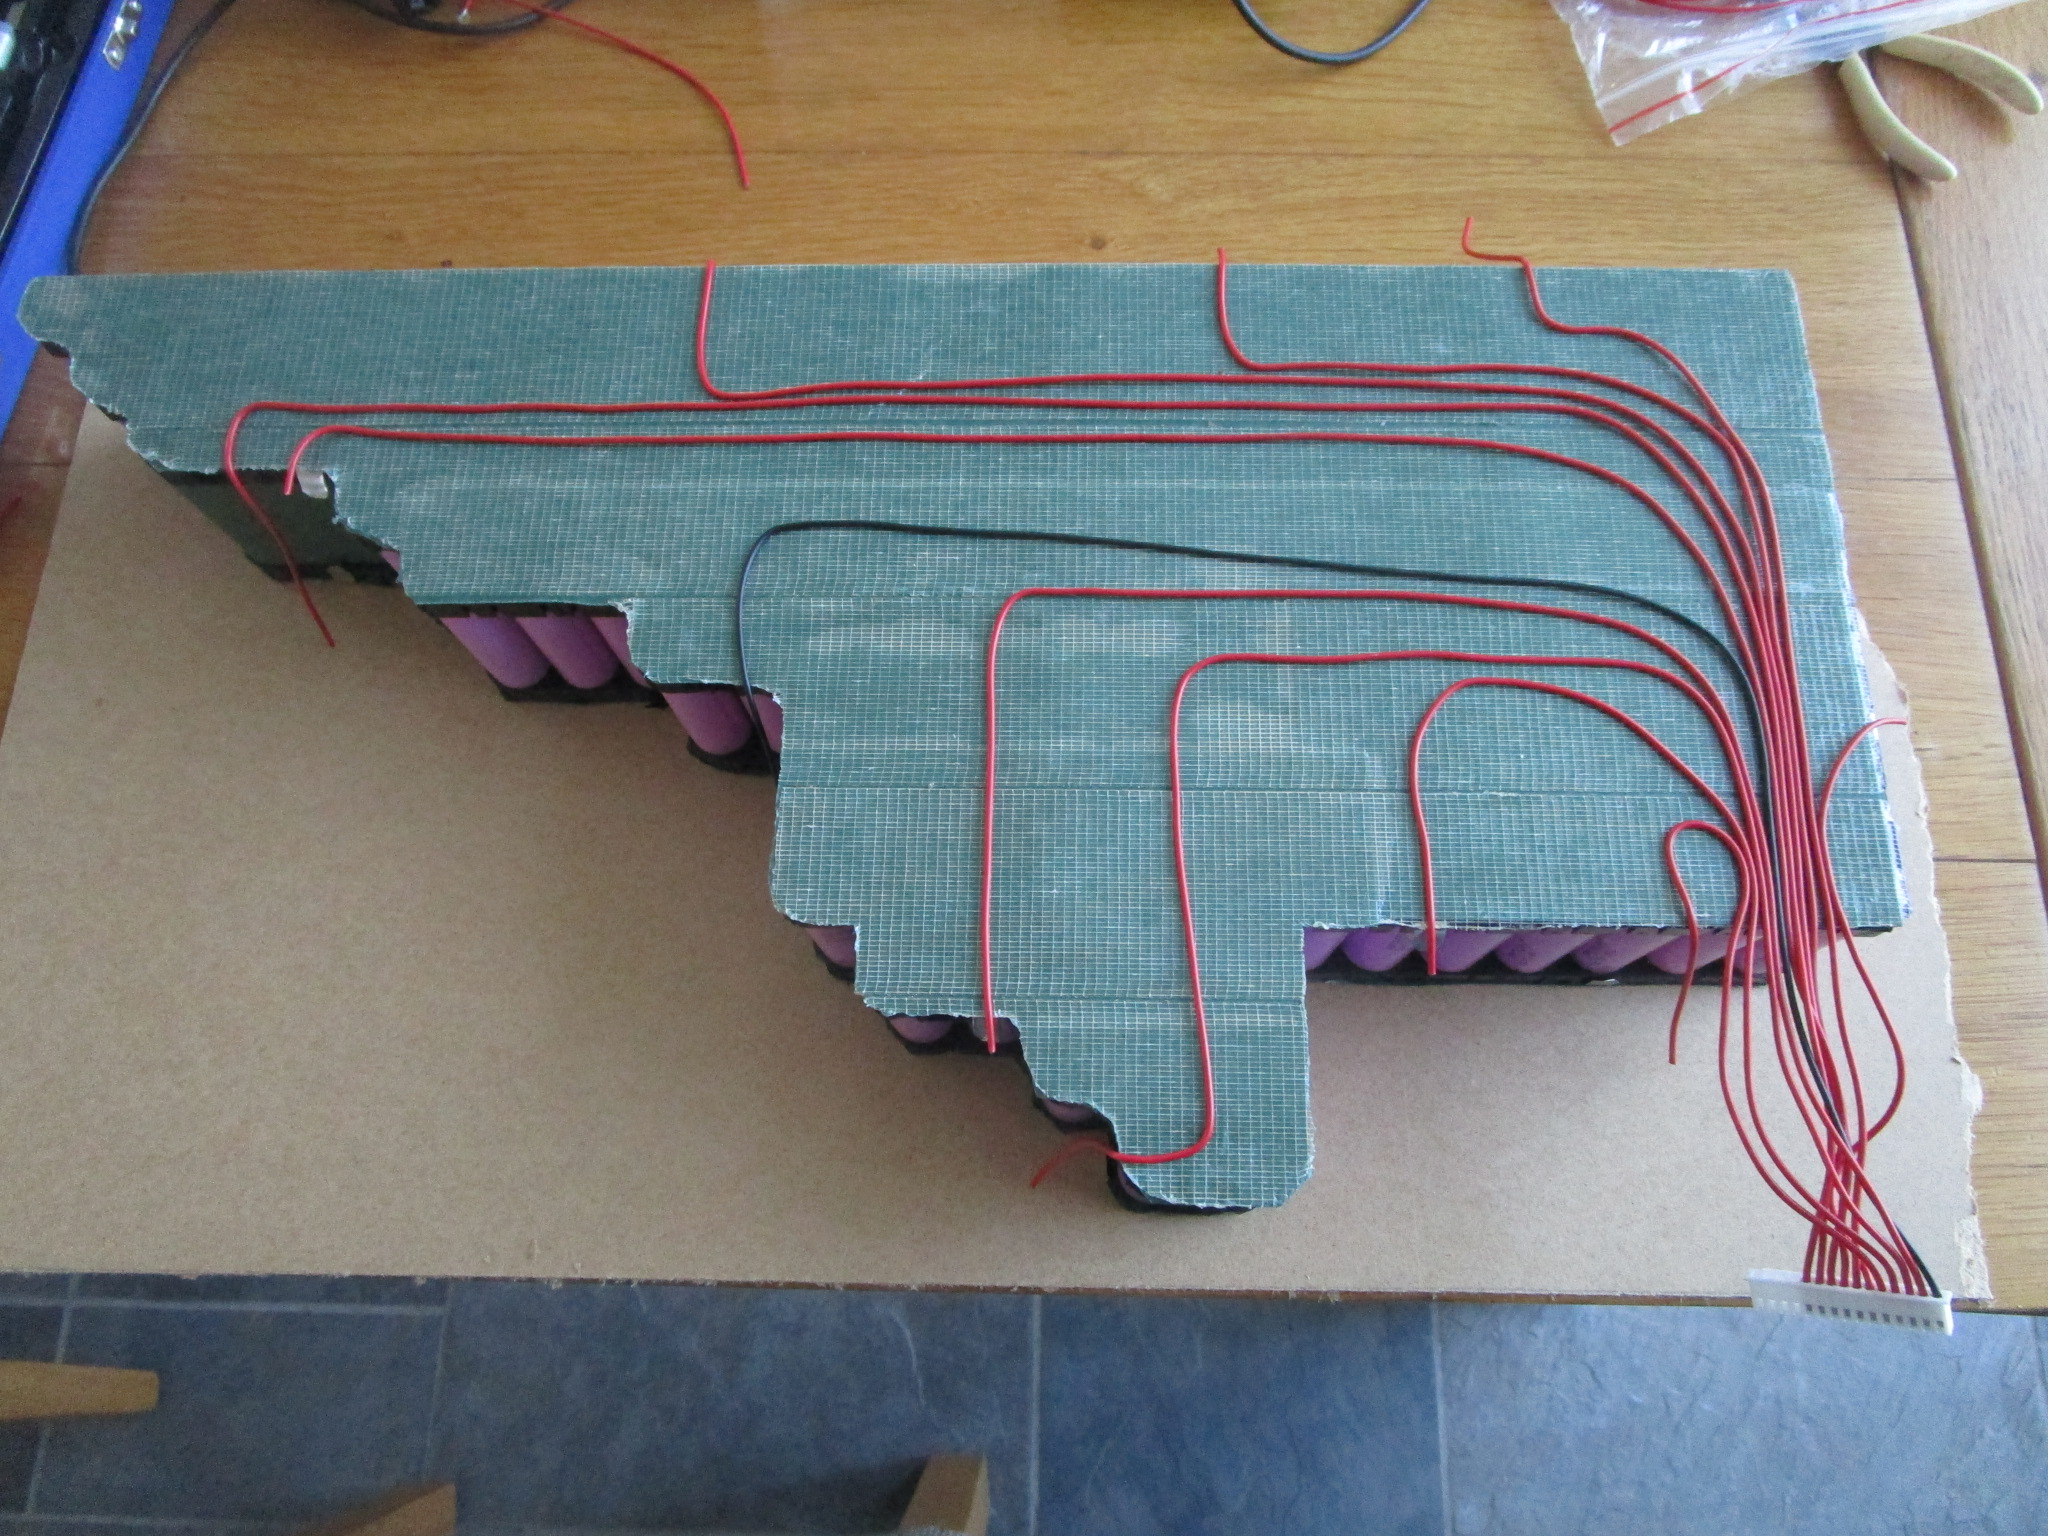
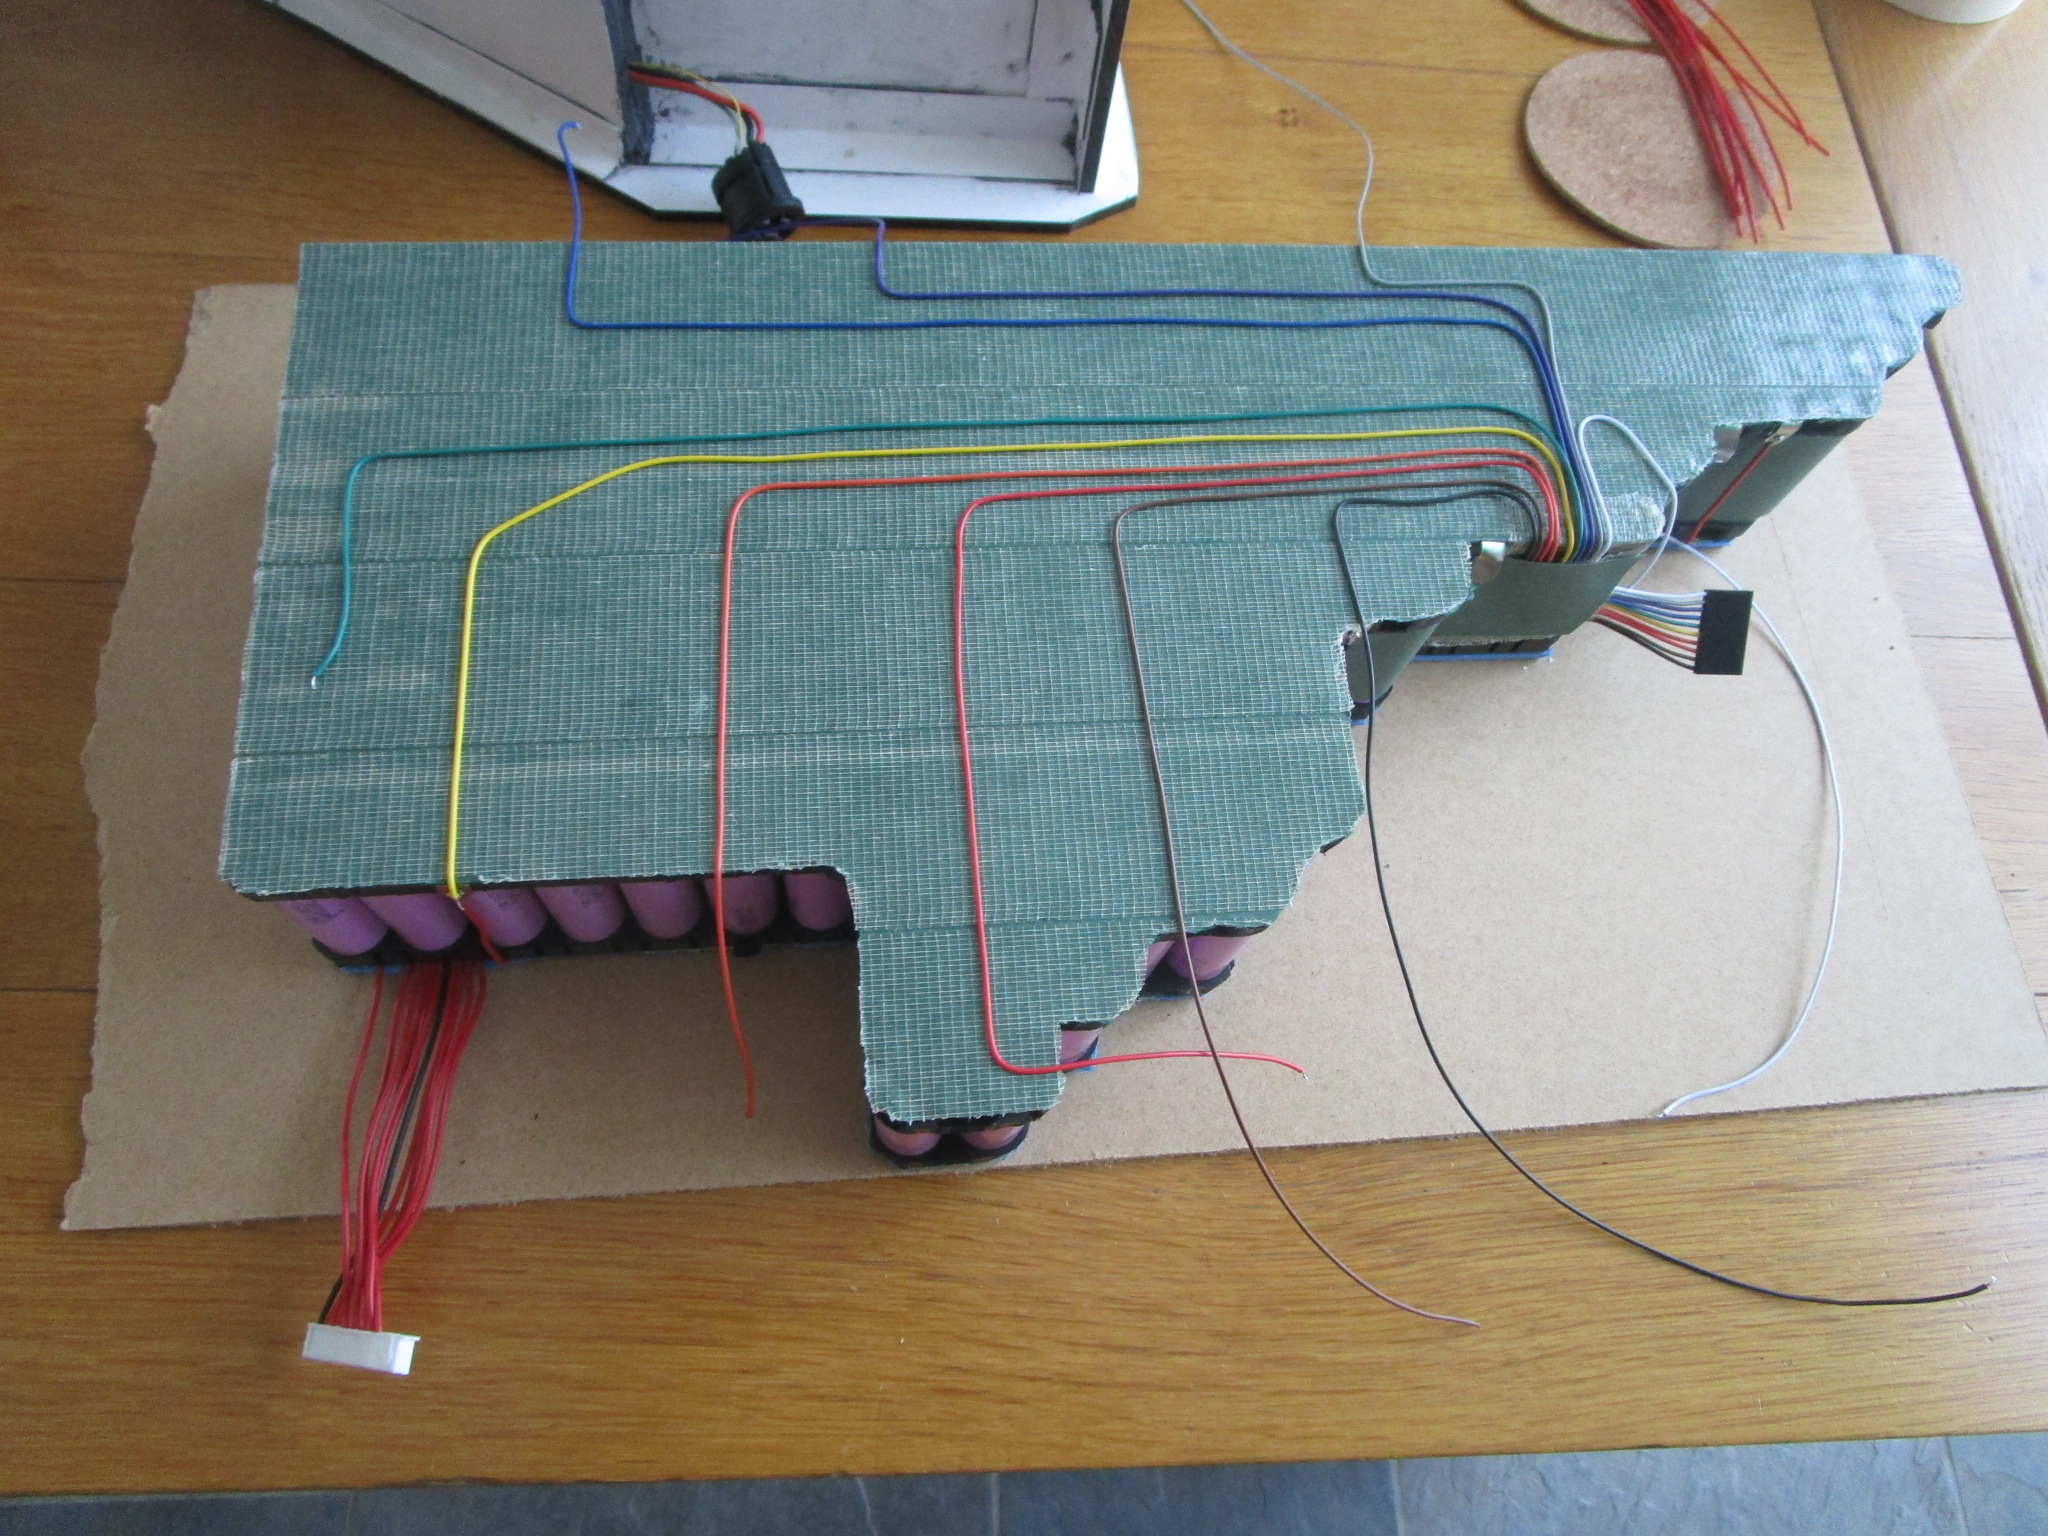
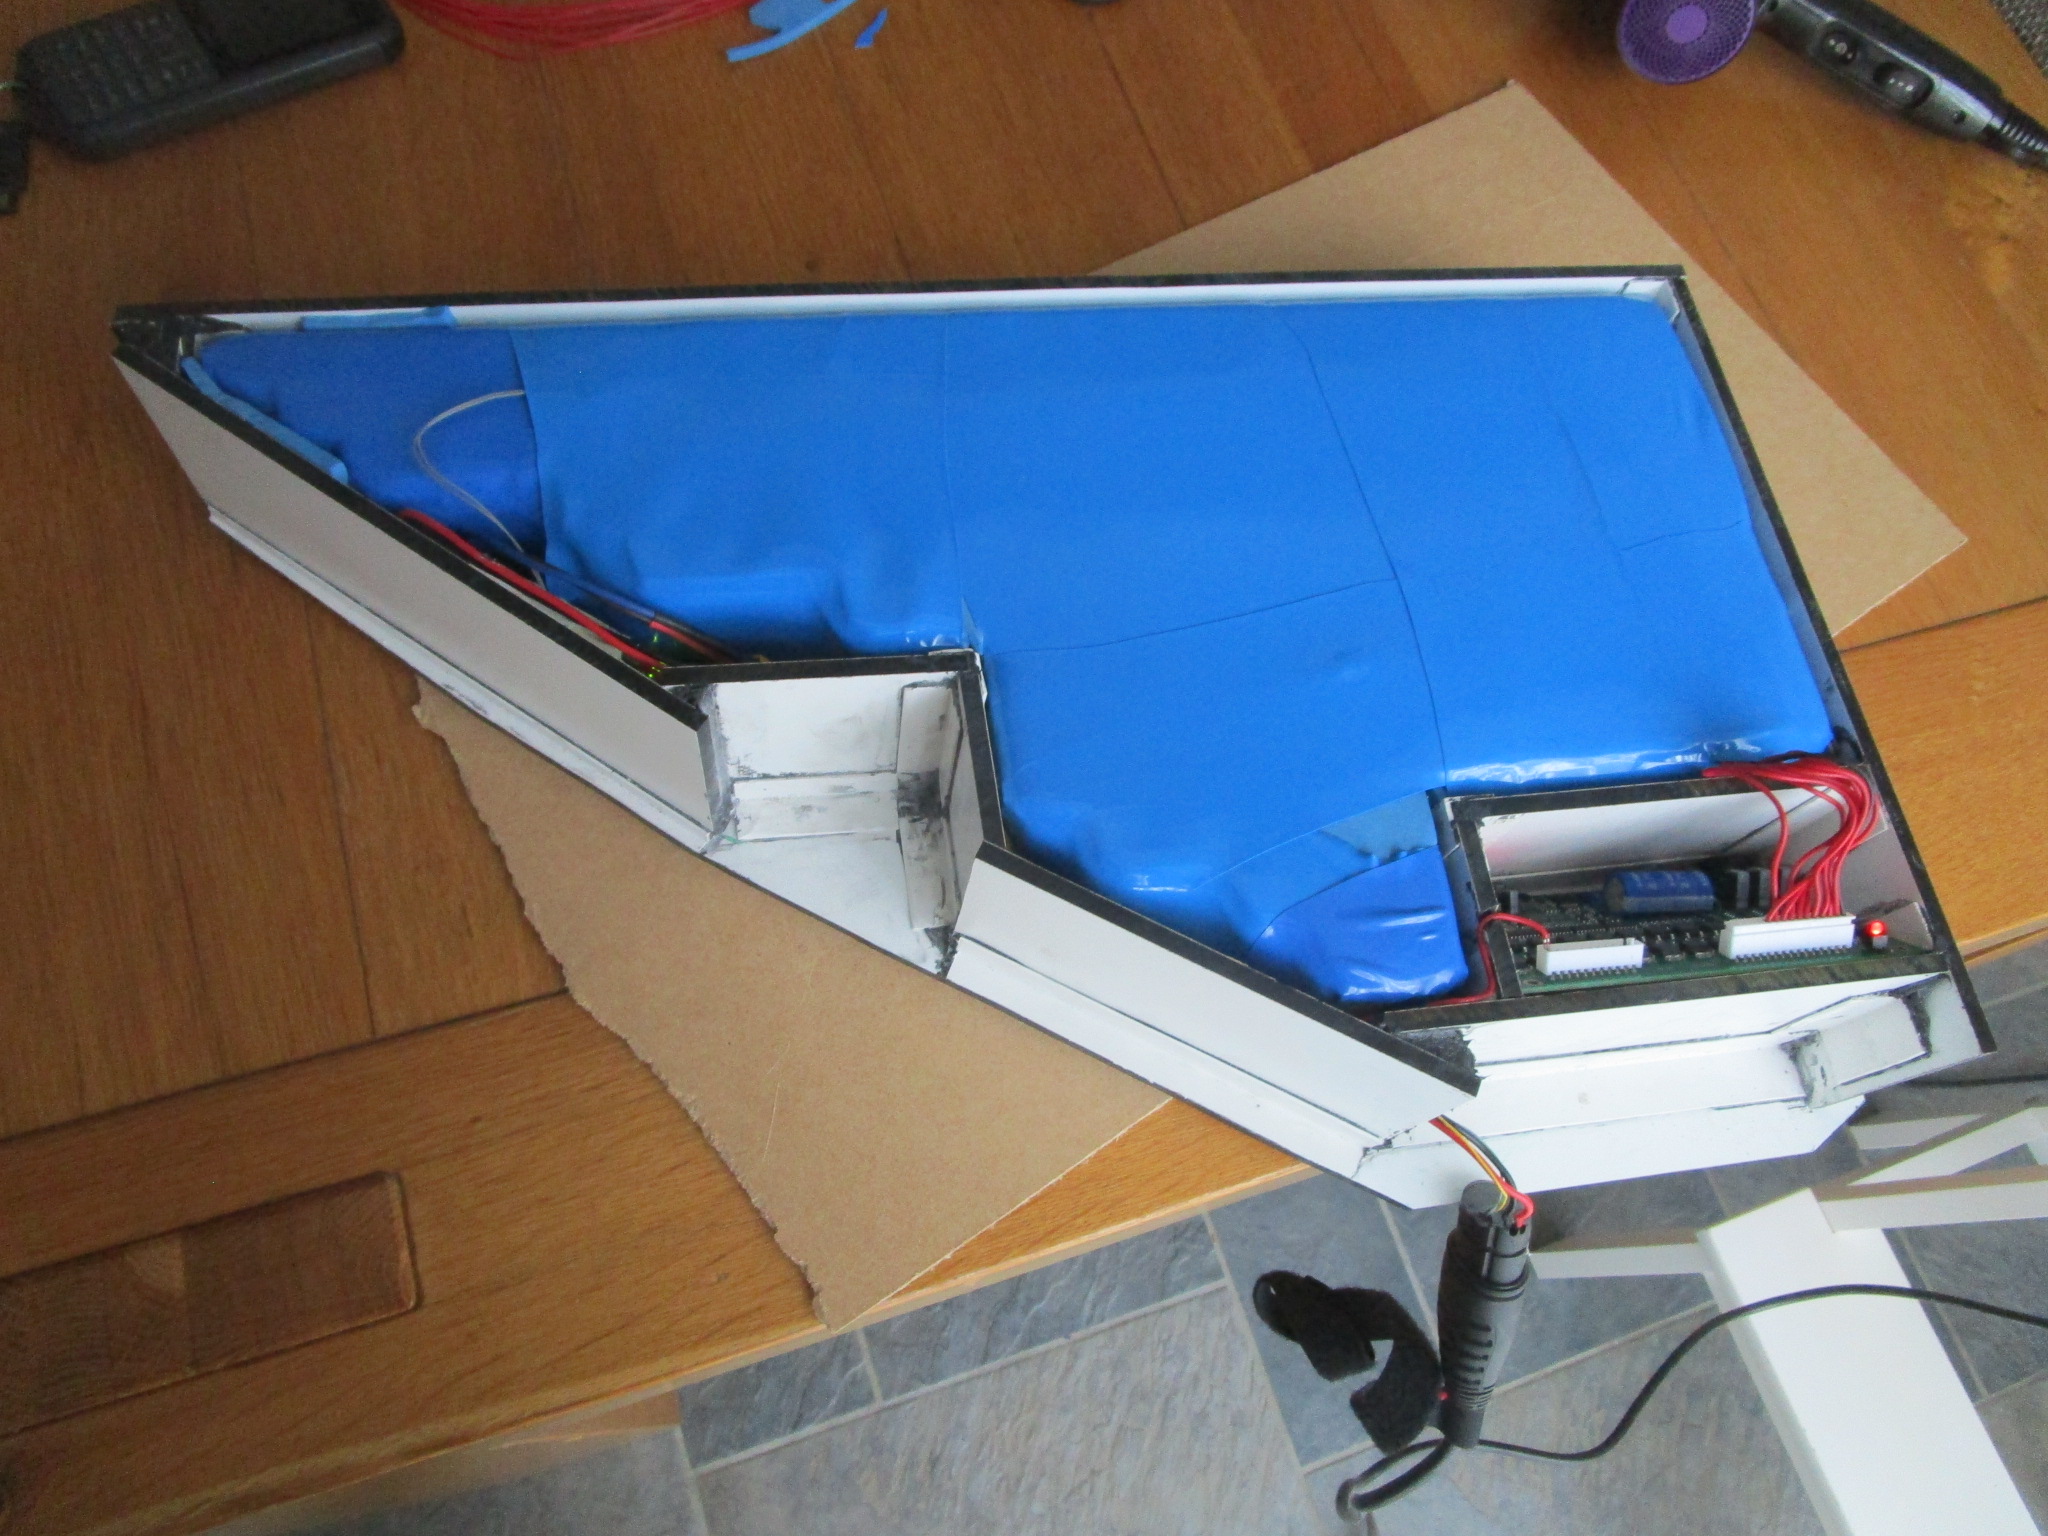
After making the 1:17 scale model (10 cells instead of 170) I knew what I needed in terms of electrical bits and pieces but placing them wasn’t all that simple. The balancer board was way too wide and the Bosch BMS had a bunch of sense wires coming out that were just asking for a short circuit. So I put a little board underneath it and routed all the sense wires to a header and from there to some more beefy wires. I cut off a small strip of the balancer board, bent the plugs so they would face upwards and mounted the board at a 30 degree angle to reduce its width relative to the width of the box. A slot cut in the compartment for the balancer allowed all the wiring to be connected and a splice to the + lead on the external connector made it work whenever the bike is powered up or charging. Three thin wires from the pack connector to the Bosch BMS take care of the charging protocol and the CAN-BUS leads between the controller and the BMS.
Building a pack this size is scary. For me this was the very first time I worked on putting together a Li-Ion chemistry based battery and to do one of this size the first time was well out of my comfort zone. Every dimension was checked many times, wire placement was determined before even building the pack, calculations of the thickness and number of interconnects in the parallel blocks, the capacity of the balancer and so on. Accidentally shorting out a single Li-Ion cell can be quite spectacular, working with 170 of them charged to 3.8V exactly (to ensure that when interconnecting them you don’t get huge currents flowing between the batteries) is more than a little bit scary. I tested each battery twice before mounting them in the pack, full charge-discharge cycle checking capacity and internal resistance. None of the batteries failed that test. Then I left them to sit for a while to see if any of them self-discharged faster than the rest, this test too was passed. And that’s a lot of work, everything you do you have to do 170 times and you can’t really miss anything.
Finally, the day of pack welding arrived. The electrical system in this house absolutely sucks and I couldn’t find a single socket capable of powering the welder without causing the circuit breaker to disengage. I traced it down to the several KA welding pulse that caused the ground fault interruptor to be EMP’d. Running the welder without ground took care of that. The only socket able to supply that kind of power was the one the oven is plugged into, so I ended up doing the welding as close to that socket as I could get (shorter wire = lower losses). Even so, weld quality went all over the place so I decided to use six rather than two welds per battery. Better safe than sorry. But the plus pole of these batteries is quite small and cramming six welds in there is hard. I did the welding at night to have as steady a power supply as is possible, the welder is super sensitive to any kind of fluctuation in input voltage.
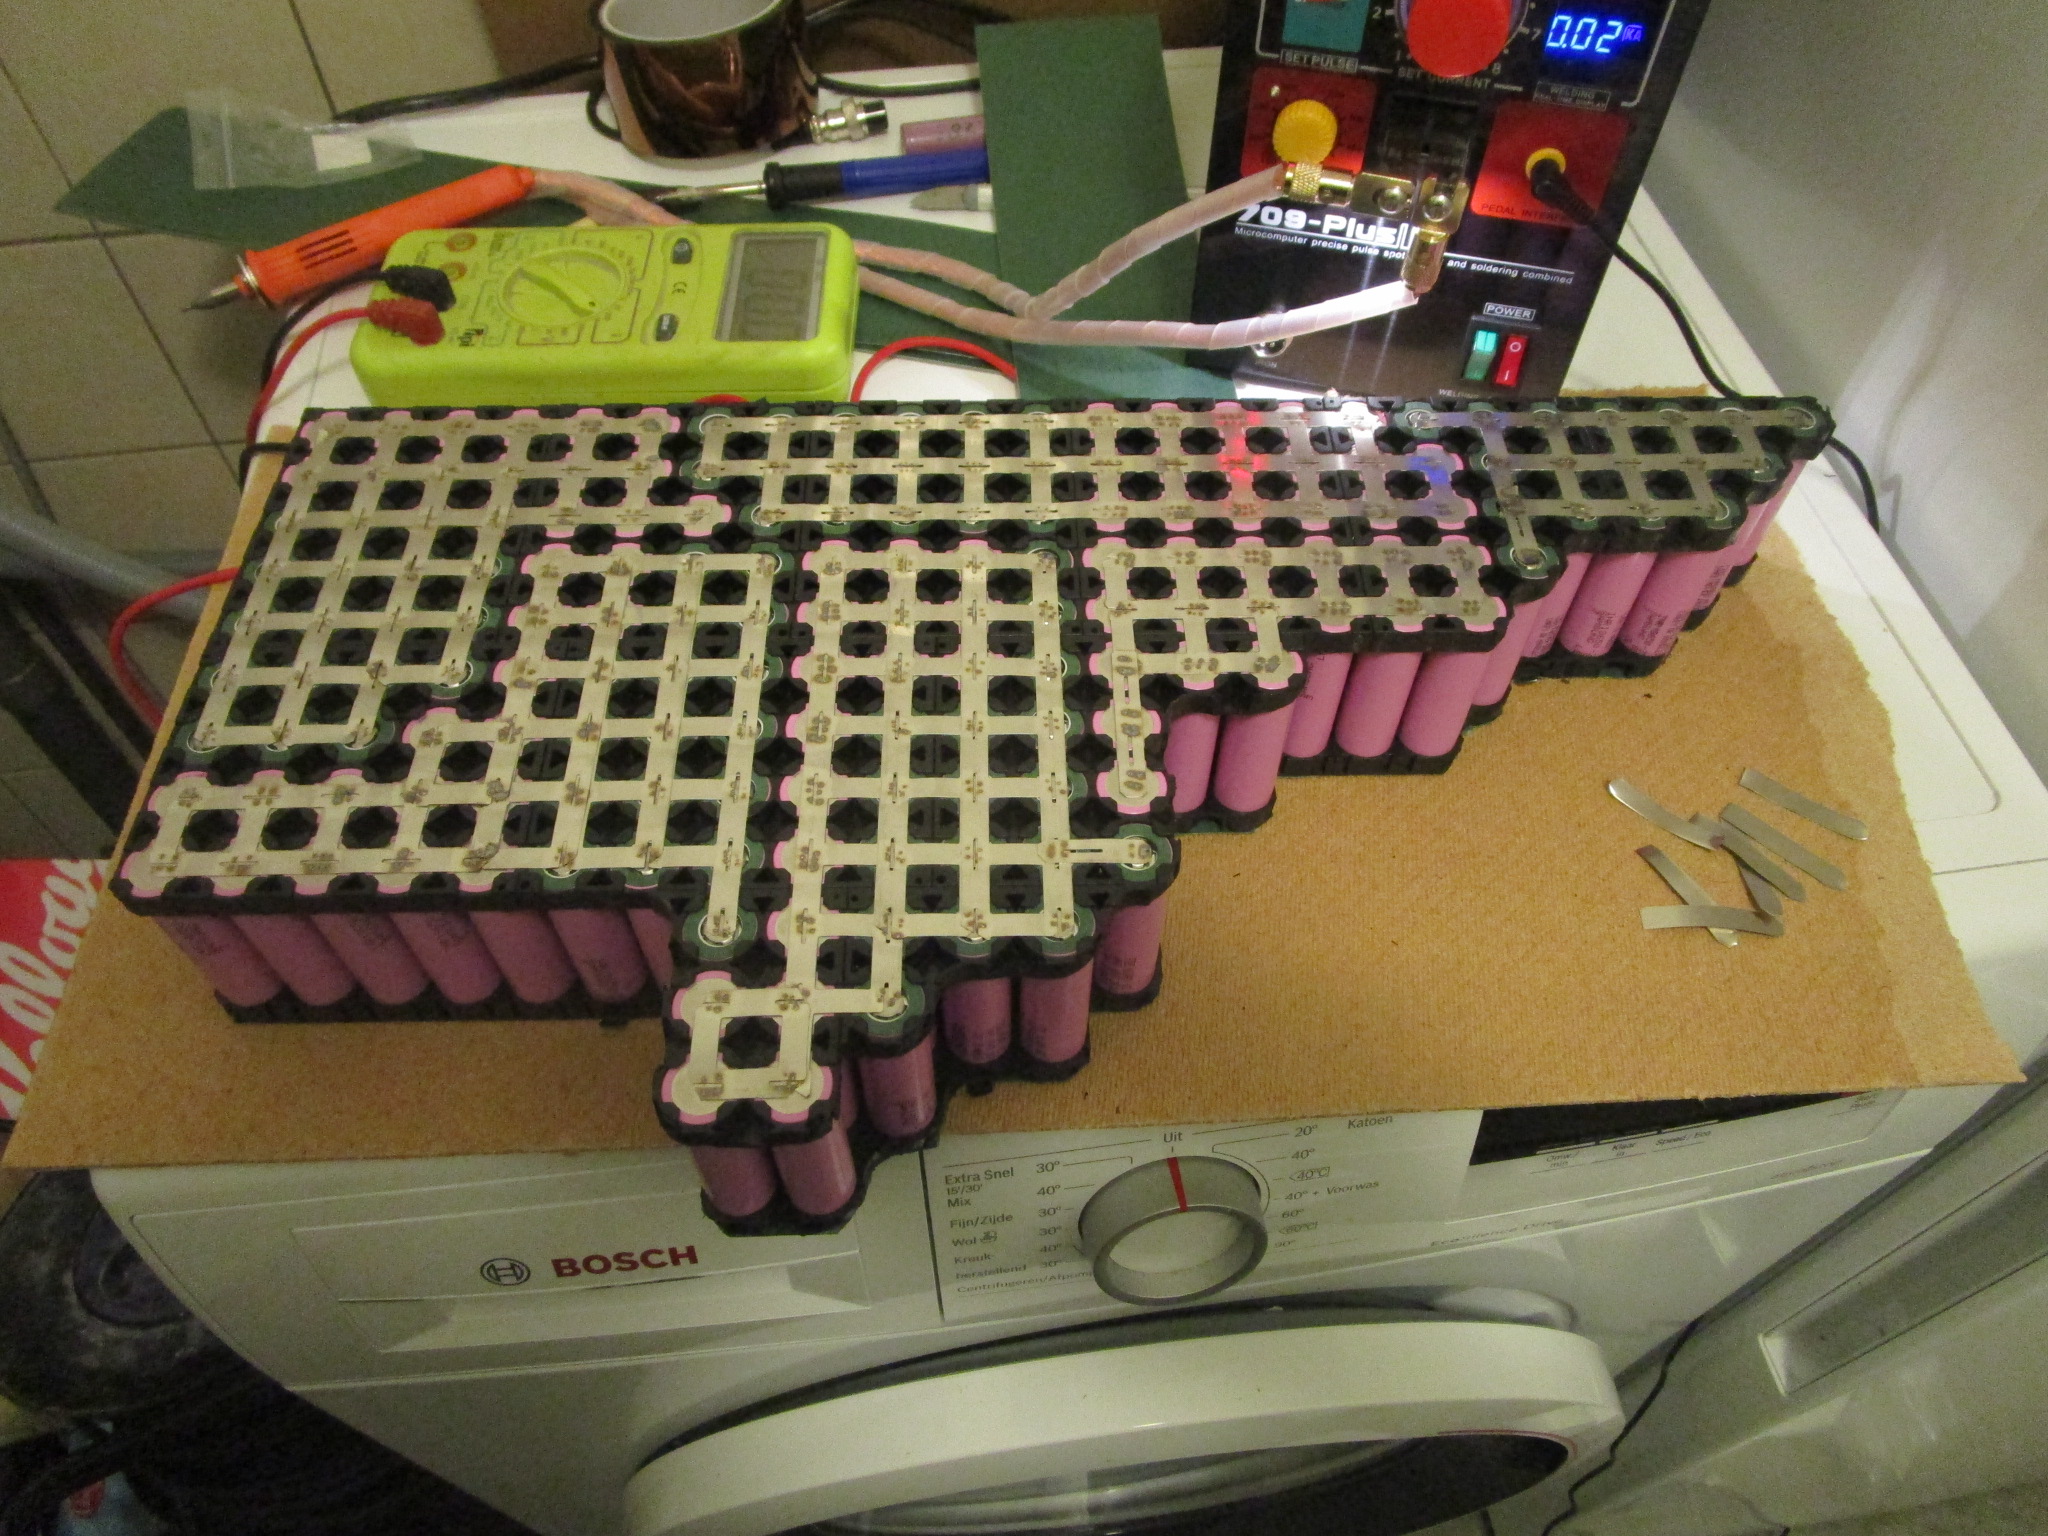
The pack was laid out in 10 groups of 17 batteries each, with a minimum overlap of three batteries between adjacent groups (to ensure enough current can flow between the cell groups). If you look closely at the picture below you can see the individual groups. The groups are connected in series with the next group. And because of the shape of the box the individual cells are laid out in a pretty weird pattern. But in the end it all fit. Routing the balancing wires was tricky, one BMS per side so there are never any crossed wires. Hobbyist produced battery packs fail (sometimes spectacularly) at an alarming rate. The main causes: bad mechanical construction, bad electrical construction, bad quality cells, bad quality BMS, overcharging, over-discharging, impact damage and vibration. I hope that my design properly accounts for all of these, especially given where it is located.
The first charge-and-discharge of the whole pack was done outside of the bike, capacity works out to 2150 Wh, which was exactly what I was aiming for. A real test was done this week, after charging the pack up fully I cycled 65 Km to another city and back again. So that’s 130 Km within a few hours, which makes this bike now a viable alternative to a vehicle. It’s a bit slower and you can’t take as much stuff but it is much, much cheaper and besides a lot better for our precious climate, which is the main reason I wanted to cut down on the use of my car. I’m super happy with how this all came out, the bike is much faster than before because the new pack stays in the high voltage domain a lot longer than a smaller pack ever would and it barely discharges over a trip like that, which should help with longevity.
If I would do another one I’d make it slightly wider, and I would use one grade thicker metal for the interconnects (0.2 mm instead of 0.15). Mostly because of the tabs that need to be welded to it for the sense and plus and minus wires. Having to keep the Bosch BMS is annoying, the range computation is still completely messed up but state-of-charge I can read remotely using the bluetooth connection to the balancer, which gives me a very good idea of what is going on with the pack. The reason to make it wider would be that the layers of insulation, foam and shrinkwrap added enough thickness to the battery that it is now slightly thicker in the middle than the enclosure. This is easily solved by routing out some space there but then the enclosure gets weaker as well.
Range is very good, at full power it will do about 180 km, and in ‘Eco’ mode it will do over 500! That’s more than I ever expect to cycle in a single day so mission successful. And here is what it all looks like, keep in mind that this is a ‘one-off’, not a production item and that as far as I’m concerned it is still experimental. The left hand side lid is taped on (to make it waterproof), I plan to dismantle the whole thing a month from now to inspect for wear and possible damage. If there is none then the left hand side lid will be glued on and the whole thing will be nicely polished and painted.

I hope this article will inspire people to look at e-bikes as potentially commuter car replacement, to send Bosch and other e-bike technology manufacturers a message that if they won’t supply what people need that they are going to have to live with people hacking their stuff and to get people to comment on the way the thing works, what they would do with it and how it could be improved or how I could work better/safer on stuff like this. Another advantage of what I built compared to the normal range e-bike batteries is that those batteries are running near the limits of what they can handle, charged up to 4.2V, discharged to 3V they will handle only a very limited number of cycles before they die. A larger battery has much more workable range which means that you can charge it up to 4V and discharge to 3.3 which effectively adds an order of magnitude or more to the number of cycles that you can expect to get out of it.
If you go down this road feel free to contact me via old fashioned email: jacques@modularcompany.com .
Enjoy! And ride safe.